
You’ve got a tackle box full of lures that have stories—the crankbait that landed your personal best bass, the saltwater popper from that trip to Florida, the vintage spoon your grandfather used. Tossing them back into a plastic tray feels wrong. They deserve better than a tangle of hooks and rust.
A shadow box turns those lures into a wall-mounted collection you can actually see and appreciate. But mounting them isn’t just about pinning them to a board. If you use the wrong adhesive or skip hook preparation, you’ll end up with sagging lures, corroded hardware, and a display that looks like a craft project gone wrong. This guide walks you through the entire process—from cleaning and hook prep to layout design and sealing—so your collection looks intentional and lasts for years.

Ibnotuiy
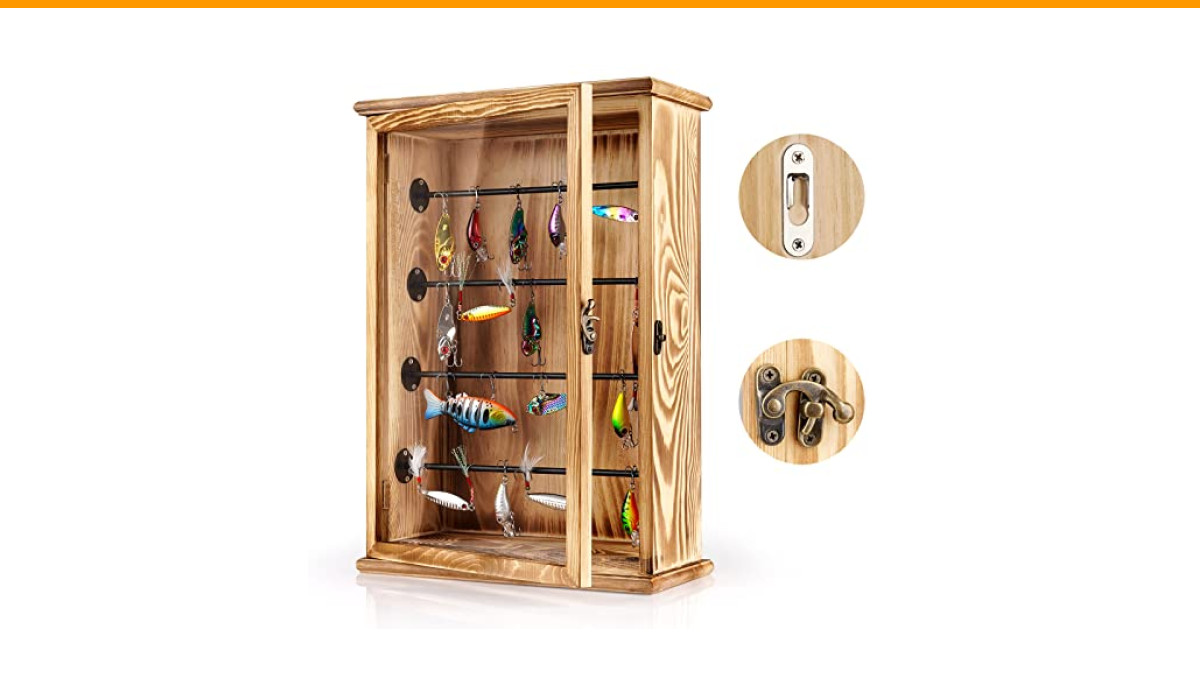
Ibnotuiy Wall Cabinet Fishing Lures Storage Display Case | Tackle Box Organizer With Door and Lockable, Fishing Gifts for Men, For Study Room, Collection Room, Office, Garage
- 【High-Quality Materials】The fishing tackle box organizer comes with a solid and enduring wood frame and and 4 tier stepped metal s…
- 【Installation Free and Lockable】The plastic tackle box has strong and secure latches to keep your valuables more securely locked i…
- 【Convenient and Stylish Design】This small fishing lure box requires no assembly and can be placed anywhere you need it, on a count…
If you’re looking for a ready-made display, the Ibnotuiy Wall Cabinet Fishing Lures Storage Display Case is a solid starting point. It comes with a wooden frame, a clear acrylic door, and four stepped metal shelves, so you can arrange lures without any drilling or assembly. The lockable latches keep dust out and curious hands away.
Why a Shadow Box is the Best Way to Display Fishing Lures
A shadow box does more than hold lures—it protects them. Unlike open shelves or pegboards, a sealed case keeps out dust, moisture, and UV light, which are the three biggest enemies of a lure’s paint and finish. Over time, sunlight fades the colors, humidity rusts the hooks, and dust settles into every crevice. A shadow box with glass or acrylic front solves all three problems.
It also turns your lures into a visual centerpiece. Grouping them by color, size, or fishing trip creates a story. You can arrange them to mimic a fishing scene—a deep-diving crankbait at the bottom, a topwater popper above it, and a jerkbait in between. The stepped shelves in the Ibnotuiy case make this kind of vertical storytelling easy.
Essential Tools and Materials for the Job
Before you start, gather everything you’ll need. Most of these you already own; a few are worth buying for a professional result.
- Shadow box—choose one with a removable backing board. Depth matters: lures with treble hooks need at least 1.5 inches of interior depth, while flat crankbaits can fit in 1 inch.
- Backing board—foam core, cork, or thin plywood. Foam core is easiest to pin into; cork adds texture; plywood works for heavier saltwater lures.
- Adhesive—epoxy, silicone, hot glue, or wire ties. Each has a specific use (more on that below).
- Hooks or wire—small brass or stainless steel hooks, or 22-gauge wire for tying lures down.
- Needle-nose pliers—for bending barbs and crimping hooks.
- Rubbing alcohol and cotton swabs—for cleaning lures before mounting.
- Clear silicone sealant—to seal the backing board edges after mounting.
- UV-protective glass or acrylic—if your shadow box doesn’t already have it, consider swapping it in. It’s worth the extra cost for long-term color retention.
One thing I’ve learned: don’t skimp on the backing board. A flimsy cardboard backing will bow under the weight of several lures, especially if you’re using wire ties. Use 1/4-inch foam core or 1/8-inch plywood for anything heavier than a few ounces.
Preparing Your Lures: Cleaning, Hooks, and Hardware
Lures straight from the tackle box are dirty. They’ve got fish slime, sunscreen, and old line residue. Mounting them without cleaning traps that grime under the adhesive and can cause paint to peel later.
Start by washing each lure in warm soapy water. Use a soft toothbrush to scrub the crevices, especially around the hook hangers and lip. Rinse thoroughly and let them dry completely. Then wipe each lure with rubbing alcohol on a cotton swab to remove any remaining oils. This step also gives the adhesive a clean surface to bond to.
Now check the condition of the paint. If you see chips or flaking, you have two options: leave them as patina (if it’s a vintage lure, that’s part of its character) or touch them up with model paint. I’d recommend leaving vintage lures alone—the wear tells a story.
How to Neutralize Hooks for Safe Mounting
Sharp treble hooks are a hazard when you’re handling lures for mounting. They also create a problem for flat display: the hooks stick out at odd angles and prevent the lure from sitting flush. The solution is to neutralize them.
For treble hooks, use needle-nose pliers to bend the barbs down flat against the hook shank. This doesn’t remove the hook, but it makes it safe to handle and allows the lure to lie flat against the backing. If you want the hooks to be completely invisible, you can remove them entirely with split-ring pliers. Just keep the hardware in a small baggie and tape it to the back of the shadow box so you don’t lose it.
For single hooks (like on jerkbaits or topwater plugs), you can either crimp the barb or replace the hook with a plain ring. If you’re mounting a saltwater lure with heavy stainless hooks, you might want to remove them altogether—they’re too thick to bend without damaging the lure body.
Pro tip: if you’re displaying a lure with a feathered treble hook, don’t bend the barbs. Instead, use a small piece of adhesive putty to hold the hook in a natural position against the backing.
Cleaning and Preserving Lure Paint
After cleaning, apply a thin coat of clear acrylic sealer (like Krylon UV Resistant Clear) to the lure. This protects the paint from UV fading and adds a subtle gloss. Spray from about 12 inches away in a well-ventilated area. Let it dry for at least 24 hours before mounting.
For wooden lures, skip the sealer if they’re vintage—the original lacquer is part of the value. Instead, just clean them gently and let them air dry. If you must seal them, use a conservation-grade varnish that won’t yellow over time.
Choosing the Right Backing and Adhesive
Your backing board is the foundation of the display. It needs to hold the lures securely without causing damage. Here’s a breakdown of the three most common types:
- Foam core—lightweight, easy to push pins into, good for small freshwater lures. But it can tear if you reposition lures multiple times.
- Cork—classic look, good for dry flies and small lures. It’s soft enough to insert pins but doesn’t hold heavy lures well.
- Plywood—the most durable option. Use 1/4-inch birch or oak plywood for saltwater lures or any lure over 2 ounces. You’ll need to drill small pilot holes for screws or wire ties.
For adhesive, there’s no single right answer. It depends on the lure’s weight and how you want to display it.
Epoxy vs. Silicone vs. Wire Ties: What to Use
| Adhesive / Method | Best For | Pros | Cons |
|---|---|---|---|
| Epoxy (two-part) | Heavy saltwater lures, metal spoons | Very strong, durable, fills gaps | Permanent, difficult to remove, can damage lure finish |
| Silicone (clear) | Most lures, especially painted or vintage | Flexible, removable, won’t damage paint | Dries slowly, can sag if too much is used |
| Hot glue | Lightweight freshwater lures | Fast, easy, repositionable while hot | Can melt on hot days, not ideal for heavy lures |
| Wire ties (22-gauge) | Any lure, especially with existing hook hangers | Reversible, doesn’t touch the lure body, holds firmly | Requires drilling holes in backing, visible wires |
My go-to for most lures is clear silicone. It’s strong enough to hold a 1-ounce crankbait, but if you ever want to swap lures out, you can peel it off without damaging the paint. Epoxy is overkill for freshwater lures and can ruin a vintage finish. Wire ties are the best choice for lures with existing split rings—you can thread the wire through the ring and twist it tight on the back of the board.
Designing Your Layout for Maximum Visual Impact
Before you stick anything down, lay your lures on the backing board and step back. Look at it like a painting. You want balance, not a random scatter.
Start with a focal point—usually the largest or most colorful lure. Place it in the center or slightly off-center. Then arrange smaller lures around it, keeping visual weight even. If you have a mix of topwater and deep divers, group them by type or by color family. A row of silver spoons looks striking when arranged diagonally.
Think about the narrative. If you’re displaying lures from a specific trip, arrange them in the order you used them that day. Or group by species—bass lures on one side, trout flies on the other. The stepped shelves in the Ibnotuiy case are perfect for this: you can put larger lures on the bottom shelf and lighter ones on top, creating depth.
Leave space between lures. Cramming them together makes the display look cluttered and makes it hard to see each lure’s details. A good rule of thumb is to leave at least 1 inch of space between lures, and 2 inches from the edges of the frame.
Step-by-Step Mounting Process
Now that you’ve planned the layout, here’s the actual mounting process. Work slowly—you don’t want to redo it.
- Lay out the lures on the backing in your planned arrangement. Use a pencil to mark the position of each lure’s center point.
- Prepare the adhesive—mix epoxy if using it, or load the hot glue gun. For silicone, squeeze a small dab onto the back of the lure. For wire ties, drill two small holes at each mark.
- Apply the lure to the backing, pressing firmly. If using silicone, hold it in place for 30 seconds to let it bond. For wire ties, thread the wire through the lure’s split ring or hook hanger, pass it through the holes, and twist tight on the back.
- Check alignment with a ruler or level. Adjust if needed before the adhesive sets.
- Let the adhesive cure completely—silicone takes 24 hours, epoxy takes 12-24, hot glue takes about 10 minutes. Don’t rush this.
- Add labels if you want to document the lures. Use small brass tags or a fine-point marker on the backing board, noting the date, species, and location.
Pro tip: when mounting a lure with a treble hook, position the hook so it lies flat against the backing. If it won’t stay, use a small piece of clear fishing line to tie the hook down to the backing board—invisible and effective.
Sealing and Hanging Your Shadow Box
Once all lures are mounted, you need to protect the display from dust and moisture. Most shadow boxes have a backing board that fits into a groove. Before you close it up, run a bead of clear silicone sealant along the inside edges of the frame. This creates an airtight seal that keeps out humidity—critical if you live in a coastal area or have a damp basement.
Let the sealant dry for at least 4 hours before closing the box. Then insert the backing board and secure it with the included clips or small screws. If your shadow box has a glass front, clean it with a microfiber cloth before closing to avoid fingerprints.
For hanging, use a level to mark the wall. The Ibnotuiy case has two metal hooks on the back, so you just need a single screw or nail. If you’re hanging a heavier display (more than 5 pounds), use a wall anchor rated for the weight.
Common Mistakes to Avoid (and How to Fix Them)
Even experts mess up sometimes. Here are the three most common mistakes I see, and how to avoid them.
Mistake 1: Using too much adhesive. A glob of hot glue or epoxy will squeeze out from under the lure and harden into a visible mess. Use a pea-sized amount for most lures, and press gently. If you do get excess, clean it immediately with a cotton swab dipped in rubbing alcohol (for epoxy, wait until it’s partially cured, then peel it off).
Mistake 2: Not pre-drilling for wire ties. If you’re using wire ties, don’t try to push the wire through the backing without drilling pilot holes. You’ll split the board or bend the wire. Always drill a 1/16-inch hole for each tie.
Mistake 3: Closing the box before the adhesive cures. If you close the shadow box while the silicone is still wet, the fumes can fog the glass, and the lure might shift from the vibration of the door closing. Wait the full 24 hours. It’s worth it.
If you make a mistake and need to reposition a lure, use a razor blade to gently pry it off the backing. For silicone, you can peel it off easily. For epoxy, you’ll likely damage the lure—so use silicone unless you’re absolutely sure.
Frequently Asked Questions About Lure Mounting
Can I mount lures with hooks still attached?
Yes, but you should bend down the barbs first. Sharp hooks are a hazard when you’re handling the display, and they’ll catch on the backing material. If you want a completely flat mount, remove the hooks entirely and store them separately.
What’s the best adhesive for a heavy saltwater lure?
For lures over 2 ounces, use a two-part epoxy or a wire tie. Silicone isn’t strong enough to hold a heavy popper or a metal jig, and hot glue will fail over time. Wire ties are the most reliable because they don’t rely on surface adhesion—they physically hold the lure.
How do I keep my lures from rusting inside the shadow box?
Rust is caused by moisture. Before mounting, make sure the lures are completely dry. After mounting, seal the box with silicone to keep out humidity. You can also add a small silica gel packet inside the box—just hide it behind the backing board. Replace it every few months if you live in a humid climate.
Can I display vintage lures without damaging them?
Yes, but you need to be careful. Don’t use epoxy or any adhesive that can’t be removed. Use silicone or wire ties, and avoid bending the hooks on vintage lures—they’re often brittle and can snap. If the paint is flaking, leave it as is; the patina adds character.
How do I label the lures in my shadow box?
Use small brass tags or a fine-point permanent marker directly on the backing board. Write the date, species, and location—for example, “Bass, June 2026, Lake Fork.” If you want to keep the board clean, attach a small printed label to the back of the shadow box instead.
What to Do Next With Your Lure Display
You’ve done the hard part—the lures are mounted, the box is sealed, and it’s hanging on the wall. But the work doesn’t end there. A shadow box is a living display. Every time you catch a fish on a new lure, you’ll want to add it. That means you need to plan for future expansion.
- Keep spare backing boards on hand so you can swap out lures without redoing the whole display.
- Use removable silicone or wire ties for lures you might replace later.
- Store extra hooks and split rings in a small container behind the backing board.
- Dust the glass front monthly with a microfiber cloth to keep the display clear.
- Check the seal every six months and reapply silicone if you see gaps.
- If you add a new lure, take a photo of the old layout first so you can replicate it if needed.
- Most importantly, enjoy the display. It’s a reminder of the days on the water, and it should make you smile every time you walk past it.
Mounting fishing lures in a shadow box is a simple project that pays off in a big way. You’ll protect your collection, show off your catches, and add a personal touch to your home or office. The Ibnotuiy display case makes it even easier with its ready-to-use shelves and lockable door. Check the current price on Amazon if you’re ready to start your own trophy wall.
