Why Make Your Own Soft Plastics?
You’re on the lake at dawn, throwing the same color worm everyone else uses. The fish aren’t biting. You know they’re there—you saw them on the sonar. What if you had a bait in a color that matched the local shad, with a scent that triggers a strike? That’s the real reason to start making your own soft plastic lures. It’s not just about saving money (though that helps). It’s about control.
When you pour your own baits, you decide the color, the glitter, the salt content, the scent. You can replicate that one discontinued color you loved, or experiment with a new combination every week. You’ll also learn how the plastic behaves, which makes you a better angler. This guide walks you through the entire process—from melting plastisol to troubleshooting common defects—so you can get it right the first time.

Smedioks
Smedioks Soft Plastic Injection Mold, 3-Cavity 5" Yama Senko Mold
- Professional-Quality Results – CNC-machined acrylic stone mold with precision-crafted cavities delivers exceptional detail, consis…
- Bubble-Free Injection – Enhanced air vent channels allow trapped air to escape efficiently during injection, helping produce smoot…
- Create Custom Baits – Make your own soft plastic fishing lures in any color, glitter, scent, or plastisol blend. Customize every b…
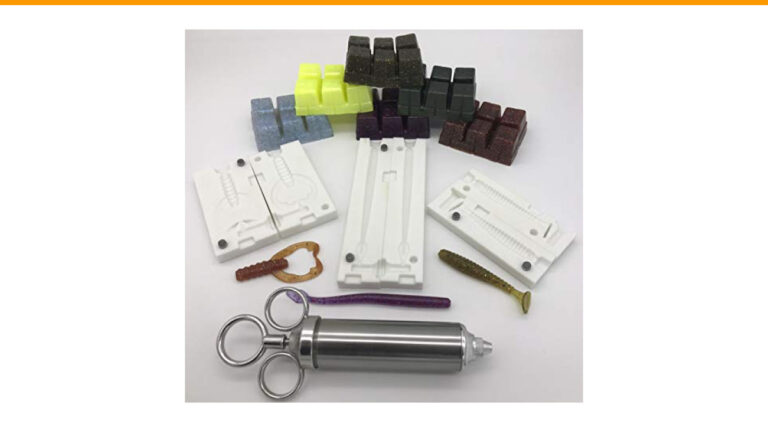
A good mold makes all the difference. The Smedioks Soft Plastic Injection Mold is a CNC-machined acrylic stone mold with three cavities for 5-inch stick baits. It has enhanced air vents that let trapped air escape during injection, so you get fewer bubbles and voids. It’s built to last through many sessions, and it works with standard soft plastic injectors. For a beginner, this type of mold removes a lot of guesswork.
Essential Materials and Safety Gear
Before you melt anything, gather your supplies. Here’s what you need:
- Plastisol – This is the liquid plastic. Buy it from a lure-making supplier. A gallon costs around $40 and makes roughly 200 stick baits.
- Molds – Silicone molds for hand pouring, or an injection mold like the Smedioks for detailed baits.
- Colorants and glitter – Liquid colorants are concentrated; a little goes a long way. Glitter comes in fine or coarse grades.
- Salt – Table salt or fine rock salt. It adds weight and makes baits sink.
- Scent – Optional, but popular. Anise, garlic, or crawfish scents.
- Heat source – A microwave works for small batches. A heat gun or a dedicated melting pot is better for larger quantities.
- Thermometer – A candy thermometer or infrared thermometer. This is non-negotiable.
- Safety gear – Nitrile gloves, safety glasses, and a well-ventilated area. Plastisol fumes are not something to breathe in.
Now, a word on safety. Plastisol is a liquid plastic that gets very hot—around 350°F. It sticks to skin and causes serious burns. Always heat it in a microwave-safe container with a handle, and let it cool slightly before handling. Work in a space with good airflow. Open a window or use a fan. This isn’t optional; it’s how you avoid a trip to the ER.
Step-by-Step: Hand Pouring Your First Lure
Step 1: Melting Plastisol Safely
Measure your plastisol into a microwave-safe cup. Start with 4 ounces—that’s enough to fill a couple of stick bait cavities. Heat it in 30-second bursts, stirring between each. You’re looking for a temperature between 300°F and 330°F. Here’s the critical part: plastisol goes through a gel phase around 280°F. It looks like pudding. Keep heating. Once it clears and becomes liquid again, it’s ready. If you stop at the gel phase, you’ll get lumpy, unusable baits. If you overheat past 350°F, the plastic burns and turns brown—that batch is ruined.
Use a thermometer. Guessing is how you ruin plastic. A candy thermometer clipped to the cup works fine.
Step 2: Adding Color, Glitter, Salt, and Scent
Once your plastisol is at temperature, add colorant. Start with 2-3 drops of liquid colorant per 4 ounces. Stir well. Add glitter—about 1/4 teaspoon for a subtle sparkle, up to 1 teaspoon for a heavy flake. If you want salt, add it at a ratio of 1 tablespoon per 4 ounces of plastisol. That’s about 20% by weight. Salt sinks to the bottom, so stir continuously while pouring. For scent, add 1-2 drops of scent oil per 4 ounces. Don’t overdo it—too much scent can actually repel fish.
One tip: mix salt into the plastisol before adding color. The salt crystals help distribute heat evenly, and you’ll see the color better.
Step 3: Pouring and De-molding
Place your silicone mold on a flat, level surface. Pour the hot plastisol slowly into the cavity, filling to the top. Let it cool for 10-15 minutes. The plastic will set as it cools. Once it’s room temperature, flex the mold to release the bait. If it sticks, pop it in the freezer for 5 minutes—that usually does the trick.
Your first few baits might have a few bubbles or an uneven tail. That’s normal. Keep practicing. You’ll get the hang of the pouring speed and temperature.
Step-by-Step: Injection Molding for Detailed Baits
Hand pouring is fine for simple shapes, but for baits with fine details—like the 5-inch stick bait from Smedioks—injection molding is better. You’ll need a plastic injector (a large syringe-like tool) and an injection mold.
Heat your plastisol to the same 300-330°F range. Fill the injector with the hot plastic. Lock the injector onto the mold’s sprue (the funnel-shaped opening). Push the plunger steadily, filling the cavity. The air vents in the mold let trapped air escape, so you don’t get bubbles. Hold pressure for a few seconds, then release. Let the mold cool for 10-15 minutes, then open and remove the bait.
Injection molding is faster and more consistent than hand pouring. Once you get the technique down, you can crank out a dozen baits in under an hour. The trade-off is the cost of the injector (around $50) and the learning curve. It took me a few tries to get the pressure right—too much force and you get flash (thin plastic fins on the bait), too little and you get short baits.
The Real Cost Breakdown: DIY vs. Store-Bought
Let’s talk money. A pack of 10 stick baits costs $6-8 at the store. That’s about $0.70 per lure. If you fish a lot, those costs add up. Here’s a realistic breakdown for making your own:
| Item | Cost | Yield | Cost per Lure |
|---|---|---|---|
| Plastisol (gallon) | $40 | ~200 stick baits | $0.20 |
| Colorant (4-color set) | $15 | ~200 uses (2 drops each) | $0.08 |
| Glitter (4 oz) | $10 | ~100 uses (1/4 tsp) | $0.10 |
| Salt (5 lb bag) | $5 | ~100 uses (1 tbsp) | $0.05 |
| Scent (2 oz) | $8 | ~50 uses (2 drops) | $0.16 |
| Total per lure | $0.59 |
That’s $0.59 per lure, not counting the mold or the electricity. The Smedioks mold costs around $30, and an injector is another $50. If you make 100 lures, your total cost per lure is about $1.39—still cheaper than store-bought. After 200 lures, it’s down to $0.79. And you have the freedom to make any color you want.
Troubleshooting Common Defects (Bubbles, Tearing, Softness)
Even experienced pourers get defects. Here’s how to fix the most common ones:
| Problem | Cause | Fix |
|---|---|---|
| Bubbles in the bait | Plastisol too hot, or poured too fast | Lower the temperature to 310°F, pour slower, tap the mold to release bubbles |
| Bait tears when de-molding | Not fully cooled, or mold too cold | Wait 15 minutes, or warm the mold slightly with a heat gun |
| Bait is too soft | Plastisol not heated enough, or expired | Heat to 330°F, check the date on your plastisol |
| Bait is stiff and brittle | Overheated, or too much hardener | Reduce heat to 320°F, use less hardener |
| Salt settles at the bottom | Salt is too heavy | Use finer salt, or stir continuously while pouring |
For bubbles, the most common issue is pouring too fast. Slow down. For tearing, patience is key—let the mold cool completely. If you’re in a hurry, pop the mold in the freezer for 5 minutes.
Advanced Customization: Layering Colors and Floating Baits
Once you’re comfortable with basic pours, try layering. Pour a small amount of one color, let it cool for 2 minutes, then pour a second color on top. This creates a two-tone bait—like a watermelon with a red tail. You can also inject a different color into the tail using a syringe.
Floating baits are another trick. Add microballoons (tiny glass spheres) to the plastisol at a ratio of 1 teaspoon per 4 ounces. They create air pockets that make the bait float. This is perfect for topwater frogs or soft jerkbaits. Test the buoyancy in a glass of water before you commit to a full batch.
Recycling and Re-melting Old Lures
Don’t throw away torn or damaged baits. You can re-melt them. Cut them into small pieces, add them to fresh plastisol, and heat. The old plastic will melt into the new. Just be aware that re-melted plastic is weaker, so don’t use it for baits that need a lot of stretch. It’s great for practice or for making weights.
One caution: don’t mix different types of plastic. Some soft baits are made from a different formula that doesn’t melt well with standard plastisol. When in doubt, test a small piece first.
Frequently Asked Questions
What temperature should I heat plastisol to?
Aim for 300°F to 330°F. Below that, you get the gel phase—lumpy, undissolved plastic. Above 350°F, the plastic burns and turns brown. Use a thermometer every time.
How much salt should I add to soft plastic lures?
For most baits, use 1 tablespoon of fine salt per 4 ounces of plastisol. That’s about 20% by weight. Too much salt makes the bait brittle and hard to pour.
Can I use a regular microwave to melt plastisol?
Yes, but use a dedicated microwave-safe cup. Don’t use the same container for food. Heat in 30-second bursts and stir between each. The plastic gets very hot, so handle with care.
How do I clean my molds?
After each use, wipe the mold with a dry cloth. For stubborn residue, use a soft brush and warm soapy water. Dry completely before storing. Silicone molds can last for years if you store them flat in a cool, dry place.
Why do my baits have bubbles on the surface?
That’s usually from pouring too fast or from moisture in the mold. Make sure your mold is completely dry before pouring. Slow down your pour, and tap the mold gently to release trapped air.
Final Tips for Consistent Results
- Always use a thermometer—guessing ruins batches.
- Stir salt and glitter continuously while pouring to keep them suspended.
- Let baits cool completely before de-molding to avoid tears.
- Start with a simple mold like the Smedioks stick bait mold to master the basics.
- Keep a notebook of your recipes—temperature, color amounts, salt ratios—so you can repeat your successes.
- Work in a ventilated area and wear gloves. Plastisol burns are no joke.
- Recycle your failed baits. Nothing goes to waste.
Making your own soft plastics is a skill that pays off in both money and fishing success. The first few batches might not be perfect, but every pour teaches you something. Before long, you’ll have a tackle box full of custom baits that no one else has. That’s a good feeling.