
You’re idling over a drop-off, staring at a screen full of blobs and arches, and you have no idea if that red mark is a bass or a brush pile. Every Garmin owner has been there. The sonar is working fine — the problem is you don’t speak its language yet.
This guide fixes that. You’ll learn exactly what each part of the Garmin display means, how to tune gain and frequency for water depth, and how to tell a thermocline from a bait ball. No vague theory. Just the button-by-button routine I use on the water, plus the mistakes that cost me hours of blank screens.

Garmin
Garmin 010-01550-00 Striker 4 with Transducer, 3.5" GPS Fishfinder with Chirp
- Clear Vu scanning Sonar shows you more of what is in the water around your boat; This high frequency sonar gives near photographic…
- The power of simple offers a keyed interface with dedicated buttons; The device is easy to use and easy to install; Available in 3…
- Waypoint map: Use the way point map to easily view, mark and navigate to locations such as brush piles, stumps and docks; Maximum…
By the end, you’ll turn raw sonar data into a fishing plan — mark the spot, adjust your presentation, and catch more fish.
If you’re just starting with Garmin, the Garmin Striker 4 with transducer is a solid entry point. It includes CHIRP sonar, ClearVü scanning, a built-in flasher, and GPS waypoint marking — all in a compact 3.5-inch display. It’s not the biggest screen, but it gives you every feature you need to practice the techniques below.
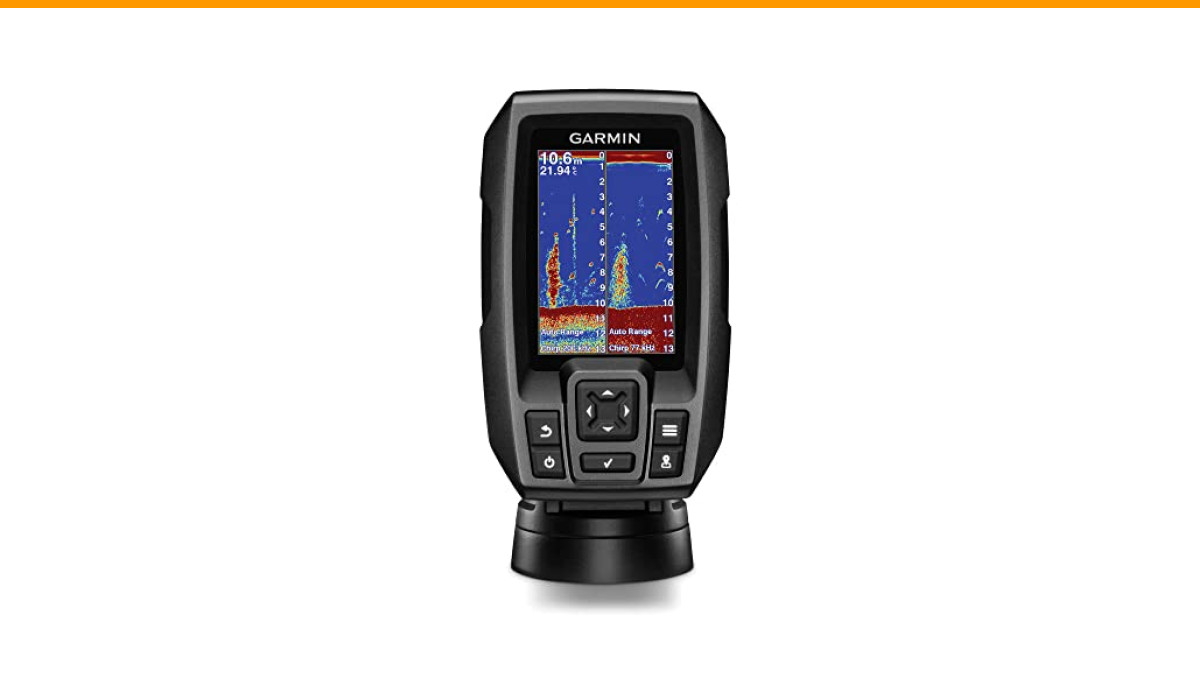
Understanding the Garmin Sonar Display: A Visual Breakdown
Turn on any Garmin fish finder and you’ll see the same basic layout. The right side shows a scrolling history of what the transducer sees. The left side (or top, depending on your view) shows the current reading — a vertical line that updates in real time.
That scrolling history is the key. The rightmost edge is what’s under your boat right now. Everything to the left is what you passed over in the last few seconds or minutes. The scroll speed controls how fast that history moves across the screen.
Depth appears in the corner, usually with a large number. Water temperature shows nearby if your transducer has a temp sensor. The bottom is the strong horizontal line near the bottom of the screen. Everything above it is the water column.
You’ll also see a color scale. Garmin uses red for the strongest returns (hard bottom, dense fish), orange and yellow for medium returns, and blue or green for weak returns (soft mud, scattered bait). Learn that scale and you’ll read any Garmin screen instantly.
The Core Settings: Gain, Frequency, and Scroll Speed Explained
Three settings control 90% of what you see. Get these right and the screen makes sense. Get them wrong and you’ll either see nothing or a screen full of noise.
Setting Gain Without Guessing
Gain is the sensitivity of your sonar receiver. Too low and you miss fish. Too high and the screen fills with clutter. The trick is to set it so the bottom is a solid red line with a thin yellow or orange band right above it. That band is the bottom echo — it tells you the gain is close.
Start with the auto gain setting. Garmin’s auto gain works well in most conditions. But in deep water (over 60 feet) or around heavy weeds, auto gain often runs too high. Switch to manual gain and adjust in small steps — 10% at a time — until the clutter disappears but you still see individual fish returns.
Pro tip: If you see too many small blue dots in the water column, turn gain down. If the bottom line gets thick and mushy, turn it down too. A crisp, thin bottom line means your gain is set right.
Choosing the Right Frequency for Depth
Garmin units offer multiple frequencies, usually 50 kHz, 77 kHz, and 200 kHz (or CHIRP ranges). Lower frequencies have a wider cone angle and penetrate deeper, but show less detail. Higher frequencies give better target separation but don’t reach as deep.
Use 200 kHz for water under 200 feet. It gives the sharpest arches and the best separation between fish and structure. Switch to 77 kHz for depths between 200 and 500 feet. Use 50 kHz only for very deep water — beyond 500 feet — where the wider cone helps you see more bottom, but be ready for fuzzier returns.
CHIRP sonar, which Garmin uses on models like the Striker 4, sweeps through a range of frequencies instead of sending a single one. This gives you better target definition and crisper arches at any depth. If your unit has CHIRP, leave it on — it’s almost always the best choice.
Scroll Speed: Match It to Your Boat Speed
Scroll speed controls how fast the sonar history moves across the screen. Set it too slow and fish marks compress into short blips. Set it too fast and the screen looks like a blur.
For most trolling or drifting, a scroll speed of 50-75% works well. When you’re moving fast (planing or running to a spot), crank it up to 100% so the screen keeps up. When you’re sitting still, drop it to 25-50% so you can study a single area in detail.
The goal is to see fish as distinct arches, not as dots or lines. If your arches look flattened, speed up the scroll. If they look stretched, slow it down.
Reading the Water Column: Fish Arches, Baitfish, and Thermoclines
Fish show up as arches on traditional sonar. The shape comes from the cone angle — as the boat passes over a fish, the distance to it changes, creating a curve. A perfect arch means the fish is directly under the boat. A half-arch means it’s off to the side.
Big, thick arches with red cores are usually larger fish. Thin, faint arches are smaller fish or fish that are tight to the bottom. But don’t obsess over arch size — a big fish can show a small arch if it’s near the edge of the cone.
Baitfish appear as clouds of small, faint marks, often in the middle of the water column. They can look like a hazy blob. When you see bait, game fish are usually nearby — either below the bait or on the edges of the cloud.
A thermocline shows up as a faint horizontal line or a hazy band across the screen, often with very few fish marks above it. It’s the boundary between warmer surface water and colder deep water. Fish often hold right above or below a thermocline because oxygen and food concentrate there. Mark the depth of the thermocline with a waypoint — it’s a prime fishing spot.
Pro tip: On Garmin’s traditional sonar view, fish icons look like little fish symbols. Turn them off. They’re an interpretation, not raw data. Go to Settings > Sonar > Fish Symbols and select Off. You’ll see real arches instead of guesses.
Identifying Bottom Hardness and Structure Types
The bottom line on your screen tells you more than just depth. The thickness and color of that line reveal the bottom composition.
Hard bottom (rock, gravel, shell) shows as a thin, bright red line with a strong second echo — a second red line below the first one, at roughly double the depth. That second echo happens because the sonar signal bounces off the hard bottom, reflects back up, then bounces again. Soft bottom (mud, silt, thick weeds) shows as a thick, fuzzy, often yellow or orange line with no second echo.
Structure — brush piles, stumps, docks, rock piles — appears as irregular shapes rising from the bottom. You’ll often see a cluster of red and orange marks with a shadow beneath them. That shadow is a sonar shadow, caused by the structure blocking the signal from reaching the bottom behind it. The shadow helps you gauge the height of the structure.
To find structure, watch for sudden changes in bottom depth or composition. A hard bottom transitioning to soft, a drop-off, or a cluster of marks on an otherwise flat bottom all deserve a waypoint.
DownVü vs. SideVü vs. Traditional Sonar: When to Use Each
Garmin offers three main sonar views. Each has a different strength.
Traditional sonar shows fish arches and bottom hardness. It’s the best for detecting fish and for seeing the water column in detail. Use it as your default view for most fishing.
DownVü (or ClearVü) gives a near-photographic image of what’s directly under the boat. It shows structure and bottom detail with incredible clarity — you can see individual branches on a brush pile. But fish don’t show as arches; they appear as bright dots or short streaks. DownVü is best for identifying structure and bottom type, not for finding fish.
SideVü scans to the left and right of your boat, showing a wide swath of bottom and structure. It’s excellent for locating drop-offs, weed lines, and schools of bait off to the side. Fish show as bright dots, and you can’t tell their depth as easily as in traditional sonar.
On a single-unit Garmin, you can split the screen to show two views at once. I usually run traditional sonar on the left and DownVü on the right. That way I see fish arches and structure detail simultaneously.
| View | Best For | Fish Appearance | When to Use |
|---|---|---|---|
| Traditional Sonar | Fish detection, water column | Arches | Default view, trolling, drifting |
| DownVü / ClearVü | Structure detail, bottom composition | Dots or streaks | Spot-locking on brush piles, wrecks |
| SideVü | Finding structure off to the sides | Bright dots | Scanning a shoreline or weed line |
| Flasher | Ice fishing, vertical jigging | Color band on dial | Real-time lure tracking in deep water |
A Simple On-the-Water Tuning Routine
You don’t need to fiddle with settings every time you turn on the unit. Follow this routine once you’re on the water, and you’ll get a clean screen in under a minute.
- Set the boat speed. Slow to 2-4 mph for the best sonar image. Fast speeds create turbulence and noise.
- Turn on the unit. Select Traditional Sonar view. Let it run for 15 seconds to get a baseline.
- Set the range. Press MENU, scroll to Sonar, then Range. Set it to Auto. The unit will lock onto the bottom.
- Adjust gain. Press MENU, then Gain. If it’s on Auto, switch to Manual. Increase gain until you see a thin red bottom line with a yellow band above it. If you see clutter, decrease by 5-10%.
- Set frequency. If your unit has CHIRP, leave it on. Otherwise, choose 200 kHz for most conditions.
- Set scroll speed. Press MENU, then Scroll Speed. Set it to 75% for trolling or drifting. Adjust up or down based on boat speed.
- Watch the screen. Run for 30 seconds. If you see too much noise, drop the gain a bit. If you see nothing but bottom, raise it.
That’s it. This routine takes less than a minute and gives you a screen you can trust. I’ve used it in everything from 10-foot flats to 400-foot lakes, and it works every time.
Troubleshooting Common Garmin Screen Issues (Noise, Cross-talk, Artifacts)
Sonar screens get weird. Here’s what most issues mean and how to fix them.
Noise (random dots or streaks all over the screen) usually comes from boat speed, electrical interference, or air bubbles under the transducer. Slow down first. If noise persists, check the transducer mount — it should be in clean water, not behind a strake or rivet. Electrical noise from the trolling motor or bilge pump can also cause it. Try turning those off to see if the noise disappears.
Cross-talk happens when two sonar units operate on the same frequency near each other. You’ll see a series of vertical lines or a striped pattern on the screen. Fix it by changing the frequency on one unit, or by setting one unit to a different CHIRP range.
Surface clutter is the band of red or orange near the top of the screen. It’s caused by small particles, plankton, and air bubbles in the surface water. You can reduce it by lowering the gain, or by using the Surface Clutter filter in the sonar menu. But don’t filter it out completely — baitfish often hang right under that clutter.
No bottom reading means the transducer isn’t getting a signal. Check the cable connection, make sure the transducer is in the water, and verify that the frequency is set to one the transducer supports.
Pro tip: If you see a single strong return that repeats at the same depth over and over, it’s likely a fish holding tight to the bottom, not a bottom echo. Watch for the arch to develop as you pass over it.
Using Waypoints and GPS to Turn Screen Data into Catches
Your Garmin fish finder with GPS is more than a depth finder. It’s a mapping tool that lets you mark productive spots and return to them exactly.
When you see something interesting on the sonar — a brush pile, a drop-off, a school of fish — press the MARK button (or select Mark Waypoint from the menu). The unit saves your current GPS position. Name it something useful like “Brush pile 12ft” or “Rock point NE.”
To return to that spot, use the Waypoint Map view. You’ll see your boat’s position and the waypoint. Navigate to it by following the on-screen arrow or by selecting Go To from the waypoint menu. The unit will guide you back with a bearing and distance.
I mark every fish I catch, every piece of structure I find, and every thermocline I see. Over a season, that builds a map of your lake that’s worth more than any paper chart. You’ll start to see patterns — fish on the same depth of structure, bait holding on the same humps.
Pro tip: Use the Garmin app (if your unit supports it) to sync waypoints to your phone. Then you can share them with a buddy or plan a trip on the couch.
Expert Tips for Shallow, Deep, and Moving Water
Shallow water (under 15 feet): Use a higher frequency (200 kHz or CHIRP high band) for the best detail. Lower the gain a bit to reduce bottom clutter. Watch for fish hugging the bottom — they’ll show as small arches right on the bottom line. SideVü is great here because it shows structure like stumps and grass beds that hold fish.
Deep water (over 60 feet): Switch to a lower frequency (77 kHz or CHIRP low band) to get better penetration. Increase the gain — you need more sensitivity to see fish that are far away. Use the flasher view if you’re vertical jigging or ice fishing; it shows your lure and fish in real time. A fish that appears as a red mark at the same depth as your lure is about to bite.
Moving water (rivers, tidal currents): The current moves your boat and your bait, which creates noise on the sonar. Slow your trolling speed to 1-2 mph. Use a higher scroll speed (75-100%) to keep up with the moving water. Fish in moving water often hold in eddies or behind structure — look for areas where the bottom line suddenly rises or drops, and cast there.
Windy days: Wind creates waves, which makes the boat rock and the transducer tilt. This causes the bottom line to waver. Slow down, use a lower gain, and consider using the Auto Gain feature to compensate. If the screen gets too noisy, switch to DownVü, which is less affected by wave action.
Key Takeaways: Your Quick-Reference Checklist
- Set gain so the bottom shows as a thin, red line with a yellow band above it. Adjust in 10% steps.
- Use 200 kHz for water under 200 feet, 77 kHz for 200-500 feet, and 50 kHz for deeper. Leave CHIRP on if you have it.
- Match scroll speed to boat speed: 25-50% when sitting, 75% when trolling, 100% when running.
- Turn off fish icons. Raw sonar arches give you real data, not guesses.
- Identify bottom hardness: thin red line with second echo = hard bottom; thick fuzzy line = soft bottom.
- Mark every waypoint — structure, thermoclines, fish schools. Build your own map over time.
- If the screen looks wrong, check gain first, then frequency, then scroll speed. That fixes 80% of issues.
Now get out there and start reading your screen with confidence. The fish are under you — you just need to see them.
