
You’ve got the right rod, the right reel, and a tackle box full of lures that look great in the package. You tie one on, cast it out, reel it back, and something feels off. The lure rolls sideways. The knot slips after a few fish. Or worse, you cast and watch your expensive crankbait sail into the lake on its own. That’s not bad luck. That’s a bad knot.
Most anglers spend serious money on lures and then trust their connection to a single piece of line to a knot they learned from a YouTube video they half-watched. The truth is, the knot is the weakest link in your entire setup. A 20-pound test line tied with a sloppy knot breaks at 8 pounds. That’s the difference between landing a fish and telling a story about the one that got away.

FREGITO
In this article
- FREGITO Fishing Line Hook Knot Tying Tool, Copper, 2pcs
- Why the Right Knot Matters More Than the Lure
- Anatomy of a Lure: Where to Tie and Why
- The 4 Knots Every Angler Must Master
- How to Choose the Right Knot for Your Lure Type
- Step-by-Step: Tying a Lure in 60 Seconds
- Common Knot Failures and How to Fix Them
- Field Tips: Tying in Wind, Rain, and Low Light
- Knot Strength Comparison Chart (Real-World Data)
- Frequently Asked Questions
- Final Cast: Practice Makes Permanent
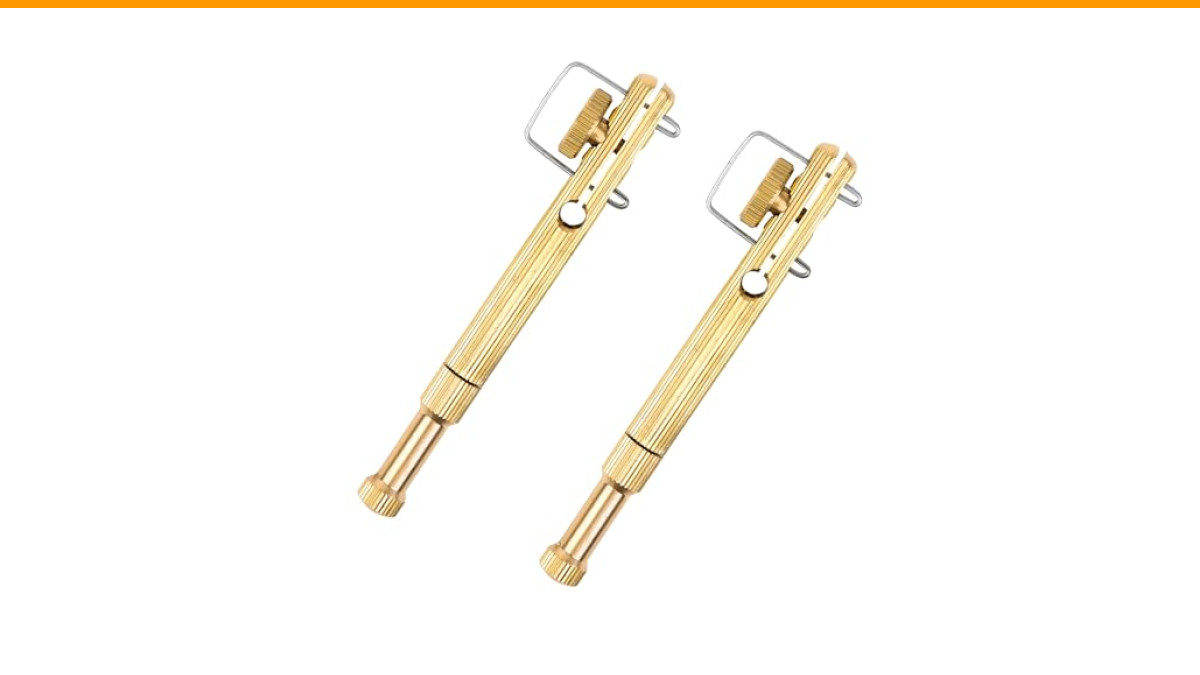
FREGITO Fishing Line Hook Knot Tying Tool, Copper, 2pcs
- Suitable size. The length of the line tie hook is 3.94 inches and the weight is 20g. It is small and convenient, easy to carry, ma…
- Good quality materials. The material of the product is copper, which is wear-resistant, corrosion-resistant, and durable. This ens…
- Ingenious design. The hook Eze fishing knot tying tool is crafted to easily and quickly tie the fishing line, saving you valuable…
This guide covers the four knots that handle nearly every fishing situation, how to match each knot to the lure you’re throwing, and what to do when things go wrong. You’ll learn why knot choice changes lure action, how to tie in bad weather, and which failures mean you need to change your approach. No fluff, no theory. Just what works on the water.
If you struggle with tying small hooks in low light or have hands that don’t cooperate with fine line, a simple tool can save you time and frustration. The FREGITO Fishing Line Hook Knot Tying Tool is a small copper device that holds the hook eye steady while you pass the line through. It’s about 4 inches long and weighs next to nothing, so it lives in your tackle box without taking up space. Worth a look if you’ve ever dropped a hook in the dirt while fumbling with a knot.
Why the Right Knot Matters More Than the Lure
Lure manufacturers spend millions on action, color, and sound. A crankbait wobbles a certain way. A spinnerbait thumps at a specific speed. But none of that matters if your knot changes how the lure moves or fails when a fish strikes.
Here’s what most people miss: the knot isn’t just a connection. It’s part of the lure’s action. A stiff, bulky knot can make a topwater lure sit nose-down. A loop knot lets a jerkbait swing freely and dart sideways. A snap changes the pivot point entirely. You’re not just tying line to metal. You’re tuning how the lure behaves.
Knot strength matters too. Every knot reduces the breaking strength of your line. A good Palomar knot retains about 95% of line strength. A poorly tied clinch knot might retain 60%. That’s a huge difference when you’re fishing heavy cover or targeting big fish.
Your line type changes the equation. Braided line is slick and stiff. It holds knots differently than nylon monofilament. Fluorocarbon is dense and slippery. It needs different knots and different technique. The best knot for braid can fail on fluorocarbon if you don’t adjust.
So before you tie anything, think about three things: what line you’re using, what lure you’re throwing, and how that lure needs to move. The knot ties all three together.
Anatomy of a Lure: Where to Tie and Why
Most lures have a split ring or a hook eye at the nose. That’s where your line connects. But the connection point matters more than you might think.
A split ring is a small metal ring that attaches to the lure’s eye. It lets the lure pivot freely and reduces line twist. Some anglers tie directly to the split ring. Others remove it and tie to the eye. Here’s the trade-off: tying to the split ring gives the lure more freedom of movement. Tying directly to the eye makes the connection more direct and can help with hooksets.
For topwater lures like poppers and walkers, a split ring is almost required. It lets the lure slide and pop without the line binding. For crankbaits, the split ring helps the bill dig in properly. For spinnerbaits, you usually tie directly to the wire frame. The wire acts as your split ring.
Soft plastic lures are different. You’re not tying to a metal eye at all. You’re rigging a hook inside the plastic. The knot goes on the hook eye, and the plastic sits above it. That means your knot needs to be small and smooth so it doesn’t tear the plastic when you cast.
One more thing: check the hook eye for burrs. A sharp edge on the eye can cut your line as you tighten the knot. Run your fingernail over the eye. If it catches, file it smooth or switch lures.
The 4 Knots Every Angler Must Master
You don’t need twenty knots. You need four done well. Each one has a job, and each one fails if you use it wrong.
Palomar Knot (Best for Braid and Heavy Line)
The Palomar is the strongest knot for braided line. It’s also one of the easiest to tie, which makes it my default recommendation for beginners.
- Double about 6 inches of line and pass the loop through the hook eye.
- Tie a simple overhand knot in the doubled line, but don’t tighten it.
- Pass the hook through the loop you created.
- Pull both ends to tighten. Wet the line first to reduce friction.
The Palomar works great with braid because braid is slick. The double wrap grips better than a single strand. It also works well with heavy monofilament and fluorocarbon. The downside? It’s bulky. On small hooks or finesse lures, the knot can be too big.
Improved Clinch Knot (Best for Mono and Fluorocarbon)
This is the classic knot most anglers learn first. It’s simple, reliable, and works best with monofilament and fluorocarbon lines.
- Pass the line through the hook eye and leave about 6 inches of tag end.
- Wrap the tag end around the standing line 5 to 7 times.
- Pass the tag end through the small loop right above the hook eye.
- Then pass it through the big loop you just created.
- Pull the tag end and standing line together to tighten.
The critical step is wetting the line before you pull. Dry line creates friction that heats up and weakens the knot. I’ve seen anglers snap off on the hookset because they skipped this step. Five seconds of water saves you a lure.
The improved clinch retains about 85% of line strength when tied properly. That’s good enough for most freshwater fishing. It’s not the strongest knot, but it’s thin and smooth, which makes it great for casting through rod guides.
Non-Slip Loop Knot (Best for Topwater and Jerkbaits)
This knot creates a fixed loop at the hook eye. The lure hangs from a small loop, which gives it maximum freedom of movement. That’s critical for jerkbaits and topwater lures that need to dart and slide.
- Tie an overhand knot in the line about 8 inches from the end. Don’t tighten it fully.
- Pass the tag end through the hook eye.
- Thread the tag end back through the overhand knot.
- Wrap the tag end around the standing line 4 to 5 times.
- Pass the tag end back through the overhand knot, then through the loop you just made.
- Pull the standing line to tighten. The overhand knot slides down and locks.
This knot takes practice. The first few times you tie it, it’ll look like a mess. Give yourself ten tries before you judge it. Once you get it, you’ll notice a dramatic difference in how your jerkbaits behave.
The loop knot also works well for streamers in fly fishing. Same principle: the fly swings freely on the loop, which imitates a live baitfish better.
Snell Knot (Best for Wide-Gap Hooks)
The snell knot is different because the line runs along the hook shank before wrapping. This makes the hook pull straight back on the hookset, which is ideal for wide-gap hooks used with soft plastics.
- Pass the line through the hook eye from the point side.
- Lay the tag end along the hook shank.
- Wrap the tag end around both the shank and the standing line 5 to 7 times.
- Pass the tag end back through the loop near the eye.
- Pull tight.
The snell knot keeps the hook in line with your rod, which improves hook penetration. It’s a favorite for catfish anglers and anyone fishing big plastic worms. It’s not useful for lures with a split ring, so keep that in mind.
How to Choose the Right Knot for Your Lure Type
Here’s where the tactical thinking comes in. Matching the knot to the lure changes how the lure performs. This is the part most articles skip.
For spinnerbaits and chatterbaits, use a Palomar or improved clinch. These lures create their own action through vibration. They don’t need a loop. A direct tie gives you better feel and more control on the retrieve.
For topwater lures like poppers, walkers, and frogs, use a loop knot. The free-swinging action makes the lure dart and sputter more naturally. A tight knot kills the action and makes the lure sit wrong in the water.
For jerkbaits and minnow-style hard baits, the loop knot is also the winner. The suspended lure needs to hang horizontally and swing side to side with twitches. A direct tie makes it pull nose-down and roll.
For crankbaits, you have a choice. A loop knot gives the lure more wiggle, which can be great for triggering strikes. But a direct tie gives you better depth control. If you’re fishing deep and need to hit a specific depth, go direct. If you’re fishing shallow and want maximum wobble, use the loop.
For soft plastics rigged on wide-gap hooks, use the snell knot. It keeps the hook angle right and improves hooksets. For finesse presentations with light line, a small improved clinch is often better because it’s less bulky.
For saltwater situations with heavy line and big hooks, the Palomar is your best bet. It’s strong, simple, and works with the thick braid most saltwater anglers use.
The table below sums it up:
| Knot | Best Line Type | Best Lure Type | Strength Retention | When to Avoid |
|---|---|---|---|---|
| Palomar | Braid, heavy mono | Spinnerbaits, jigs, saltwater lures | ~95% | Small hooks, finesse lures |
| Improved Clinch | Mono, fluorocarbon | Crankbaits, topwater, general purpose | ~85% | Braid (can slip) |
| Non-Slip Loop | Any line | Jerkbaits, topwater, streamers | ~90% | Spinnerbaits, heavy cover |
| Snell | Mono, fluorocarbon | Wide-gap hooks, soft plastics, catfish | ~90% | Split ring lures, braid |
Step-by-Step: Tying a Lure in 60 Seconds
Speed matters on the water. Fish move, weather changes, and you don’t want to spend ten minutes re-tying after a backlash. Here’s my routine for a quick, reliable tie with the improved clinch knot.
- Cut the line at a sharp angle with line cutters. A clean cut makes threading easier.
- Wet your fingers and the line. This prevents friction damage.
- Thread the line through the hook eye. If the line is frayed, cut it back and start over.
- Wrap the tag end around the standing line exactly 5 times. Count them. Don’t guess.
- Pass the tag end through the small loop above the eye, then through the big loop.
- Pull slowly until the wraps seat against the eye. Then pull hard.
- Clip the tag end to about 1/8 inch. Leave a tiny bit, not a long tail.
That’s it. With practice, this takes under a minute. The key is counting your wraps every time. Five is right for most mono and fluorocarbon. Seven is better for very light line. Three is enough for heavy line.
One habit that saves lures: after you tighten the knot, give it a sharp tug. If it slips or moves, cut it off and re-tie. A knot that moves under pressure will fail on a fish.
Common Knot Failures and How to Fix Them
Every angler has a story about a knot that failed at the worst moment. Here’s how to diagnose and fix the most common problems.
Knot slips and comes undone. This usually means you didn’t tighten it enough, or you used the wrong knot for your line type. Braid on an improved clinch will slip because braid is too slick. Switch to a Palomar. If you’re using mono and it slips, add one more wrap and wet the line before tightening.
Line breaks right at the hook eye. This is almost always friction damage. You didn’t wet the line before pulling, or the hook eye has a burr. Check the eye with your fingernail. If it’s rough, file it. Always wet your line before tightening, especially with fluorocarbon.
Line breaks a few inches above the knot. That’s line damage, not knot failure. Your line has nicks from rocks, teeth, or the rod guides. Cut back the damaged section and re-tie. This is why you should check your line for abrasion every time you re-tie.
The knot cinches down crooked. This happens when you pull the tag end and standing line unevenly. The wraps bunch up on one side. Pull both ends slowly and evenly, and seat the wraps against the eye before applying full pressure.
Line memory makes the knot hard to tie. Monofilament and fluorocarbon develop coils from being spooled. This makes the tag end curl away from the hook. Straighten the line by running it between your thumb and finger a few times before you start.
The loop knot collapses. The non-slip loop knot needs the overhand knot to slide down and lock. If it doesn’t, the loop closes. Tighten the overhand knot before you wrap, and make sure you pass the tag end through the right loops. Watch a video if you’re unsure. It’s a fiddly knot.
Field Tips: Tying in Wind, Rain, and Low Light
You won’t always tie knots at a picnic table. The best fishing happens in bad weather. Here’s how to manage when conditions fight you.
Wind. The line blows around and the tag end won’t stay put. Turn your back to the wind and use your body as a shield. Hold the hook between your lips to keep it steady. It’s not glamorous, but it works. Or use a knot-tying tool that holds the hook for you. The FREGITO knot tying tool is designed exactly for this. It grips the hook eye so you can focus on the line.
Rain. Wet hands make line slippery. Dry your hands on your shirt before you start. Wear a hat with a brim to keep rain off your face. If it’s pouring, tie the knot under your jacket or inside your tackle box lid.
Low light. Dawn and dusk are prime fishing times, but you can’t see what you’re doing. Practice tying your knots by feel until you can do it with your eyes closed. This sounds silly, but it’s a skill worth developing. Use a headlamp with a red light. Red light preserves your night vision and doesn’t spook fish as much as white light.
Cold hands. Finger dexterity drops fast in cold weather. Wear fingerless gloves or keep a hand warmer in your pocket. Slow down. Rushing makes mistakes.
Heavy line. Thick braid and heavy mono are stiff and hard to work with. Use a tool to hold the hook. The extra leverage helps you pull the knot tight. Also, consider a snap or swivel for big lures. It saves you from re-tying every time you switch lures.
Knot Strength Comparison Chart (Real-World Data)
Here’s the thing about knot strength percentages: they come from lab tests with perfect conditions. Real-world strength is lower because your line is wet, nicked, and twisted. But the relative differences hold up.
A Palomar knot on 20-pound braid tests around 18-19 pounds. The same braid with an improved clinch tests around 15-16 pounds. The difference is real, but it only matters if you’re fishing at the edge of your line’s capacity.
For most freshwater fishing with 10-15 pound line, the improved clinch is perfectly adequate. You’re not going to break off a bass on a clean knot. The failures happen when the knot is tied poorly or the line is damaged.
Here’s a realistic comparison based on my experience and common field tests:
| Knot | Strength on Braid | Strength on Mono | Strength on Fluoro | Ease of Tying |
|---|---|---|---|---|
| Palomar | Excellent | Good | Good | Easy |
| Improved Clinch | Poor (slips) | Excellent | Good | Easy |
| Non-Slip Loop | Good | Good | Good | Hard |
| Snell | Fair | Excellent | Good | Medium |
The takeaway? Match the knot to the line first, then to the lure. A Palomar on braid is rock solid. A Palomar on mono is fine but bulky. An improved clinch on braid is asking for trouble.
Also, consider line-to-lure weight ratio. If you’re casting a 1/4-ounce spinnerbait on 30-pound braid, the heavy line kills your casting distance. The lure can’t load the rod properly. You’ll cast half as far as you would with 10-pound line. Your knot won’t fix that. Match your line weight to your lure weight for optimal performance.
Frequently Asked Questions
What is the strongest knot for tying a lure to braided line?
The Palomar knot is the strongest for braid. It retains about 95% of line strength and doesn’t slip like other knots. The double line through the hook eye grips the slick braid better than a single strand. Tie it slowly and wet it before tightening.
Should I use a snap or swivel instead of tying directly?
It depends on the situation. A snap lets you change lures quickly, which is great for power fishing when you’re covering water. But a snap adds weight and changes the lure’s action. For finesse presentations with light line, tie directly. For heavy lures and fast fishing, a snap is fine. Swivels are only needed to prevent line twist, usually with spinnerbaits or when trolling.
Why does my line keep breaking at the knot?
Most of the time it’s friction damage. You didn’t wet the line before tightening, or you pulled too fast. Dry line heats up and weakens. Another cause is a burr on the hook eye. Check it with your fingernail. Also, check your line for nicks. If the line is damaged above the knot, it will break there, not at the knot.
How many wraps should I use for the improved clinch knot?
Five wraps is the standard for most monofilament and fluorocarbon lines. Use seven wraps for very light line (under 8-pound test) to get more grip. Use three wraps for heavy line (over 20-pound test) to avoid a bulky knot. Always count your wraps. Guessing leads to inconsistent knots.
Can I use the same knot for all lure types?
You can, but you’ll lose performance. A direct knot like the Palomar works for everything, but it restricts the action of topwater lures and jerkbaits. Those lures need a loop knot to move freely. If you only want to learn one knot, learn the Palomar. Then add the loop knot when you want to improve your topwater game.
Final Cast: Practice Makes Permanent
Knot tying is a motor skill. You don’t learn it by reading. You learn it by doing it a hundred times until your fingers know