You’ve been stood up. The river’s running clear, the caddis are hatching, and every trout within fifty yards is keyed in on a size 16 elk hair that you don’t have in your box. You riffle through your fly case for the tenth time. Nothing close. So you tie on a big stimulator and fish blind, hoping for a reaction strike that rarely comes.
Tying your own flies fixes that. It’s not just about saving money—though a single streamer pattern costs about a third of what you’d pay at the shop. It’s about having the exact fly, in the exact size and color, for the water you’re standing in. This article walks you through the core techniques of how to tie fly fishing lures: the tools that matter, the mistakes that ruin flies, and the water-specific logic behind hook, bead, and material choices. You’ll also get three step-by-step patterns that build on each other, from a simple nymph to a bushy dry to a heavy streamer.

Creative Angler
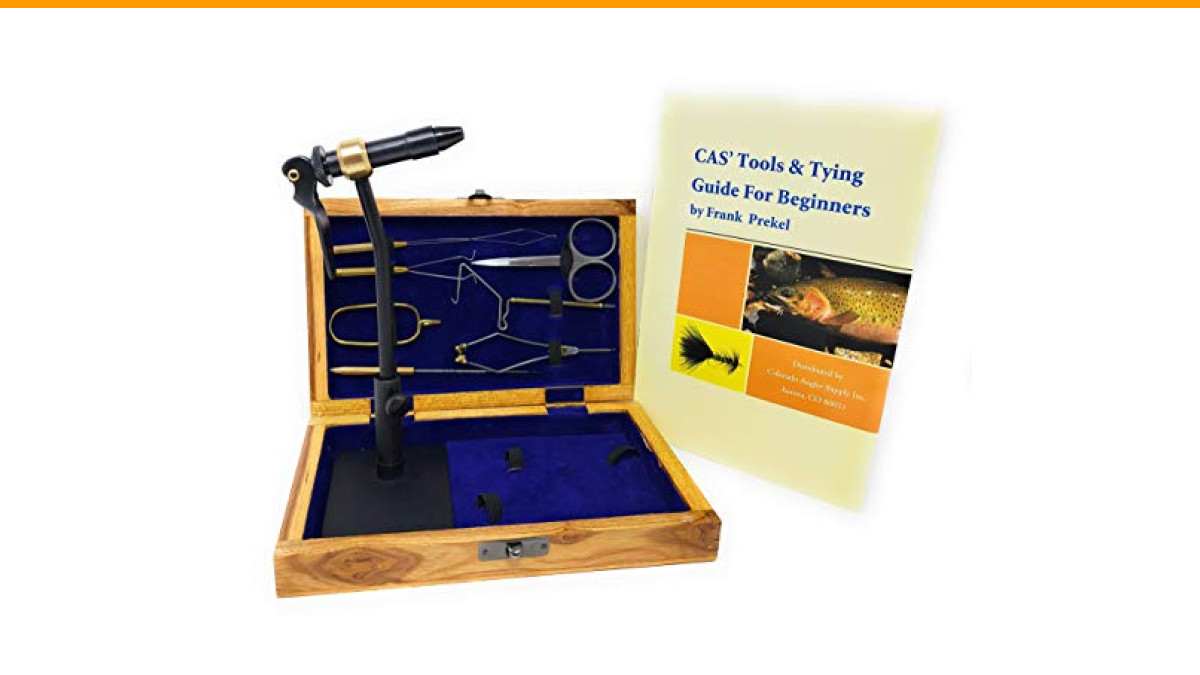
Colorado Anglers Fly Tying Standard Tool Kit with Wooden Box & Book, Rotary Vise, Bobbin, Scissors, Whip Finisher, Complete Set for Beginners & Pros
- COMPLETE FLY TYING STARTER SET IN ELEGANT WOODEN BOX: Dive into fly tying with Colorado Anglers' all-in-one kit! Housed in a styli…
- PREMIUM ROTARY VISE FOR PRECISION TYING: At the heart of this kit is a top-quality rotary fly tying vise, offering 360-degree rota…
- ESSENTIAL TOOLS FOR CRAFTING FLIES: Equip yourself with high-quality fly tying tools designed for efficiency and precision. The ki…
If you’re starting from zero, a solid kit makes the learning curve far less steep. The Colorado Anglers Fly Tying Standard Tool Kit bundles a rotary vise, bobbin, scissors, whip finisher, and a stash of feathers, furs, and threads in a wooden box. It’s not the cheapest option, but it’s complete enough that you won’t need to buy anything else for your first dozen patterns.
Why Tying Your Own Flies Changes the Game
Most anglers start tying to save money. That’s fine, but the real payoff is control. When the hatch is a size 18 blue-winged olive and your box only has size 14s, you can sit at the vise that evening and crank out half a dozen perfect matches. No driving to the fly shop. No settling for something “close enough.”
Tying also teaches you how flies actually work. Once you’ve wrapped a pheasant tail nymph, you understand why the thorax is thicker than the abdomen. Once you’ve spun a deer hair head, you get why the fly floats so high. That knowledge makes you a better angler, not just a better tier.
There’s a learning curve, and your first few flies will look rough. Mine did. The proportions will be off, the hackle will spin instead of lay flat, and the whip finish might unravel. That’s normal. The techniques below are the ones I wish someone had explained to me before I wasted a dozen spools of thread on ugly bugs.
Essential Fly Tying Tools (And What You Can Skip)
You don’t need a $400 vise to tie fishable flies. You do need a few tools that work reliably. Here’s the breakdown of what matters and what you can ignore.
The Vise, Bobbin, and Scissors
The vise is the only tool where spending a little more actually pays off. A rotary vise—one where the head spins the hook 360 degrees—lets you inspect the fly from every angle without re-clamping. That’s huge for symmetry. The Colorado Anglers kit includes a rotary model that handles hooks from size 22 midges up to size 2 streamers, which covers the vast majority of freshwater patterns. It’s not a Renzetti, but it holds a hook firmly and rotates smoothly. If you’re tying more than a hundred flies a year, that’s enough.
The bobbin holds your thread spool and controls tension. Look for one with a ceramic or tungsten carbide tube—the tube is where the thread passes through, and cheap metal tubes will groove and cut your thread after a few months. The bobbin in the kit has a ceramic tube, which is a pleasant surprise at this price point.
Scissors are the most abused tool at the bench. You’ll use them to cut thread, trim hackle, and shape dubbing. Get a pair with fine points for detail work, and a second, cheaper pair for cutting wire and tinsel. The kit’s scissors work well for the first few months, but plan to replace them with a dedicated fine-point pair once they start getting dull. A good pair of Dr. Slick scissors runs about $25 and lasts years.
The Bodkin, Whip Finisher, and Dubbing Spinner
A bodkin is just a needle in a handle. You’ll use it to pick out dubbing, apply head cement, and clear the hook eye. The one in the kit is fine—don’t overthink this tool.
The whip finisher looks intimidating but is actually simple once you practice the motion ten times. It ties a jam-proof knot that locks the thread at the head of the fly. The kit includes a standard whip finisher tool, and the included book has a decent photo sequence. If the tool feels awkward in your hand, you can tie a whip finish by hand—it’s just a series of loops around the hook shank—but the tool is faster once you get the rhythm.
A dubbing spinner is a small hook-shaped tool that twists fur and synthetic fibers into a tight rope. You don’t need one for your first few flies. When you start tying dubbing loops for streamer bodies or woolly buggers, it becomes essential. The kit doesn’t include one, which is fine—it’s a $5 tool you can pick up later.
The 5 Most Common Fly Tying Mistakes (And How to Fix Them)
Every tier makes these mistakes early on. Here’s how to spot them and what to do differently.
- Lumpy, uneven bodies. This happens when you twist the dubbing too tight or apply it in uneven clumps. Fix: twist the dubbing onto the thread in a thin, even rope before wrapping. Apply a small amount at a time—about the size of a pea for a size 14 nymph—and wrap forward in touching turns. If the body still looks lumpy, you’re using too much dubbing. Take it off and start over.
- Split hackle. When you wind a hackle feather around the hook, the barbs sometimes fold back over the stem, creating a gap. Fix: use a hackle gauge or just look at the feather’s barb length relative to the hook gap. For a dry fly, the barb length should be about one and a half times the hook gap. Also, stroke the barbs backward before you start winding, and keep the feather’s shiny side facing forward.
- Weak whip finish. If the head of your fly unravels after a few casts, you didn’t pull the whip finish tight enough. Fix: after the last wrap, pull the thread tag firmly—not hard, but with steady pressure—and then release the tool. Practice the motion on a bare hook until it feels automatic.
- Thread breaking at the head. This is almost always from tying off with too much tension. The thread should be snug, not guitar-string tight. Fix: reduce tension on the bobbin as you approach the head. If the thread still breaks, check for a burr on the bobbin tube.
- Hook eye filled with cement. You apply head cement to lock the thread, and it seeps into the eye. Fix: use a bodkin to clear the eye immediately after applying cement, and don’t apply so much. A drop the size of a pinhead is plenty.
How to Choose the Right Hook and Bead for the Water You Fish
Hook size and weight aren’t random. They’re tied directly to the water you’re fishing and the insect life in it. Here’s a practical framework.
For fast riffles and pocket water, trout have less time to inspect your fly. You can get away with larger, heavier patterns that get down quickly. Use a size 10 or 12 nymph with a 3.2mm tungsten bead. The tungsten bead adds weight without making the fly bulky. For slow pools and flat tails, fish get a long look. Drop down to a size 16 or 18, use a lighter brass bead or no bead at all, and match the natural insect’s profile closely.
Hook type matters too. Standard nymph hooks (like a Tiemco 3761) have a curved shank that mimics a natural larva. Dry fly hooks (like a Tiemco 100) are lighter wire and have a turned-up eye that helps the fly land upright. Streamer hooks (like a Tiemco 300) are heavy wire with a longer shank, so the fly rides with a more lifelike undulation. Don’t use a dry fly hook for a streamer—it’ll bend out on a big fish.
For stillwater, you’ll want to adjust your approach. Lakes and ponds have no current to carry your fly, so you need either a floating line with a long leader and a weighted fly, or a sinking line. A size 10 woolly bugger with a tungsten bead and a marabou tail sinks at about two feet per second—that’s a good starting point for a 6-foot drop.
| Water Type | Hook Size | Bead Weight | Best Pattern Type |
|---|---|---|---|
| Fast riffle | 10–12 | Tungsten 3.2mm | Heavy nymph, stonefly |
| Slow pool | 16–18 | Brass 2.0mm or none | Match-the-hatch dry, small nymph |
| Stillwater | 8–10 | Tungsten 3.2mm | Woolly bugger, leech |
| Small stream | 14–16 | Brass 2.0mm | Elk hair caddis, pheasant tail |
Material Substitutions: Making Do with What You Have
You won’t always have the exact feather or fur a pattern calls for. That’s fine. Substitutions work if you understand what the material is doing structurally.
For dry fly hackle, the key is stiffness. A dry fly hackle needs to hold the fly up on the surface film. If you don’t have a genetic hackle cape, use a stiff saddle feather from a rooster. It won’t be as neat, but it’ll float. For nymph dubbing, the key is texture and color. If the pattern calls for hares ear, you can substitute any tan or brown fur—squirrel, muskrat, even rabbit—mixed with a bit of synthetic dubbing for sparkle. The action changes slightly, but the silhouette remains.
For streamer tails, marabou is the go-to because it breathes in the water. If you don’t have marabou, use a soft hen feather or even a strip of rabbit fur. The movement will be subtler, but it still works. For wing cases, turkey quill is traditional, but a strip of a plastic bag or a piece of thin craft foam works just as well. The fish care about the silhouette and the movement, not the brand of your materials.
One rule: never substitute a stiffer material for a softer one in a pattern that needs to move. A streamer with a stiff tail won’t undulate, and it’ll fish like a lump.
Step-by-Step: Tying a Pheasant Tail Nymph (Beginner)
This is the first pattern every tier should learn. It’s simple, catches fish in almost any water, and teaches you the core skills: dubbing a body, tying in a tail, and forming a wing case.
- Clamp a size 14 nymph hook in the vise. Start the thread at the 1/3 point behind the eye, and wrap rearward to the bend.
- Tie in a tail of pheasant tail fibers. Use 5-6 fibers, tips pointing back, about one hook shank length long. Secure with thread wraps.
- Twist a thin rope of pheasant tail fibers around the thread and wrap forward to form the abdomen. Stop at the 2/3 point.
- Tie in a small tuft of peacock herl for the thorax. Wrap it forward to the eye.
- Fold the pheasant tail fibers forward over the thorax to form the wing case. Tie off and trim.
- Whip finish, apply a drop of head cement, and you’re done.
The whole fly takes two minutes once you’ve practiced. Fish it under an indicator with a small split shot about 12 inches above the fly.
Step-by-Step: Tying an Elk Hair Caddis (Intermediate)
This is the dry fly that catches more trout than any other pattern in the West. It teaches you two hard skills: spinning deer hair and flaring elk hair for the wing.
- Clamp a size 16 dry fly hook. Start thread at the eye, wrap to the bend.
- Tie in a few fibers of elk hair for the tail, about a hook eye length long.
- Dub a tapered body forward to the 2/3 point. Use a light tan or olive dubbing.
- Tie in a grizzly hackle feather at the thorax. Wind it forward with 3-4 turns, then tie off.
- Cut a small clump of elk hair, clean the fuzz from the butts, and lay it on top of the hook. Hold it in place with a few loose wraps, then tighten to flare the hair forward over the eye.
- Trim the front of the hair to a neat head. Whip finish and cement.
This fly floats like a cork. The elk hair wing is what creates the silhouette, so don’t skimp on the material.
Step-by-Step: Tying a Woolly Bugger Streamer (Advanced)
The woolly bugger is the streamer that catches everything from bluegill to bass. It’s called “advanced” here because it combines several techniques: marabou tail, chenille body, and palmered hackle.
- Clamp a size 8 streamer hook. Start thread at the eye, wrap to the bend.
- Tie in a marabou tail. Use a clump about the diameter of a pencil, length about one and a half hook shanks. Secure firmly.
- Tie in a length of chenille at the bend, then a grizzly hackle feather with the shiny side facing forward.
- Wrap the chenille forward in touching turns to form the body. Stop at the 2/3 point.
- Wind the hackle forward over the chenille in open spiral wraps. Tie off.
- Add a tungsten bead if you want it to sink faster. Whip finish and cement.
Fish it on a sink tip line with a slow, stripping retrieve. The marabou tail pulses with each pause.
Your Skill Progression Path: From Nymphs to Streamers
Don’t jump straight to complex patterns. Build your skills in order.
Beginner: Tie 20 pheasant tail nymphs. Focus on even dubbing and a clean whip finish. Then move to a hare’s ear nymph—same skills, slightly different proportions.
Intermediate: Tie 20 elk hair caddis. This teaches you hackle control and hair flaring. Then try a parachute Adams—it adds a post and a parachute hackle wrap, which is a new skill.
Advanced: Tie 20 woolly buggers in different colors. This teaches you palmered hackle and working with chenille. Then try a Clouser minnow with dumbbell eyes—it adds weight management and a different head shape.
After about 60 flies, you’ll have the fundamentals down. After 200, you’ll be improvising your own patterns.
Final Tips for Clean, Durable Flies
- Keep your scissors sharp. Dull scissors crush materials instead of cutting them, which ruins fine hackle and hair.
- Use head cement sparingly. A drop the size of a pinhead on the thread head is enough. Too much seeps into the hook eye and ruins the fly.
- Check your thread tension regularly. Too tight, and you’ll break the thread at the head. Too loose, and the body will spin.
- Store flies in a box with individual slots. Flies rubbing against each other will bend hackle and crush bodies.
- Clean your vise jaws with a soft brush occasionally. Dried cement and dubbing buildup will make the jaws slip.
- If a fly looks wrong, don’t fish it. Take it apart and re-tie it. You’ll learn more from a failed fly than a perfect one.
Tying your own flies is a skill that pays off every time you’re on the water. Start with the basics, practice the failures, and you’ll be fishing your own patterns within a month.
Frequently Asked Questions
What is the best fly tying vise for a beginner?
A rotary vise with a solid steel shaft and adjustable tension is the best starting point. The Colorado Anglers kit includes one that handles most freshwater hook sizes. You don’t need a $300 vise until you’re tying hundreds of flies a year.
How long does it take to tie a fly?
A simple nymph takes 2-3 minutes once you’ve practiced. A dry fly with a deer hair wing takes 5-7 minutes. A streamer with a marabou tail and palmered hackle takes 8-10 minutes. Your first few will take twice as long—that’s normal.
What hook size should I use for trout?
For most trout fishing, sizes 12-16 cover the majority of situations. Size 14 is the most versatile. Use size 10-12 for stoneflies and streamers, and size 18-20 for midges and tiny mayflies.
Can I tie flies without a whip finisher?
Yes. You can tie a whip finish by hand using a simple loop-and-wrap technique. It’s slower and takes practice to get tight, but it works. The tool is faster and more consistent, so it’s worth learning.
Why does my thread keep breaking?
Most likely, you’re applying too much tension, or the bobbin tube has a burr. Check the tube with a magnifying glass for rough edges. Also, use a slightly heavier thread (like 6/0 or 140 denier) until you get the feel for tension.
