You’ve been standing in the same riffle for twenty minutes, and the trout are rising all around you. They’re sipping something small and tan, but your box only has size 12 stimulators and a few beat-up nymphs. You know the feeling. The fish are telling you exactly what they want, and you can’t give it to them.
Tying your own flies solves that problem permanently. When you can sit down at a vise and spin up a size 18 pheasant tail in eight minutes, you stop being at the mercy of the fly shop’s inventory. You tie what the fish are eating, not what was left on the shelf. This guide walks you through the complete process—tools, materials, three proven patterns, hatch matching, troubleshooting, and field testing—so you can start tying flies that actually catch fish.

Creative Angler
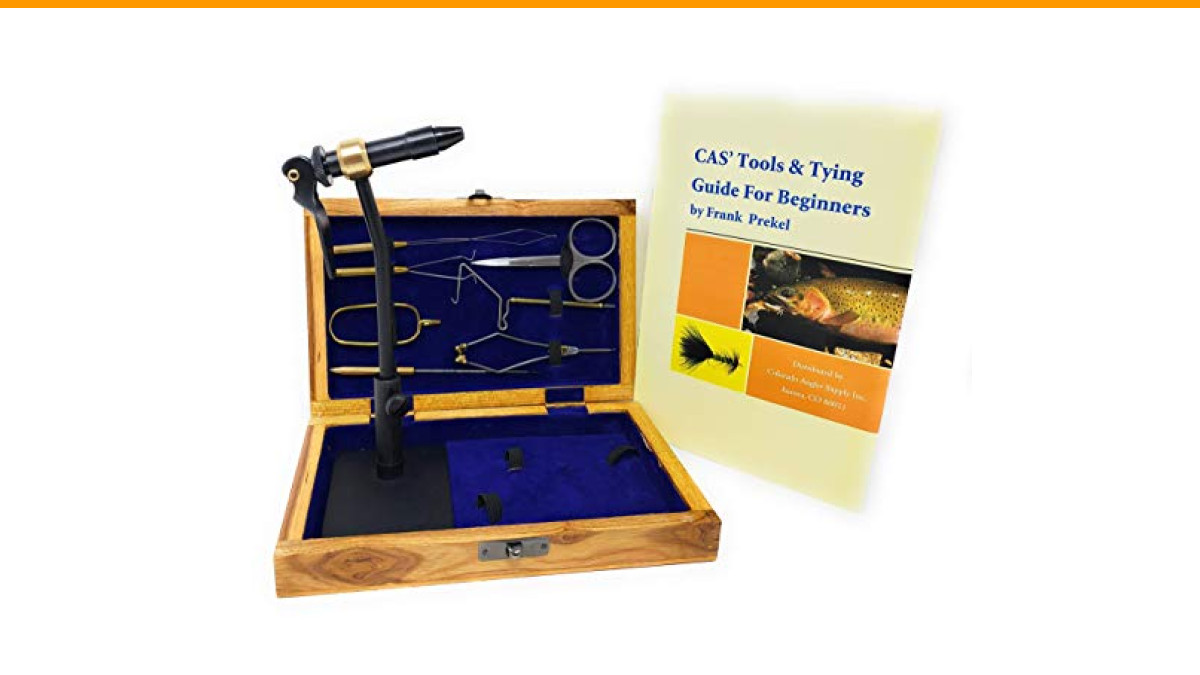
Colorado Anglers Fly Tying Standard Tool Kit with Wooden Box & Book, Rotary Vise, Bobbin, Scissors, Whip Finisher, Complete Set for Beginners & Pros
- COMPLETE FLY TYING STARTER SET IN ELEGANT WOODEN BOX: Dive into fly tying with Colorado Anglers' all-in-one kit! Housed in a styli…
- PREMIUM ROTARY VISE FOR PRECISION TYING: At the heart of this kit is a top-quality rotary fly tying vise, offering 360-degree rota…
- ESSENTIAL TOOLS FOR CRAFTING FLIES: Equip yourself with high-quality fly tying tools designed for efficiency and precision. The ki…
You’ll learn the why behind each step, not just the recipe. That’s the difference between copying a pattern and understanding how to design one.
A solid fly tying starter kit saves you from the frustrating hunt for individual tools. The Creative Angler kit bundles a rotary vise, bobbin, scissors, whip finisher, and a selection of feathers, furs, and threads in a wooden box. For a beginner, that means you’re tying on day one instead of assembling a bench piece by piece. The rotary vise alone is worth having—it lets you spin the hook instead of reaching around it, which keeps your proportions honest.
Why Tying Your Own Flies Beats Buying Them
Cost is the obvious reason. A decent dry fly runs $3 to $5 at a shop. The materials for a dozen of the same pattern might cost you $8 total. After a season of heavy fishing, you’ve paid for your vise and then some.
But the real advantage is flexibility. Hatches change week to week, sometimes day to day. When the caddis come off in May, you need size 14 elk hair caddis in three different body shades. The shop has one. You can tie all three variations in an evening.
There’s also the satisfaction factor. Catching a fish on a fly you tied yourself feels different. It’s not vanity—it’s the knowledge that you solved a puzzle the fish presented to you.
Essential Fly Tying Tools: The Non-Negotiable Starter Kit
You don’t need a wall of gadgets. You need five things that work well and last.
- Vise: A rotary model is worth the extra money. It holds the hook securely and lets you inspect your work from every angle without touching the fly. The Creative Angler kit’s vise does this well.
- Bobbin: This holds your thread spool and controls tension. A ceramic-tipped bobbin won’t fray your thread. Cheap ones will, and you’ll snap thread at the worst moments.
- Scissors: Sharp, fine-point scissors are non-negotiable. You’re cutting hackle tips and trimming dubbing close to the hook eye. Blunt scissors crush material instead of cutting it.
- Whip finisher: This tool ties the final knot on every fly. A proper whip finish is smooth and secure. Fingernail knots work in a pinch but fail under pressure.
- Head cement: A drop on the finished head locks everything in place. Without it, your fly unravels after a few fish.
- Place a size 14 nymph hook in the vise. Start thread at the eye and wrap back to the bend.
- Tie in 5-6 pheasant tail fibers at the bend, tips pointing back.
- Wrap the fibers forward to form the body. Leave a small gap behind the eye.
- Tie off the fibers, then tie in a short piece of copper wire.
- Make a small thorax with peacock herl. Wrap the copper wire forward in open spirals over the thorax, then tie off.
- Whip finish and apply head cement.
- Start with a size 14 dry fly hook. Attach thread at the eye and wrap to the bend.
- Tie in a piece of tan dubbing. Spin it onto the thread and wrap forward to form a slightly tapered body.
- Select a small clump of elk hair. Clean out the underfur. Cut the tips square.
- Tie the elk hair in by the butts, just behind the eye, so the tips extend back over the body.
- Pull the elk hair back over the body and tie it down at the front. Trim the butts at an angle.
- Wrap a dry fly hackle in front of the wing. Two or three turns is enough. Whip finish and cement.
- Use a size 6 or 8 streamer hook. Start thread at the eye and wrap to the bend.
- Tie in a marabou tail. It should be about 1.5 times the hook shank length.
- Tie in a piece of chenille and a hackle feather at the bend.
- Wrap the chenille forward to the eye, then spiral the hackle forward over it. Tie both off.
- Whip finish and cement.
- Start with the pheasant tail nymph. Tie a dozen of them before moving on.
- Invest in a rotary vise and a ceramic bobbin. They make the biggest difference in your tying experience.
- Match your flies to the local hatch. Collect insects from your river and tie imitations that match their size and color.
- Test every fly in water before fishing it. Watch the action and adjust the weight or hackle as needed.
- Use head cement on every fly. It’s the cheapest insurance against losing a fish to a failed knot.
- Break the rules. Try bright colors and unconventional materials. Fish often respond to something they’ve never seen.
- Keep a tying journal. Note what patterns work, what conditions you fished, and what you’d change. It becomes your personal playbook.
That’s the core. Add a bodkin (a needle on a handle) for picking out dubbing and clearing the hook eye, and you’re set.
Choosing the Right Hook, Thread, and Materials
Hook selection matters more than most beginners realize. Dry flies need light wire hooks that float. Nymphs need heavier wire to sink fast. Streamers need long shanks to give the fly profile.
Here’s a simple breakdown:
| Fly Type | Hook Style | Hook Size Range | Key Materials |
|---|---|---|---|
| Dry Fly | Standard dry fly hook, light wire | 12–20 | Elk hair, deer hair, hackle, dry fly dubbing |
| Nymph | Nymph hook, heavy wire, curved or straight | 10–18 | Pheasant tail, hare’s ear dubbing, tungsten beads |
| Streamer | Long shank streamer hook | 2–8 | Marabou, chenille, bucktail, flash material |
Thread choice is simpler. Use 8/0 or 70-denier thread for most flies. It’s strong enough for nymphs and streamers but thin enough for small dries. For size 18 and smaller, drop to 14/0 or 50-denier. It’s a pain to work with at first, but it prevents building a bulky head.
Matching Materials to Fly Type (Dry, Nymph, Streamer)
Dry flies need buoyant materials. Elk hair and deer hair float well and create a visible silhouette on the water. Dry fly dubbing is treated to repel water. Hackle feathers—usually from a rooster neck—provide the legs and the floatation surface.
Nymphs are the opposite. You want them to sink. Pheasant tail fibers, hare’s ear dubbing, and copper wire all add weight and imitate the slender profile of immature insects. Tungsten beads add significant weight in a small package. A size 14 tungsten bead sinks a nymph twice as fast as a brass one.
Streamers imitate baitfish, leeches, and sculpins. Marabou is the star here—it breathes and pulses in the water, even when you’re not moving the fly. Chenille builds the body quickly. Bucktail adds stiffness and a more realistic baitfish profile. Flash material like Flashabou catches light and draws strikes in stained water.
Step-by-Step: Tying Your First Three Flies
Start with these three. They cover the fundamental skills—dubbing, hackle wrapping, and palmering—and they catch fish everywhere.
The Pheasant Tail Nymph (Beginner)
This is the first fly most tiers learn, and for good reason. It imitates a huge range of mayfly nymphs.
Pro tip: Keep the body slim. Most beginners build it too fat. A skinny pheasant tail catches more fish than a bulky one.
The Elk Hair Caddis (Intermediate)
This dry fly floats like a cork and imitates adult caddis flies. The elk hair wing is the tricky part.
Pro tip: Don’t overdress the hackle. Two turns gives the fly a low profile that fish see as natural. Five turns makes it look like a dandelion.
The Woolly Bugger (Advanced Beginner)
This streamer catches everything that swims. It’s forgiving to tie and looks alive in the water.
Pro tip: Use a cone head or bead head on the front. It makes the fly sink faster and gives it a jigging action on the retrieve.
How to Match Your Fly to the Local Hatch
This is where you start thinking like a tier instead of a recipe follower. Matching the hatch means understanding what insects live in your river and when they emerge.
Start with a simple entomology guide for your region. In most trout streams, the big three are mayflies, caddisflies, and stoneflies. Each has a distinct life cycle.
Mayflies emerge from the water as duns, then molt into spinners. Trout eat them at every stage. Match the size and color of the natural. A size 16 light olive mayfly dun needs a size 16 light olive dry fly.
Caddisflies are skittish. They run across the surface to take off. That’s why the elk hair caddis works—the wing looks like a caddis in flight. Stoneflies are big. A size 6 stonefly nymph imitation works in fast water where the naturals live under rocks.
Carry a thermometer. Water temperature drives the hatch schedule. When the water hits 50°F in spring, expect the first mayflies. When it hits 60°F, caddis start coming off. Stoneflies hatch in late spring and early summer.
Your job is to tie imitations that match the size, shape, and color of the naturals in your river. That means collecting a few bugs yourself. Turn over rocks, look at the water surface, and take notes. It’s not overthinking—it’s the difference between fishing blind and fishing with intent.
Fixing Common Fly Tying Mistakes
Everyone makes these mistakes. Here’s how to fix them.
Uneven thread wraps. If your thread bunches up or leaves gaps, you’re applying uneven tension. Slow down. Keep the bobbin moving at a steady angle. If you’re fighting the thread, it’s probably too thick for the hook size.
Brittle knots. A whip finish that breaks means you’re pulling too hard or the thread is damaged. Check your bobbin for nicks. Use a ceramic bobbin. And don’t overtighten—snug is enough.
Bulky heads. This happens when you use thick thread or wrap too many times. Use thinner thread for small flies. Trim the head with scissors before applying cement.
Hackle that wraps unevenly. The feather should be tied in by its tip and wrapped forward. If it’s twisting, you’re not stroking the fibers back as you wrap. Use your fingers to push the fibers back after each turn.
Dubbing that falls off. Your dubbing was too loosely spun onto the thread, or the thread was too wet. Keep your dubbing wax handy. A small amount of wax on the thread makes the dubbing stick.
Field Testing: How to Tune Your Fly for Action
Tying a fly is only half the job. You need to know how it behaves in the water. Test every fly before you fish it.
Cast it into a pool and watch the drift. Does a dry fly sit high on the surface, or is it dragging? If it’s dragging, add floatant or trim the hackle. Does a nymph sink fast enough? If it’s hanging up in the film, add a split shot or use a heavier bead.
For streamers, strip it through the water. Watch the tail. Does it pulse naturally, or does it spin? Spinning means the marabou is tied in crooked. Re-tie it straight.
Check the hook point. A dull hook loses fish. Sharpen it with a hook hone before every outing. It takes ten seconds and saves you the heartbreak of losing a big fish.
Also, watch the fly’s action in different current speeds. A fly that looks great in slow water might tumble in a fast riffle. Adjust your casting angle or switch to a heavier pattern.
Advanced Customization: Beads, UV Resin, and Color Theory
Once you have the basics down, start experimenting. Tungsten beads are the first upgrade. They add weight without bulk. A size 14 tungsten bead on a pheasant tail makes it fishable in deep runs.
UV resin is a game-changer for durability. A thin coat over the head and thorax seals the fly and adds a subtle shine. It also protects the thread from fish teeth. Use it sparingly—too much makes the fly sink.
Color theory matters more than you’d think. In clear water, use natural, muted colors—olive, tan, brown, black. In stained water, switch to brighter colors—chartreuse, orange, pink. Fish see contrast before they see detail. A bright flash of color can trigger a strike from a fish that’s otherwise indifferent.
Don’t be afraid to break the rules. Some of the best flies are combinations of materials that shouldn’t work together. A purple Woolly Bugger catches fish in almost every river, even though there’s no purple insect in nature. Fish strike out of aggression, not hunger.
Frequently Asked Questions
What is the easiest fly to tie for a beginner?
The pheasant tail nymph is the standard answer. It uses one material for the body, requires no hackle, and teaches you the core skills of thread control and even wrapping. You can tie a passable one in five minutes on your first try.
How long does it take to tie a fly?
A simple nymph takes 5-10 minutes once you have the motions down. A dry fly with a hackle and wing takes 10-15 minutes. A streamer with multiple materials can take 20 minutes. Your first few will be slower—that’s normal. Speed comes with repetition.
Do I need an expensive vise to tie good flies?
No. A basic rotary vise from a starter kit is enough to tie 95% of patterns. Expensive vises offer finer adjustments and smoother rotation, but they don’t tie the fly for you. Upgrade when you feel limited by your current tool, not before.
What are the best materials for tying flies on a budget?
Use craft store feathers and fur instead of premium fly shop materials. Marabou from a craft store works as well as the expensive stuff. Chenille is cheap anywhere. You can also substitute rabbit fur for dubbing. Just make sure the materials are clean and dry before you tie with them.
Why do my flies fall apart after catching a few fish?
You’re probably skipping the head cement or using a weak whip finish. The whip finish knot is the strongest knot in fly tying—use it on every fly. Also, check your thread tension. If the thread is too loose, the materials shift and the fly unravels.
Final Cast: Your Next Steps to Mastery
Tying your own flies is a skill that pays off for decades. The first few are rough, but the hundredth one is a thing of beauty. And the fish don’t care about perfection—they care about presentation. Get to the vise, tie something ugly, and go fish it. That’s how every expert started.
