You’ve just tied on a new crankbait, made your cast, and watched the lure flutter back to the boat. Then you set the hook on a solid fish, and the line comes back slack. The knot failed. We’ve all been there, and it’s almost never the line’s fault—it’s the connection.
This guide walks you through the exact process of putting a lure on your line, covering the knots that hold, the ones that give lures better action, and the fixes you need when something goes wrong on the water. You’ll leave with a clear decision path: which knot for which lure, and why it matters more than you think.

HOOK-EZE
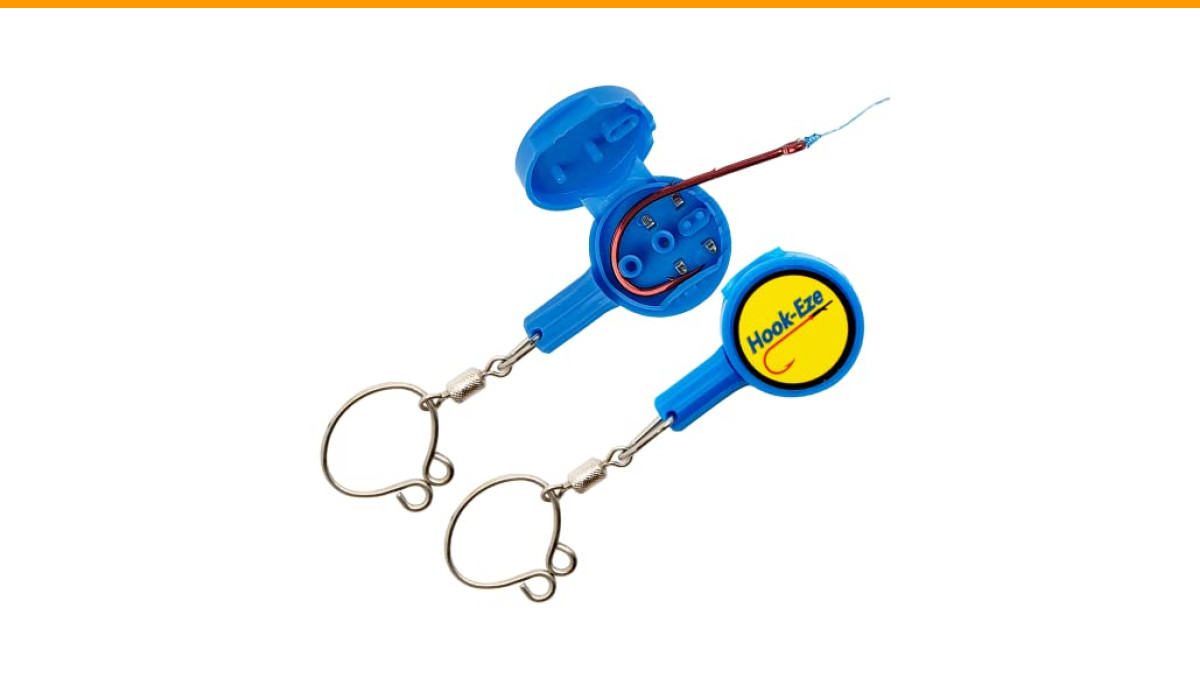
HOOK-EZE 2X Fishing Knot Tying Tool, Standard Size - Safety Device & Line Cutter - Multifunctional Fishing Accessories - Covers Fully Rigged Hooks - Blue
- Everybody Can Tie Their Own Tackle Safely: Prevent fish hook injuries by covering the sharp barb on the fishing hook when tying fi…
- Ideal For Tying A Variety of Fishing Tackle: Suitable for fishing hooks sized from a standard 4/0 down to the smallest hook size #…
- Suitable for Anglers of All Ages and Experience: Perfect for fishermen with dexterity issues such as arthritis as well as young be…
One tool that makes the whole process safer and easier, especially when you’re dealing with tiny hooks or cold fingers, is a knot-tying aid like the HOOK-EZE 2X Fishing Knot Tying Tool. It covers the barb while you work, so a slip doesn’t end with a hook buried in your thumb.
Essential Knots for Attaching Lures
Three knots handle nearly every lure-attachment scenario on the water. Each serves a different purpose, and knowing when to use each one matters more than memorizing a dozen variations.
When to Use a Loop Knot for Action
A loop knot leaves the lure hanging from a fixed loop, usually 1/4 to 1/2 inch long. That slack lets the lure pivot freely on the line. This is critical for walking baits like topwater poppers and pencil poppers—they need that hinge point to dart side-to-side. A direct tie to the eye kills that action flat.
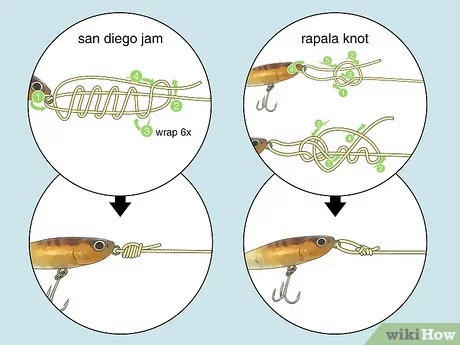
The Rapala knot is the most common loop knot, but the Non-Slip Mono Loop is stronger and easier to tie in fluorocarbon. Both work fine. The trade-off: loop knots reduce knot strength by about 10-15% compared to a snug clinch knot. You trade a little breaking strength for a lot of action.
Use a loop knot for jerkbaits, topwater plugs, and any hard bait where you want maximum wobble. Skip it for jigs and soft plastics—those need a direct, snug connection for sensitivity.
The Palomar Knot for Braided Lines
The Palomar is the strongest knot for braided line, period. It retains nearly 100% of the line’s breaking strength when tied correctly. Braid is slick and slippery, so knots that rely on friction—like the clinch knot—tend to slip under heavy pressure. The Palomar’s double-line design creates a self-tightening grip that doesn’t slip.
It’s also dead simple to tie: double the line, pass it through the eye, tie an overhand knot with the doubled line, then pass the lure through the loop and pull tight. The downside is that it’s bulky. On small lures with tiny eyes, getting the loop through can be a struggle. That’s where a knot-tying tool helps, since you can guide the loop through without mashing the hook barbs.
For braid in the 10-30 pound range, the Palomar is your go-to. For heavier braid above 50 pounds, consider the FG knot for a slimmer profile that casts better through rod guides.
Step-by-Step: Tying a Lure to Monofilament and Fluorocarbon
Monofilament and fluorocarbon are both single-strand lines, and they behave similarly at the knot. The Improved Clinch Knot is the standard here, and it’s the one most anglers learn first. Here’s the precise sequence:
- Thread the line through the lure eye, leaving 6-8 inches of tag end.
- Wrap the tag end around the standing line 5 times for monofilament, 6 times for fluorocarbon. Fluorocarbon is stiffer, so it needs one extra wrap to hold.
- Pass the tag end through the small loop right above the eye, then back through the big loop you just created.
- Wet the knot with saliva or water. This is non-negotiable—dry line creates friction heat that weakens the material.
- Pull the tag end slowly while holding the standing line. Seat the knot against the eye, then trim the tag to 1/8 inch.
The most common mistake here is skipping the wetting step. Dry fluorocarbon generates enough heat to deform the line, and the knot fails at half strength. Always wet it.
One thing to watch: mono and fluoro have memory. If your line has been spooled for months, it’ll coil up and make knot-tying frustrating. Stretch the line gently before tying to remove some of that coil.
Step-by-Step: Tying a Lure to Braided Line
Braided line needs a different approach because it’s slippery and has zero stretch. The Palomar is the safest bet, but the Uni Knot is a solid alternative that works well for braid-to-lure connections.
- Double 6 inches of braid and pass the loop through the lure eye.
- Tie a simple overhand knot with the doubled line, but don’t tighten it yet.
- Pass the lure through the loop you created.
- Wet the knot and pull all four strands—the standing line and the tag end—to seat it firmly.
- Trim the tag end close, about 1/16 inch, since braid doesn’t slip like mono.
Braid is thin for its strength, so a 30-pound braid has the diameter of 8-pound mono. That means it seats differently and can cut into itself if you pull too hard before wetting it. Take your time.
One issue with braid: it’s visible to fish in clear water. Many anglers tie a short fluorocarbon leader (18-24 inches) to the braid, then tie the lure to the fluoro. That’s a smart setup, but it means you need a reliable braid-to-fluoro connection like the FG knot or a double Uni knot.
How to Attach Lures with Split Rings, Snaps, and Swivels
Not every lure gets tied directly. Split rings, snaps, and swivels change the equation, and each has a specific job.
Direct Tie vs. Snap: Pros and Cons
Direct tying gives you maximum sensitivity and the most natural presentation. The lure moves exactly as it was designed, with no extra hardware to dampen vibration. That’s why jig fishermen and soft plastic anglers almost always tie direct—they need to feel every bump on the bottom.
Snaps and clips let you change lures in seconds without retying. That’s a huge advantage when fish are biting on a specific color and you’re cycling through options. The downside: snaps add weight and can interfere with the action of small, light lures. A size 1 snap on a 1/16-ounce jig head will kill the action.
Swivels are for lures that spin—inline spinners, spoons, and some crankbaits. They prevent line twist, which is the enemy of casting accuracy and knot strength. A barrel swivel between your main line and leader is the standard fix.
My rule: direct tie for anything under 1/4 ounce and anything you need to feel deeply. Use a snap for hard baits over 1/4 ounce, especially when you’re experimenting with colors. Use a swivel only when the lure spins.
Preventing Line Twist and Knot Failure
Line twist is the silent killer of fishing presentations. It happens when your lure spins in the water, which twists the line over time. The first sign is a loop that appears when you let your line go slack. Left unchecked, it causes wind knots that snap on the cast.
Inline spinners and spoons are the worst offenders. They rotate as they retrieve, and every rotation adds a twist to the line. A swivel stops that twist before it reaches your main line. But here’s the catch: a swivel placed too close to the lure changes its action. Put the swivel 12-18 inches up the line, with a fluorocarbon leader between the swivel and the lure.
Knot failure happens for four reasons: dry knots, rushed seating, sharp hook eyes, and line damage. The hook eye on a cheap lure can have a burr that cuts the line as you pull the knot tight. Run your finger over the eye before tying—if it catches, file it smooth.
| Problem | Cause | Fix |
|---|---|---|
| Knot slips off the eye | Not enough wraps or wrong knot for line type | Use Palomar for braid, Improved Clinch for mono/fluoro |
| Line snaps at the eyelet | Sharp burr on the hook eye or knot not seated | Smooth the eye with a file; wet and re-seat the knot |
| Wind knots on the cast | Line twist from spinning lures | Add a barrel swivel 12-18 inches above the lure |
| Knot fails under heavy pressure | Dry knot or over-tightened | Always wet the knot; pull slowly and steadily |
Matching the Knot to the Lure Type
Different lures demand different connections. Here’s a quick breakdown of what I use and why.
Crankbaits and jerkbaits: Loop knot, always. The free-swinging action is what triggers strikes. A direct tie restricts the wobble and makes the lure run off-center.
Spinners and spoons: Use a snap or a direct tie with a swivel above. The key is preventing line twist. A snap makes it easy to swap blade colors, which is often the difference between a bite and a blank.
Jigs and soft plastics: Direct tie with an Improved Clinch or Palomar. You need maximum sensitivity to feel the bottom and detect subtle bites. Any hardware in between deadens that feedback.
Topwater: Loop knot for walk-the-dog action. A tight knot makes the bait spin instead of dart. That’s a frustrating thing to watch, and it’s completely avoidable.
Quick Fixes for Broken Knots on the Water
You’re on the water, a fish just broke your knot, and you need to get back to fishing fast. Here’s how to handle it without fumbling.
First, check the line for damage. If the break happened at the knot, the line is probably fine. If it broke 6 inches up, there’s a nick in the line—cut it back an extra foot to get past the weak spot.
Second, retie with a knot you can do blindfolded. The Improved Clinch is the fastest for mono and fluoro. For braid, the Palomar is quick once you’ve practiced it a few dozen times.
Third, don’t rush the wetting step. Even when a fish is rising, take the two seconds to wet the knot. Dry knots fail. Period.
If you’re using a snap, you can skip the retie entirely—just clip on a new lure. That’s the real advantage of snaps when you’re in a hurry.
Common Knot-Tying Mistakes and How to Avoid Them
The most common mistake is tying too fast. You’re excited, the fish are biting, and you rush the knot. That’s exactly when you make errors. Slow down for the last two steps—wetting and seating—and you’ll eliminate most failures.
Another mistake is leaving too much tag end. A long tag end catches weeds and creates drag, which makes your lure run wrong. Trim it to 1/8 inch or less. Too short is also a problem—the knot can slip apart. Aim for the thickness of a pencil lead.
People also misuse the clinch knot on braid. It doesn’t hold. Braid is too slick. If you’re using braid, commit to the Palomar or the Uni Knot. Stop trying to make the clinch work.
Finally, don’t reuse a knot. If you’ve been fishing hard and the knot looks worn or fuzzy, cut it off and retie. A fresh knot is cheap insurance.
Frequently Asked Questions
What is the strongest knot for tying a lure to fishing line?
The Palomar knot is the strongest for braided line, retaining nearly 100% of line strength. For monofilament and fluorocarbon, the Improved Clinch knot is the standard, but the Palomar also works well there. The key is matching the knot to the line type, not just picking the strongest one overall.
Should I use a snap or tie directly to the lure?
Tie directly for lures under 1/4 ounce and for anything where you need maximum sensitivity, like jigs and soft plastics. Use a snap for hard baits over 1/4 ounce when you want to swap colors quickly. Snaps add weight and can interfere with the action of small lures.
How do I prevent line twist when using inline spinners?
Use a barrel swivel placed 12-18 inches above the lure, with a fluorocarbon leader between the swivel and the spinner. The swivel absorbs the rotation from the blade, so your main line stays twist-free. Retie the leader every few trips, as it can weaken from repeated spinning.
Why does my knot keep breaking at the hook eye?
Check the hook eye for a sharp burr. Many lures have rough edges from manufacturing that cut the line as you tighten the knot. Run your fingernail over the eye—if it catches, file it smooth. Also, make sure you’re wetting the knot before seating it. Dry line creates friction heat that weakens the material.
Can I use the same knot for braided and monofilament line?
You can, but the Palomar works best for braid, while the Improved Clinch is better for mono and fluorocarbon. Braid is slick and slippery, so the clinch knot can slip under pressure. The Palomar’s double-line design grips braid effectively. For mono and fluoro, the clinch knot holds well and is faster to tie.
What to Remember on Your Next Trip
- Match the knot to the line: Palomar for braid, Improved Clinch for mono and fluoro.
- Use a loop knot for crankbaits, jerkbaits, and topwater to maximize lure action.
- Direct tie for jigs and soft plastics; use snaps only for hard baits over 1/4 ounce.
- Always wet your knot before seating it—dry line fails at half strength.
- Add a swivel 12-18 inches above any spinning lure to prevent line twist.
- Check hook eyes for burrs before tying; a rough eye cuts line instantly.
- Keep a knot-tying tool like the HOOK-EZE in your tackle box to speed up reties and protect your fingers.