You’ve probably stood in the tackle shop, stared at a $12 crankbait, and thought, “I could make that.” And you’re right. Making wooden fishing lures isn’t just a way to save money—it’s a way to catch fish on something nobody else has. A lure you carved yourself has a rhythm, a wobble, a personality that mass-produced plastic just doesn’t have.
This guide walks you through the entire process, from picking the right wood to tuning the final action in your bathtub. You’ll learn the exact tools, the step-by-step shaping method, how to install hardware, and how to fix the common problems that make beginners give up. By the end, you’ll have a lure that’s ready to catch your first fish on your own creation.

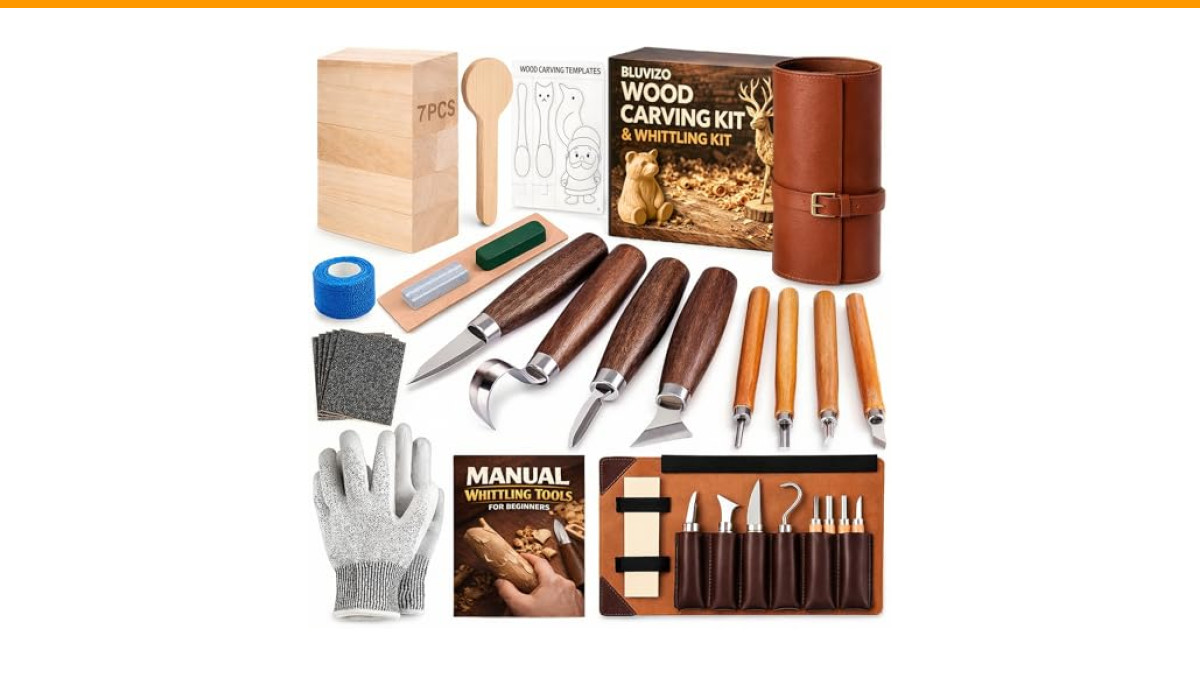
Bluvizo
Wood Carving Kit Whittling Kit: Wood Carving Knife Tools with Leather Case
- [Wood Carving Kit Deluxe Edition] Everything you need to start carving: 4 knives, 4 chisels, 7 basswood blocks, spoon blank, polis…
- [Premium Walnut Handles & Sharp Blades] Blades are precision-sharpened for effortless cuts. Metal cap prevents blade breakage. Erg…
- [Complete Maintenance & Storage Set] The wood whittling kit comes with a portable storage bag, easy to store and carry. Leather st…
Before we dive into the wood, let’s talk about the one tool that makes all the difference: a good carving knife. A sharp, comfortable knife is the difference between a fun afternoon and a frustrating fight with the grain. The Bluvizo Wood Carving Kit includes four knives, four chisels, seven basswood blocks, a strop, sharpening stone, and cut-resistant gloves—everything you need to start shaping blanks safely. It’s not the fanciest set on the market, but it’s a solid, complete package that won’t leave you hunting for tools halfway through your first lure.
Why Build Your Own Wooden Lures?
Custom lures catch fish because they’re tuned to your local water and the specific fish you’re after. A store-bought crankbait is a compromise—it has to work for everyone. Your lure can be weighted to run exactly three feet deep, wobble at exactly the speed you reel, and make a noise that matches the local baitfish.
There’s also the cost. A quality wooden crankbait from a custom builder can run $20 to $40. You can make your own for under $5 in materials once you have the tools. And when you lose one on a snag (and you will), it stings a lot less.
But the real reason is the feeling. The first time you catch a bass on a lure you carved from a block of cedar, you’ll understand. It’s not just fishing anymore—it’s creation.
Essential Tools and Materials: The Complete Checklist
You don’t need a full workshop, but you do need a few specific items. Here’s the exact list for making a standard 3-inch crankbait.
Tools
- Carving knife – A sharp, fixed-blade knife like the ones in the Bluvizo kit. A dull knife is dangerous.
- Band saw or coping saw – For cutting the rough profile. A coping saw works fine for beginners.
- Belt sander or sandpaper – 80-grit for shaping, 220-grit for finishing.
- Drill with small bits – 1/16-inch for hook hangers, 3/32-inch for eyelets, 1/8-inch for the line tie.
- Small files – For cleaning up holes and slots.
- Vise or clamps – To hold the lure while you work.
Materials
- Wood blank – 3/4-inch thick, 3 inches long, 1 inch wide. Balsa, cedar, or maple.
- Diving lip – A 1/16-inch thick piece of polycarbonate or aluminum, about 1 inch long and 3/4 inch wide.
- Hook hangers – Two #4 stainless steel screw eyes.
- Line tie – One #4 stainless steel screw eye.
- Weights – Lead or tungsten wire, 1/16-inch diameter, about 1 inch long.
- Sealant – Epoxy or CA glue (more on this later).
- Paint – Spray paint or airbrush paint, plus a clear coat.
Safety Gear
- Cut-resistant gloves – Non-negotiable. A slip with a carving knife can ruin your day.
- Safety glasses – For sawdust and any flying debris.
- Dust mask – When sanding, especially with cedar or balsa.
That’s it. You can start with less, but this list covers everything you’ll need for your first few lures.
Selecting and Preparing the Right Wood (Balsa vs. Cedar vs. Maple)
The wood you choose determines the action, the weight, and how much work you’ll put into finishing. Here’s the honest breakdown.
Balsa Wood
Balsa is light, soft, and easy to carve. It floats like a cork, which makes it perfect for topwater lures and shallow-running crankbaits. But it’s fragile—you’ll dent it with a fingernail if you’re not careful. You’ll need to seal it with epoxy to keep water out and add some weight to get it to dive.
Cedar
Cedar is the classic choice. It’s light enough to float, but dense enough to cast well. It carves nicely and takes paint beautifully. The grain is tight, so it’s less likely to crack. I’ve made a dozen lures from cedar and only had one split on me, and that was my fault for drilling too close to the edge.
Maple
Maple is heavy and strong. It sinks, which is great for deep divers, but it’s tough to carve. You’ll need a sharp knife and some patience. Maple lures are nearly indestructible—I’ve bounced them off rocks and they just keep working.
| Wood Type | Density (g/cm³) | Buoyancy | Ease of Carving | Best For |
|---|---|---|---|---|
| Balsa | 0.10–0.20 | Floats high | Very easy | Topwater, shallow cranks |
| Cedar | 0.32–0.38 | Floats low | Easy | Most crankbaits |
| Maple | 0.55–0.65 | Sinks slowly | Moderate | Deep divers, heavy action |
For your first lure, go with cedar. It’s forgiving, easy to find at any hardware store, and gives you a good sense of how wood behaves. Balsa is too soft for a beginner—you’ll sand through details before you know it. Maple is a workout.
Step-by-Step: Shaping Your Lure Blank
Okay, you’ve got your wood and tools. Let’s make a lure.
Creating the Template and Transferring the Profile
Draw your lure profile on a piece of paper first. A standard 3-inch crankbait has a rounded nose, a slight taper toward the tail, and a flat belly. You can find free templates online, but drawing your own is part of the fun.
Cut out the paper template with scissors. Trace it onto your wood blank with a pencil. Make sure the grain runs lengthwise—from nose to tail. This is critical. If you cut against the grain, the lure will be weak and may snap on a hard hookset.
Cutting and Sanding to Final Shape
Now cut out the profile. If you’re using a band saw, keep your fingers at least an inch away from the blade. A coping saw works too, but it takes longer. For your first lure, use a coping saw—it’s slower, but you have more control.
After cutting, you’ll have a rough block. Now the fun part: shaping. Use a carving knife to remove the sharp edges. Work from the nose back to the tail, keeping your cuts smooth and even. Don’t try to carve too much at once—take thin shavings, about 1/16-inch thick.
Once you have a rounded shape, switch to sandpaper. Start with 80-grit to smooth the knife marks, then move to 150-grit, then 220-grit. The smoother you sand, the better the paint will look. Balsa and cedar sand fast, so don’t press hard.
Check the shape as you go. Hold the lure up to the light and look at the silhouette. The belly should be flat, the back slightly curved, and the nose rounded. If you see a flat spot, sand it out.
One tip: don’t over-sand the nose. The diving lip will sit in a slot there, and you need enough wood to hold it. Leave about 1/8-inch of material at the nose.
Installing the Diving Lip and Hardware
Now you’re ready for the parts that make it a fishing lure, not just a wooden fish.
Drilling for Hook Hangers and Eyelets
Mark the positions for your hook hangers. For a 3-inch crankbait, place one hanger about 1/2 inch from the nose on the belly, and another about 1/2 inch from the tail. The line tie goes on the nose, centered.
Use a drill bit slightly smaller than your screw eyes. For #4 screw eyes, that’s a 1/16-inch bit. Drill straight down, about 1/4 inch deep. If you drill too close to the edge, the wood will split—I’ve ruined two lures that way. Keep at least 1/8 inch of wood on all sides.
Now drill the slot for the diving lip. This is on the nose, angled downward at about 30 degrees. The slot should be 1/16-inch wide and about 1/2 inch deep. A small handsaw or a Dremel with a cutoff wheel works best. Go slowly—you want the lip to fit snugly, not sloppily.
Weighting the Lure for Balance
Here’s where the physics comes in. A crankbait needs weight in the belly to keep it upright and to help it dive. Without weight, the lure will float on its side and roll over when you reel.
Drill a 1/8-inch hole in the belly, centered between the hook hangers. Insert a piece of lead wire—about 1 inch long for cedar, 1/2 inch for balsa. You can adjust the depth to change the lure’s action. More weight in the front makes it dive deeper; more weight in the back makes it run shallower.
Test the balance in a glass of water. The lure should float with the nose slightly down, at about a 45-degree angle. If it floats flat, add more weight. If it sinks, you’ve added too much—take some out.
Once you’re happy, glue the weights in with a drop of epoxy. Then screw in the hook hangers and line tie. Add a drop of super glue to each screw eye to keep them from backing out.
Sealing and Painting for Durability
Wood is porous. If you don’t seal it, water will soak in, and your lure will get heavy and lose its action. Sealing is not optional.
Choosing the Right Sealant
You have three main options:
- Epoxy – The best for durability. It dries hard and clear, and it’s waterproof. The downside is it’s thick and can fill in details if you’re not careful. Use a thin coat and brush it on.
- CA glue (super glue) – Fast and easy. It soaks into the wood and hardens, but it’s brittle and can crack if the lure bends. Good for small lures.
- Marine varnish – A traditional choice. It’s flexible and waterproof, but it takes multiple coats and a long time to dry.
I use epoxy for all my lures. It’s worth the extra time. Just make sure you coat the entire lure, including the inside of the hook hanger holes. Let it dry completely before painting.
Painting Techniques and Stenciling
Now the fun part—making it look like a fish. Start with a base coat of white or light gray spray paint. This gives you a clean canvas.
For a simple pattern, use stencils. Cut a fish shape from a piece of paper, place it on the lure, and spray over it. Or use a toothbrush to flick paint for a speckled effect—the classic trout pattern.
If you have an airbrush, you can do more detailed work. But honestly, a few colors of spray paint and a stencil are enough for your first few lures. Fish don’t care about realism; they care about action and silhouette.
Finish with a clear coat. Use a spray-on clear polyurethane or a brush-on epoxy. This protects the paint and adds a glossy shine that mimics a real fish’s scales.
Testing and Tuning Your Lure’s Action
You’ve built it. Now the real test: does it swim? Fill a bathtub or a large bucket with water. Attach your line to the line tie, and reel it in slowly.
Watch the lure’s action. A good crankbait should wobble side to side, with a tight, consistent roll. The nose should point down slightly, and the lure should dive a few inches below the surface.
If the lure rolls on its side, you have a weight problem. Add a little more weight to the belly, or move the line tie slightly to one side. If the lure doesn’t dive, the lip angle is too shallow. Increase the angle by sanding the slot a bit deeper.
This is where the tuning gets personal. Every lure is different, and the water test tells you what to adjust. Don’t skip it—a lure that looks perfect on the bench but swims like a wounded duck will not catch fish.
Troubleshooting Common Lure Problems
Here are the most common issues you’ll run into, and how to fix them.
Lure Rolls on Its Side
This is almost always a balance issue. The center of gravity is too high, or the weight is uneven. Add a small weight to the belly, or sand a little off the top of the lure to lower the center of gravity.
Lure Doesn’t Dive
Check the lip angle. If it’s too flat (less than 20 degrees), the water won’t push the nose down. Increase the angle to 30–45 degrees. Also, make sure the line tie is on the nose, not on the top of the lip.
Lure Spins Instead of Wobbling
This happens when the lip is off-center, or the lure’s body is asymmetrical. Sand the lip slot so the lip sits perfectly centered. Check the body by rolling it on a flat surface—if it wobbles, sand the high side.
Paint Cracks or Peels
You didn’t wait long enough between coats, or you used the wrong type of paint. Let each coat dry completely. Use a flexible clear coat, like a spray polyurethane, to avoid cracking.
Frequently Asked Questions
What’s the best wood for a beginner lure maker?
Cedar is the best choice. It’s easy to carve, floats well, and is forgiving of mistakes. Balsa is too soft, and maple is too hard for a first project.
Do I need an airbrush to paint lures?
No. Spray paint and stencils work fine. An airbrush gives you more control, but it’s not necessary for your first few lures.
How do I make my lure dive deeper?
Increase the lip angle, add more weight to the belly, or use a heavier lip material. The deeper you want to go, the steeper the lip should be.
Can I use a knife I already have?
You can, but a proper carving knife makes a big difference. A dull or thick blade will tear the wood instead of cutting it. The Bluvizo kit includes knives that are sharp and comfortable, which makes a huge difference when you’re carving for hours.
How long does it take to make one lure?
Plan for 2–3 hours for your first one, including drying time for the sealant and paint. Once you get the hang of it, you can knock one out in about an hour.
What to Do With Your First Handmade Lure
So you’ve got a finished lure. It’s carved, sealed, painted, and tuned. Now go use it. Tie it on a rod with 10-pound line, cast it near a fallen tree or a weed line, and reel it slow. When you feel that first hit, you’ll know it was worth every cut.
- Start with cedar—it’s the most forgiving wood for beginners.
- Invest in a good carving knife set; sharp blades make the work safer and easier.
- Always seal your lure before painting—water will ruin an unsealed lure.
- Test the action in water before you paint, and again after. Tuning is an ongoing process.
- Keep your first few lures simple. A basic crankbait catches fish; a complicated one might not even swim.
- Don’t be afraid to make mistakes. Every lure you ruin teaches you something for the next one.
- Join an online lure-building community. You’ll pick up tips and tricks you won’t find anywhere else.
Now get out there and make something that catches fish. You’ve got the knowledge, the tools, and the wood. The only thing left is to start carving.