
You’ve spent another Saturday morning at the tackle shop, staring at a wall of crankbaits that all look the same. The one with the right color costs $12. The one with the right action costs $15. The one that does both? It’s behind glass. Most anglers accept this as normal, but it doesn’t have to be that way.
This guide walks you through making your own fishing lures at home — from a simple wooden crankbait to hand-poured soft plastics and spinners. You’ll learn the physics behind why lures wiggle, what makes them sink or float, and how to fix common problems like rolling or poor action. By the time you finish, you’ll have the skills to build lures that catch fish, and you’ll save enough money to justify the hobby to anyone who asks.

Dr.Fish
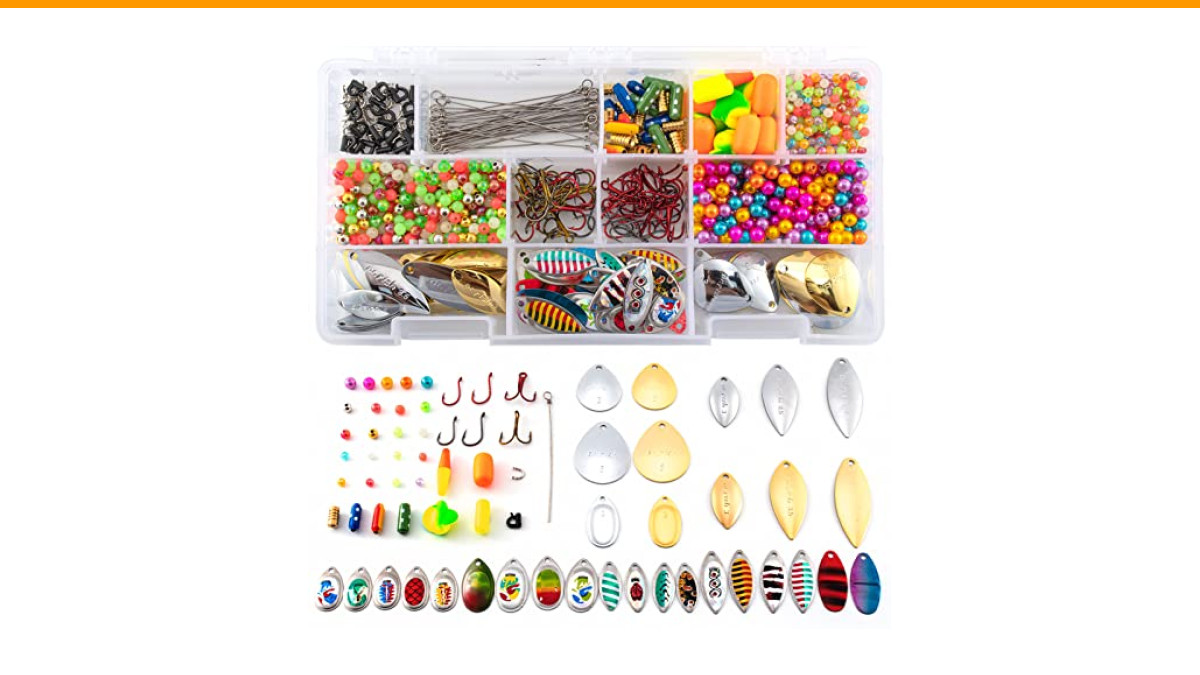
Dr.Fish 1310pk Spinner Making Kit Walleye Rig Lure Making Accessories | Lure Making Supplies for Spinners & Fishing Rigs Includes Colorado Willow Blade, Shafts, Hooks, Clevises, Rig Float, Bead
- 1310 pieces huge quantity lure making supplies including hooks, spinner blades, spinner shafts, clevises, lure bodies and rig floa…
- Includes total 100 pieces of spinner blade in multiple different styles, sizes and patterns
- Specially chosen tackles allow you to make spinners and walleye rigs with just one kit. We added rig floats, speed change clevis a…
If you’re starting from zero, a pre-assembled kit can remove the guesswork. The Dr.Fish 1310pk Spinner Making Kit includes spinner blades, hooks, clevises, shafts, lure bodies, floats, and over a thousand beads in a tackle box. It’s a practical way to build inline spinners and walleye rigs without buying each component separately.
Why Build Your Own Lures? (Beyond the Cost Savings)
Let’s start with the obvious: money. A decent wooden crankbait costs $8 to $15 in a store. You can make one at home for about $2 in materials — hook, split rings, a lip, some paint, and a piece of scrap wood. Soft plastic baits cost pennies each when you pour them yourself. Spinners cost less than a dollar in components.
But the real reason to build your own lures is control. You decide the buoyancy, the action, the color, and the size. That $12 crankbait in the store might not dive deep enough for the ledge you fish. You can adjust the lip angle and weighting on your own lure to match exactly what the fish want on any given day.
There’s also the satisfaction factor. When you catch a fish on a lure you carved, painted, and tuned yourself, it feels different. It’s not just a tool; it’s proof that you understand what makes fish bite. That’s worth more than the savings.
Essential Lure-Making Tools and Materials
Before you start, gather the basics. You don’t need a full workshop, but a few tools make the job much easier.
The Beginner’s Starter Kit (Under $50)
- Hobby knife or small carving knife — for shaping balsa or pine bodies.
- Sandpaper — 80 to 220 grit for shaping, 400 for smoothing.
- Dremel or rotary tool — optional, but speeds up hollowing and slot cutting.
- Wire cutters and needle-nose pliers — for bending hook hangers and split rings.
- Epoxy or super glue — for attaching lips and sealing wood.
- Paint — acrylic craft paint works fine; add a clear coat on top.
- Clear coat — epoxy resin or nail polish for a durable finish.
- Split rings, hooks, and hook hangers — available at any tackle shop or online.
- Diving lips — clear polycarbonate or lexan sheets, cut to size.
- Lead wire or small weights — for adjusting buoyancy.
Sourcing Materials: Retail vs. Recycled
You can buy everything new, but half the fun is finding materials for free. Scrap wood from a construction site — pine, cedar, or balsa — works perfectly for crankbait bodies. Old spoons from the kitchen drawer can be bent into blade baits. Melted plastic from old soft plastics can be re-poured into new shapes if you’re careful.
Retail sources like craft stores and online tackle suppliers offer consistency. You know exactly what you’re getting. Recycled materials are cheaper but require more work and sometimes fail — that’s part of the learning curve. For your first few lures, buy new materials so you can isolate problems. Once you know what you’re doing, start experimenting with junk.
The 5-Step Process for a Wooden Crankbait
This is the classic DIY lure. It’s easy to shape, and the action can be tuned to match any store-bought model.
Step 1: Shaping and Sealing the Body
Start with a block of balsa, pine, or cedar. Balsa is light and floats well; pine is heavier and casts better. Draw the outline of your lure on the side of the block — a minnow shape works well for beginners. Cut it out with a coping saw, then shape it with a knife and sandpaper.
Keep the body symmetrical. If one side is heavier than the other, the lure will roll in the water. After shaping, seal the wood with a thin coat of epoxy or super glue. This prevents water from soaking in and changing the weight.
Step 2: Installing the Diving Lip and Hardware
Cut a slot in the front of the body for the diving lip. The lip angle determines diving depth and action. A steeper angle (about 45 degrees) makes the lure dive deeper but wiggle less. A shallower angle (about 30 degrees) gives a wider wobble at shallower depths.
Insert the lip into the slot and secure it with epoxy. Install hook hangers — small screw eyes or wire loops — in the belly and tail. Make sure the hangers are centered, or the lure will track crooked.
Step 3: Weighting for the Perfect Sink Rate
Weighting is where you control buoyancy. A floating crankbait should sit tail-down in the water, with the head slightly higher. To achieve this, add lead wire or small weights to the belly, just behind the front hook hanger.
Test in a glass of water. Add a small weight, test again. It’s easier to add weight than remove it, so go slowly. For a sinking lure, add more weight until the lure sinks slowly — about 1 foot per second. For a suspending lure (one that hangs in the water column), add just enough weight to make it neutrally buoyant.
Step 4: Painting and Sealing with Epoxy
Paint the lure with acrylic craft paint. You can use a brush, but an airbrush gives a smoother finish. Start with a white base coat, then add colors and patterns. Don’t overthink it — fish aren’t art critics.
After painting, seal with a clear coat. Two-part epoxy resin is the most durable. It’s thick and self-leveling, so it gives a glass-like finish. Apply a thin coat, let it cure, then add a second. This protects the paint from teeth and rocks.
Step 5: Hooks, Split Rings, and Final Assembly
Attach split rings to the hook hangers, then add hooks. Use treble hooks for most crankbaits — they hook fish better than single hooks. For a lighter presentation, use single hooks.
Test the lure in a bathtub or a bucket. Watch how it swims when you retrieve it. If it rolls, the weight is off. If it dives too deep, the lip angle is too steep. Adjust and retest until it runs true.
How to Hand-Pour Soft Plastic Baits (Without a Pressure Pot)
Soft plastic baits — worms, grubs, swimbaits — are easy to make at home with a mold and plastisol. Plastisol is a liquid plastic that turns solid when heated. You can buy it in bulk online, or melt down old soft plastics in a dedicated pot (never use a pot you cook with).
Heat the plastisol to about 350°F (175°C) in a pouring pot or a microwave-safe container. Stir frequently to avoid burning. Add colorant and glitter if you like. Pour the liquid into a two-part mold, then wait for it to cool.
The tricky part is air bubbles. Without a pressure pot, you’ll get tiny bubbles in the baits. They don’t affect how well the bait catches fish, but they look less professional. To minimize bubbles, pour slowly and tap the mold gently after pouring. The first few baits might have imperfections — that’s normal. You’ll get better with practice.
Safety note: Plastisol fumes are toxic. Work in a well-ventilated area, ideally outdoors or under a fume hood. Wear gloves and eye protection. Don’t overheat the plastic, as it can release harmful gases.
Building a Simple Spinnerbait and Inline Spinner
Spinners are among the simplest lures to make. An inline spinner consists of a wire shaft, a blade, a clevis (the piece that holds the blade), beads, and a hook. A spinnerbait adds a lead head and a skirt.
For an inline spinner, straighten a piece of stainless steel wire. Thread a bead, then a clevis with a blade attached, then more beads. Add a hook at the end and form a loop at the top for your line. The blade spins as you retrieve, creating flash and vibration.
Use the Dr.Fish spinner making kit to get a variety of blades, clevises, and beads. The kit includes 100 spinner blades in different shapes and colors, plus 70 clevises and 1100 beads. You can make dozens of spinners with that alone. Just add hooks and a wire shaft, which the kit also includes (30 shafts).
For a spinnerbait, add a lead head mold and a silicone skirt. The lead head is poured, then the skirt is attached, then the blade and wire arm. It’s a bit more involved but still manageable in an hour.
Troubleshooting: Why Your Lure Isn’t Working
You’ve built your lure, but it doesn’t act right. Here’s how to fix the most common problems.
Fixing a Lure That Rolls or Spins
If your lure rolls to one side during the retrieve, the weight is off-center. Check the hook hangers — if one is slightly off to the side, it will cause a roll. Reposition the hangers or add a small weight to the opposite side to balance.
Another cause is a lip that isn’t straight. Hold the lure up and sight down the lip. If it’s twisted even a few degrees, it will cause the lure to spiral. Replace the lip or adjust it with heat (if it’s plastic).
Adjusting Buoyancy and Action
If your lure sinks too fast, remove weight or use a lighter wood. If it floats too high and won’t dive, add weight to the belly or increase the lip angle. The action — the wiggle — depends on the lip and the body shape. A wider body with a smaller lip gives a tighter wiggle. A narrower body with a bigger lip gives a wider wobble.
Water temperature also matters. In cold water (below 50°F), fish are sluggish, so a slower, tighter action works better. In warm water, they’re more aggressive, so a wider wobble can trigger strikes. Adjust your lure’s action to match the conditions.
Finishing Touches: Clear Coats and Realistic Details
A good clear coat is what separates a homemade lure from a toy. Epoxy resin is the gold standard. It’s tough, clear, and self-leveling. Apply it in a thin layer with a brush or a toothpick, then rotate the lure to keep it even. Let it cure for 24 hours.
For realistic details, add eyes — you can buy 3D eyes at craft stores or online. A few brush strokes of gill lines or scale patterns add depth. Don’t go overboard; sometimes a simple pattern is more effective than a detailed one.
One trick: paint a white belly and a dark back. This mimics the natural countershading of baitfish and makes the lure more visible from below and above.
Testing Your Lures in a Bathtub vs. The Lake
Before you drive to the lake, test your lures in a bathtub or a large bucket. Fill it with water and observe the action. A bathtub is too small for a full retrieve, but you can see if the lure sinks, floats, or rolls.
For a more accurate test, use a swimming pool or a shallow pond. Attach the lure to a rod and reel it in at different speeds. Watch how it dives, wiggles, and tracks. Make notes and adjust at home.
Lake testing is the ultimate proof, but it’s not always convenient. The bathtub test catches 90% of problems before you leave the house.
Safety First: Handling Hooks, Plastics, and Solvents
Working with hooks, knives, and hot plastic is dangerous if you’re careless. Keep a first-aid kit nearby. Use a hook file to dull the barb on hooks you’re handling, then sharpen it before fishing.
When melting plastisol, wear a respirator with organic vapor cartridges, not just a dust mask. Work outdoors or in a well-ventilated garage. Never leave hot plastic unattended.
Epoxy and solvent-based paints produce fumes. Use them in a ventilated area and wear gloves. If you’re sensitive to chemicals, look for water-based alternatives.
Frequently Asked Questions
What’s the easiest lure to make for a beginner?
An inline spinner is the easiest. You just thread beads and a clevis onto a wire shaft, add a hook, and you’re done. No carving, no painting, no weighting. The Dr.Fish spinner kit has all the parts you need to make dozens in an afternoon.
How much money can I save by making my own lures?
You’ll save 50% to 80% per lure, depending on the type. A wooden crankbait costs about $2 in materials versus $10 to $15 in a store. Soft plastics cost about $0.10 per bait versus $1 each. The savings add up fast if you fish often.
Do homemade lures catch as many fish as store-bought ones?
Yes, if they’re made correctly. The fish don’t care about the brand. They care about the action, size, and color. Homemade lures can be tuned to match local baitfish perfectly, which often makes them more effective than generic store-bought models.
What’s the best wood for making crankbaits?
Balsa is the lightest and gives a lively action, but it’s fragile. Cedar is a good middle ground — light and durable. Pine is heavier and casts well but has a tighter action. Start with cedar; it’s forgiving and easy to shape.
Can I use old soft plastics to make new baits?
Yes, you can melt down old soft plastics and re-pour them. Heat them in a dedicated pot to about 350°F, add color if needed, and pour into molds. The quality won’t be as good as fresh plastisol, but it’s a free way to recycle.
Final Cast: Getting Your DIY Lures on the Water
- Start with a simple inline spinner or a wooden crankbait — don’t try to build a swimbait with a jointed body on your first day.
- Test every lure in a bathtub before you go to the lake. It saves time and frustration.
- Keep a notebook of your lure designs, weights, and actions. What works in May might not work in October.
- Buy a lure-making kit like the Dr.Fish 1310pk to stock up on spinner components without breaking the bank.
- Master one type of lure before moving to the next. Depth of skill beats breadth every time.
- Safety first: wear gloves and a respirator when working with plastic or epoxy.
- Enjoy the process. Even a lure that doesn’t catch fish teaches you something about how they think.
