You pull out your grandfather’s old tackle box, and there they are — a dozen battered wooden lures with chipped paint, rusty hooks, and a layer of grime that’s been baking in the garage for decades. Your first instinct is to scrub them shiny with whatever’s under the sink. Stop right there.
Cleaning vintage fishing lures is a balancing act between making them fishable and preserving their collector’s value. A harsh scrub can strip the original finish, and that can turn a $50 lure into a $5 lure in one careless pass. This guide walks you through the safe way to clean, restore, and store old lures — whether you plan to fish them or display them.

SALTY CAPTAIN EST - 2019
Salty Captain Sea Spray – Fishing Reel Cleaner Spray 500ml
- POWERFUL FISHING REEL CLEANER: Designed for saltwater rod and reel care, Sea Spray removes salt, grime, and brine that damage fish…
- QUICK & EASY REEL CLEANER SPRAY: Skip the hassle of complicated reel cleaning tools. Our foaming spray clings to your fishing reel…
- PREVENTS RUST & CORROSION: Salt buildup is the #1 cause of rusted reels. Sea Spray acts as a salt remover and corrosion preventati…
You’ll learn how to identify lure materials, which chemicals are safe, how to restore rusty hooks without wrecking the lure, and when to leave a lure alone entirely. I’ve been restoring vintage tackle for over a decade, and I’ve made every mistake you can imagine. Let me save you the trouble.
If you’re cleaning a batch of lures, you’ll also need to protect your reels from the same salt and grime. A quality spray like Salty Captain Sea Spray – Fishing Reel Cleaner Spray cuts through salt buildup and prevents corrosion, so your gear stays smooth long after the lures are done.

Why Clean Vintage Lures? Fishing vs. Collecting
Before you dip anything in water, decide what these lures are for. That decision changes everything.
If you’re going to fish them, you want them functional: sharp hooks, solid split rings, and a clear coat that won’t peel off on the first cast. If you’re collecting, you want to preserve the original paint, the patina, and even the old rusty hooks — because that’s what makes them valuable.
Most vintage lures fall somewhere in between. You might want to fish a classic Creek Chub or Heddon but still keep its character. The key is knowing when to stop cleaning. For a collector’s lure, a gentle wipe with a soft cloth and mild soap is often enough. For a fishing lure, you can be more aggressive.
Here’s a simple rule: if the lure has original packaging, a rare color pattern, or is from a well-known maker in excellent condition, don’t touch it. If it’s a common lure with chipped paint and rust, go ahead and restore it for the water.
Safety First: Materials, Gloves, and Ventilation
Old lures are made of wood, plastic, or metal — and each reacts differently to cleaners. You need to know what you’re dealing with before you start.
Wood lures (like classic bass poppers) are porous. Soaking them in water can swell the wood and crack the paint. Plastic lures (like old Rapalas) are more forgiving but can cloud or soften with harsh solvents. Metal lures (like spoons and spinners) can handle more scrubbing but are prone to rust and pitting.
For heavy grime, you might be tempted to use toilet bowl cleaner or a rust remover. Those contain strong acids that can strip paint instantly. Always wear nitrile gloves and work in a well-ventilated area — preferably outside. The fumes from rust removers are no joke, and you don’t want that stuff on your skin.
If you’re cleaning a lure with lead-based paint (common on pre-1970s lures), be extra careful. Don’t sand it dry; wet-sand instead to keep lead dust out of the air. And never use a wire brush on a painted lure — it will gouge the finish.
Step-by-Step Cleaning Guide
Step 1: Disassembly (Hooks, Rings, and Hardware)
Take the lure apart before you clean it. Remove the hooks, split rings, and any metal hardware. This protects the hooks from getting gunked up and lets you clean the lure body without metal parts in the way.
Use a pair of split-ring pliers to open the rings gently. Don’t twist the rings out of shape — they’ll weaken and might fail on a big fish. If a split ring is rusty, you can replace it later, but set it aside for now.
Keep all the hardware in a small container so you don’t lose it. I use an old pill organizer, but a zip-top bag works fine.
Step 2: The Initial Wash (Soap and Water)
Start with the gentlest method: warm water and a drop of dish soap. Use a soft-bristled toothbrush to scrub the lure body. This removes surface dirt, old fish slime, and loose grime without touching the paint.
For wood lures, keep the wash quick — under a minute — and dry them immediately with a soft towel. Don’t soak them. For plastic and metal lures, you can be a bit more thorough.
If the lure still looks grimy after this, move to the next step.
Step 3: Removing Oxidation and Grime (Chemical Options)
For stubborn oxidation on metal lures, a paste of baking soda and water works wonders. Apply it with a soft cloth and rub gently. It’s mildly abrasive but won’t scratch the metal.
For plastic lures with yellowed clear coat, a 50/50 mix of white vinegar and water can help. Dip a cotton swab and rub the affected area. Don’t soak the lure — just a light wipe.
For heavy rust on hardware, a vinegar soak is your best bet. Submerge the hooks and split rings in white vinegar for 30 minutes to an hour. The acid dissolves the rust without damaging the metal. After the soak, scrub with a wire brush (on the metal parts only) and rinse well.
If you’re dealing with a particularly grimy lure, some restorers use a product called Goof Off or a mild acetone on a cotton swab for spot cleaning. But test it on an inconspicuous spot first — acetone will melt plastic lures instantly.
Step 4: The Final Rinse and Drying
After any chemical treatment, rinse the lure body with clean water. For wood lures, use a barely damp cloth instead of running water to avoid swelling. For plastic and metal, a quick rinse under the tap is fine.
Dry everything thoroughly. Use a soft towel, then let the lures air-dry on a rack for a few hours. Any trapped moisture will cause rust or mildew later.
Once dry, inspect the lure. If the paint is chipped or the clear coat is dull, you can move to touch-up work (see below). If the hooks are still rusty after the vinegar soak, you might need to replace them.
Restoring Hardware vs. Replacing It
Old hooks and split rings are often rusty, but that doesn’t mean you need to toss them. For collectors, original hardware is part of the lure’s history. For fishing, though, rusty hooks are a safety hazard — they won’t set properly and can snap under pressure.
Here’s my approach: if the rust is surface-level, clean it with vinegar and a wire brush. The hook will look better and still be usable. If the hook is pitted or has deep rust, replace it. A pitted hook is weak and can fail on a big fish.
For split rings, the same rule applies. But note that split rings are cheap — a pack of 50 costs a few dollars. If you’re restoring a lure for fishing, replacing the split rings is a no-brainer. For a collector’s lure, keep the originals even if they’re a little rough.
One tip: when replacing hooks, don’t go up in size. A heavier hook will change the lure’s action and make it swim erratically. Stick with the same size and style that came on the lure.
Touching Up Paint and Preserving the Finish
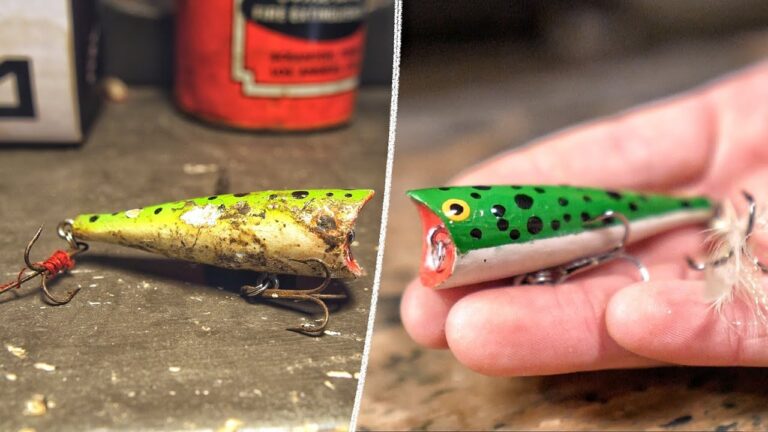
Chipped paint is the most common issue on vintage lures. The question is whether to touch it up or leave it. For a collector’s lure, leave it. The chips are part of the story. For a fishing lure, a little touch-up can make it look sharp and protect the wood from water damage.
If you decide to touch up, use model paint (like Testors or Tamiya) in a matching color. Apply it with a fine brush, and only fill in the bare spots — don’t repaint the whole lure. Let the paint dry completely, then seal it with a thin coat of epoxy or a clear nail polish. This protects the paint and adds a glossy finish.
For missing eyes, you can buy replacement eyes at a craft store or online. They come in sizes from 1/8 inch to 1/2 inch. Glue them on with a drop of super glue, then seal with clear coat.
If the clear coat is cracked or peeling, you can strip it off with a solvent like CitriStrip and reapply a fresh coat. But this is risky — the solvent can also remove the original paint. I usually only do this if the lure is already in rough shape.
One thing to avoid: don’t spray a heavy clear coat over a lure that’s going in the water. It adds weight and changes the action. A thin brush-on epoxy is better.
Post-Cleaning Maintenance and Storage
Once your lures are clean and restored, the right storage keeps them that way. Here’s what I’ve learned from years of collecting.
Store each lure in its own slot in a tackle box, or wrap it in wax paper. Don’t let lures touch each other — the hooks will scratch the paint. For extra protection, use individual plastic bags with a small silica gel pack to absorb moisture.
Keep your tackle box in a cool, dry place. Heat and humidity are the enemies of vintage lures. A garage that gets hot in summer can cause the paint to bubble and the wood to warp.
Check your lures every few months. If you see any rust forming on the hooks, wipe it off with a dry cloth. A light coat of reel oil on the hooks and split rings can prevent rust, but don’t get it on the lure body — it will attract dust.
For long-term storage, consider a display case. It protects the lures and lets you enjoy them. Just make sure the case has a lid to keep out dust.
Frequently Asked Questions (FAQs)
Can I use vinegar to clean vintage fishing lures?
Yes, but be careful. Vinegar is great for removing rust from hooks and split rings, but it can dull the paint on the lure body. Use it only on metal parts, and rinse thoroughly. For the lure body, stick with mild soap and water.
How do I remove old fishing line from a lure?
Use a pair of tweezers or a dental pick to gently lift the line away from the lure. If the line is tangled in the hooks, cut it with scissors. Don’t pull too hard — you might snap the hook or damage the lure’s finish.
Should I replace the hooks on a vintage lure?
If you’re fishing the lure, yes — especially if the hooks are rusty or weak. If you’re collecting, keep the original hooks even if they’re rusty. Original hardware adds value. For fishing, replace with new hooks of the same size and style.
How do I get yellowing off a plastic lure?
Yellowing is caused by UV light and oxidation. You can lighten it with a mild bleach solution (1 part bleach to 10 parts water) applied with a cotton swab, but test on a small area first. Some restorers use a product called Retr0bright, but it’s hard to find. The yellowing is often permanent, so don’t expect miracles.
What’s the best way to clean a wooden lure without damaging the paint?
Use a soft, damp cloth with a drop of dish soap. Wipe gently and dry immediately. Never soak a wooden lure. For stubborn grime, use a cotton swab dipped in soapy water. Avoid any solvents or abrasives.
Final Thoughts: Know When to Stop
The biggest mistake I see beginners make is over-cleaning. They scrub a vintage lure until it looks brand new, and in the process, they’ve stripped the original finish and killed its value.
- Decide if the lure is for fishing or collecting before you start.
- Use the gentlest cleaning method first — soap and water works for most lures.
- Vinegar soaks are for metal parts only, not the lure body.
- Replace hooks and split rings only if they’re pitted or unsafe.
- Touch up paint only on fishing lures, never on collector’s items.
- Store lures in individual slots with silica gel packs.
- When in doubt, leave the lure alone. A little patina is character.
Cleaning vintage lures is about respect — for the craftsmanship and for the fish that might still be fooled by them. Take your time, use the right tools, and your lures will last another generation.