You’re on the water, the fish are rising, and your fly finally lands in the perfect spot. You set the hook, feel the weight, and then—nothing. The line snaps right at the eye of the fly. That’s the moment you realize the knot was the weakest link in your entire setup.
Most anglers spend hours picking the right fly, rod, and leader, then ruin it all with a sloppy knot. I’ve done it. You’ve probably done it too. The good news is that tying a secure knot isn’t hard once you understand the mechanics behind it. This article walks you through the exact knots to use for different lines and lures, plus a field method that works when your hands are cold and wet.
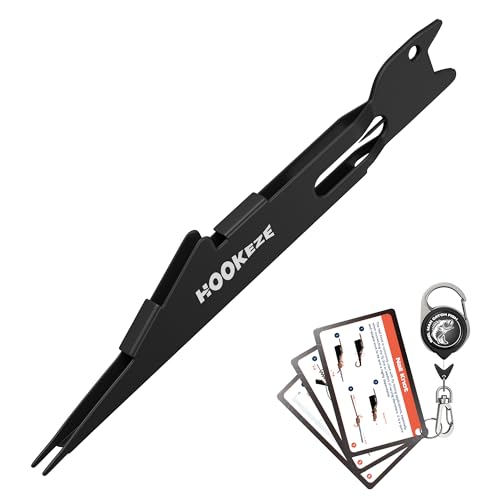
HOOK-EZE
HOOK-EZE Fishing Nail Knot Tying Tool Combo|Includes Waterproof Pocket Guide, Nail Knot Tying Tool with Hook Cleaner, Zinger Retractor|Fly Fishing Accessories Fishing Gifts & Stocking Stuffers for Men
- Easy & Safe Nail Knot Tying: Tie perfect nail knots quickly and securely—regardless of your experience level. Whether you're a beg…
- Complete Fly Fishing Tool Kit: Everything you need in one compact combo: a premium stainless steel nail knot tying tool with a bui…
- Accessible & User-Friendly: Thoughtfully designed for accessibility, this tool is perfect for older anglers, those with arthritis,…
You’ll walk away knowing which knot holds best for braid versus fluorocarbon, why a loop knot matters for a topwater popper, and how to fix the most common knot failures before they cost you a fish.
If you struggle with fine motor control, cold hands, or just want a foolproof way to tie a nail knot on the water, the HOOK-EZE Fishing Nail Knot Tying Tool Combo takes the frustration out of the process. It includes a stainless steel tool with a hook eyelet cleaner, waterproof knot guide cards, and a retractable zinger so you can clip it to your vest and tie nails knots in seconds.

Why the Right Knot Matters More Than the Lure
A $50 hand-tied fly or a perfectly tuned crankbait does nothing if the knot fails. The knot is the single point of connection between you and the fish. It’s also the place where most breakoffs happen.
Knot failure usually comes down to three things: the wrong knot for the line material, a knot tied incorrectly, or a knot that’s been weakened by friction or damage. Each of these is preventable.
Think about the forces involved. A 5-pound trout can pull with far more force than its body weight when it shakes its head. Add current, and the strain multiplies. Your knot needs to maintain close to 100% of the line’s breaking strength to handle those bursts.
Here’s a number to keep in mind: a properly tied improved clinch knot holds about 90-95% of the line’s rated strength. A poorly tied one might hold 60% or less. That difference is the gap between landing a fish and watching it swim away with your fly.
Anatomy of a Secure Knot: What Makes It Hold
Every knot works because of friction. The coils press against each other and the line, creating enough grip to hold under tension. When a knot slips or breaks, it’s usually because that friction isn’t doing its job.
Three things determine whether a knot holds: how many coils you use, how cleanly the wraps lay against each other, and whether you lubricate the line before tightening.
Wetting the line is not optional. Dry monofilament generates heat when it slides against itself, which weakens the material. A quick lick or a dip in the water before you pull tight reduces friction and keeps the line strong.
You also need to pull the tag end and the standing line in opposite directions, slowly and steadily. Jerking the knot tight creates micro-damage that shows up later as a break at the eye.
The Role of Line Type (Mono, Fluoro, Braid)
Monofilament stretches and has some give. It forgives a slightly imperfect knot. Fluorocarbon is stiffer and denser, so it requires more wraps and careful seating. Braid is slick and doesn’t stretch, which means knots that rely on friction, like the clinch, can slip unless you add extra wraps or use a different knot entirely.
For braid, the Palomar knot is the gold standard. The double line through the eye creates a self-locking mechanism that doesn’t rely on friction between the line and itself. The uni knot also works well on braid because the barrel wraps grip the slick surface better than a clinch knot.
For fluorocarbon, you need to be patient. The stiffness makes it harder to pull the coils tight, and the knot can fold over itself if you rush. Use five or six wraps on the improved clinch and pull slowly.
The Role of Lure Type and Action
A lure’s action depends on how it moves through the water. A tight knot restricts movement. A loop knot allows the lure to swing freely, which changes the action dramatically.
Hard baits like crankbaits, jerkbaits, and topwater poppers benefit from a loop knot. The loose connection lets the front of the lure pivot naturally, which gives it a wider, more erratic wobble. Fish often hit a lure with a wider action more aggressively.
Jigs and soft plastics work better with a tight connection. You want direct contact with the hook to feel the bottom and detect subtle bites. A loop knot here reduces sensitivity and can cause missed hooksets.
Spinnerbaits sit somewhere in the middle. A tight knot works fine, but a small loop can improve the blade’s flash and vibration. Test both and see which produces more strikes in your water.
The 4 Essential Knots Every Angler Must Know
You don’t need to memorize twenty knots. You need four that cover every situation you’ll face on the water. Master these and you can tie on any lure, on any line, in any condition.
Improved Clinch Knot (Best for Beginners)
This is the knot most anglers learn first, and for good reason. It’s simple, reliable, and works well with monofilament and fluorocarbon.
- Thread the line through the hook eye, leaving about six inches of tag end.
- Wrap the tag end around the standing line five times.
- Pass the tag end through the small loop just above the eye.
- Then pass it through the big loop you just created.
- Wet the line and pull the tag end slowly until the coils stack neatly.
- Trim the tag end to about an eighth of an inch.
The improved clinch fails on braid because the slick line slips through the wraps. Stick to mono and fluoro for this knot.
Palomar Knot (Strongest for Braid)
If you fish braided line, this is the knot to use. It’s nearly impossible to tie wrong, and it retains almost 100% of the line’s strength.
- Double about six inches of line and pass the loop through the hook eye.
- Tie a simple overhand knot in the doubled line, but don’t tighten it.
- Pass the hook through the loop you created.
- Pull both the standing line and the tag end to tighten.
- Trim the tag end.
The only downside is that it uses more line, so you’ll lose a bit more when you retie. It’s also awkward with very large lures because the hook needs to pass through the loop.
Uni Knot (Versatile for All Lines)
The uni knot is the workhorse of fly fishing. It works on mono, fluoro, and braid, and it’s also a great choice for connecting leader to tippet.
- Pass the line through the hook eye and double it back, creating a loop.
- Wrap the tag end around the doubled line five or six times.
- Moisten the coils and pull the tag end to seat them.
- Slide the knot down to the eye and pull the standing line tight.
The uni knot creates a slightly larger profile than the clinch, which can matter with tiny flies. But the strength and versatility make it a solid default.
Non-Slip Loop Knot (Best for Hard Baits)
This knot creates a fixed loop that lets your lure swing freely. It’s the difference between a crankbait that wobbles lazily and one that darts side to side.
- Tie a loose overhand knot in the line about six inches from the end.
- Pass the tag end through the hook eye and back through the overhand knot.
- Wrap the tag end around the standing line four or five times.
- Pass the tag end back through the overhand knot.
- Pull the tag end to tighten the wraps, then pull the standing line to close the loop.
The loop should be about a quarter inch long. Any longer and the lure might tangle; any shorter and you lose the free-swinging action.
How to Choose the Right Knot for Your Lure
The table below breaks down the best knot for each lure type and line combination. Use it as a quick reference before you tie on your next fly or lure.
| Lure Type | Best Knot | Line Material | Why It Works |
|---|---|---|---|
| Dry Flies | Improved Clinch | Mono, Fluoro | Small profile, keeps the fly upright |
| Nymphs & Streamers | Uni Knot | All lines | Strong and secure, works with weighted flies |
| Crankbaits | Non-Slip Loop | Mono, Fluoro | Free-swinging action, wider wobble |
| Topwater Poppers | Non-Slip Loop | Mono, Fluoro | Allows the popper to pivot and splash |
| Jigs | Palomar | Braid | Direct contact, high sensitivity |
| Spinnerbaits | Improved Clinch or Uni | Mono, Fluoro, Braid | Secure connection without restricting blade action |
| Soft Plastics | Palomar | Braid | Strongest hold for hooksets through weeds |
This table isn’t law. Conditions change, and sometimes a different knot works better on a particular day. But this gives you a solid starting point.
Step-by-Step: Tying On a Lure in 60 Seconds (Field Method)
Your hands are cold. The wind is blowing. The fish are feeding, and you need to change lures fast. This is where a reliable field method saves you.
Here’s the sequence I use when speed matters:
- Clip the old lure and inspect the last few inches of line for nicks or curls. If it looks damaged, cut back to fresh line.
- Choose your knot based on the lure and line type. For most situations, the uni knot is the fastest to tie blind.
- Thread the line through the eye, leaving a generous tag end—at least six inches.
- Tie the knot without rushing, but don’t obsess over perfection. A clean uni knot with five wraps holds nearly as well as one with seven.
- Wet the knot with saliva or a dip in the water before pulling tight.
- Pull slowly and steadily until the coils seat. Give it one firm final pull to set it.
- Trim the tag end close, but leave enough to prevent the knot from unraveling.
Practice this sequence at home until you can do it without looking. That’s the secret to efficient field changes.
If your hands are shaking or you’re wearing gloves, a tool like the HOOK-EZE nail knot tying tool makes the process far easier. The stainless steel guide holds the line and hook eye in place, so you can wrap the line around the tool without fumbling. It’s a genuine help for older anglers or anyone with arthritis.
Troubleshooting: Why Your Knot Fails and How to Fix It
Knots fail in predictable ways. Each failure mode has a specific cause, and once you know what to look for, you can fix it before it costs you a fish.
Knot slips and comes undone. This usually means the wraps aren’t seated properly. You didn’t pull the tag end hard enough, or you didn’t wet the line before tightening. The fix is to re-tie with more attention to the seating process. For braid, switch to a Palomar knot.
Line breaks at the eye. This is almost always caused by a sharp burr on the hook eye or a knot that was tightened too fast, creating friction damage. Check the eye with your fingernail for rough spots. If you feel one, file it smooth or use a different hook. Slow down your tightening process.
Line curls and kinks near the knot. This happens when you pull the knot tight without wetting it, or when you use too much force. Monofilament and fluorocarbon both suffer from heat damage. Re-tie with a wet knot and pull gently.
Knot breaks at the tag end. You trimmed it too close. The tag end needs to be at least an eighth of an inch long to prevent the knot from unraveling under pressure.
Knot won’t seat cleanly. This is common with thick fluorocarbon. The coils bunch up instead of stacking. The fix is to use more wraps and pull the tag end at a slightly different angle. Sometimes a tiny bit of line twist from a swivel causes the problem. Untwist the line before tying.
Pro Tips for Knot Strength and Longevity
You can tie a perfect knot and still lose fish if you ignore the details. These tips separate anglers who rarely lose lures from those who constantly re-tie.
- Retie after every few casts, especially when fishing around rocks or structure. A knot that’s been rubbed against a rock loses strength even if it looks fine.
- Check the last foot of line for abrasion before each new knot. Run your fingers along it and feel for rough spots or flat sections.
- Use a line conditioner or simply wet your fingers before tightening. Dry line is brittle line.
- Don’t use your teeth to trim the tag end. You’ll create a weak point in the knot. Use a sharp pair of nippers.
- Match the knot to the line’s diameter. A clinch knot with five wraps works for 4X tippet, but you might need six or seven wraps for thicker 0X material.
- When using fluorocarbon, let the knot sit for a few seconds before applying full tension. The material needs time to settle.
One more thing: don’t over-tighten. A knot that’s pulled with maximum force can crush the line fibers and create a weak spot. Pull until the coils are snug, then give it a firm but controlled final pull.
Frequently Asked Questions
What is the strongest knot for tying on a fly?
The Palomar knot is widely considered the strongest for braided line, holding close to 100% of the line’s rated strength. For monofilament and fluorocarbon, the improved clinch knot with five or six wraps is the standard. The non-slip loop knot is slightly weaker but still strong enough for most fishing, and it gives you the action advantage for hard baits.
Should I wet my line before tightening a knot?
Yes, always. Wetting the line reduces friction and heat when the knot tightens. Dry line can weaken by up to 20% from friction damage alone. A quick dip in the water or a lick of the line before pulling tight is the single easiest way to improve knot strength.
How many wraps should I use for a clinch knot?
For monofilament, five wraps is standard. For fluorocarbon, which is stiffer and more slippery, use six or seven wraps. For braid, avoid the clinch knot entirely and use a Palomar or uni knot instead. The number of wraps also depends on line diameter—thicker line benefits from an extra wrap.
Why does my knot keep slipping on braided line?
Braided line is slick and doesn’t create the same friction as monofilament. The improved clinch knot relies on friction, so it slips. Switch to a Palomar knot or a uni knot with at least six wraps. Both create a more secure grip on the slick surface of braid.
Can I use the same knot for all my lures?
You can, but you’ll sacrifice performance. A tight knot like the clinch works for everything, but it restricts the action of crankbaits and topwater lures. A loop knot gives those lures the free-swinging motion they need, but it reduces sensitivity for jigs and soft plastics. Learn at least three knots and match them to the lure.
Final Cast: Practice These Knots Before Your Next Trip
Knot tying is a skill, and like any skill, it degrades with disuse. Spend fifteen minutes at the kitchen table tonight tying each of the four knots on a practice hook. Do it until you can tie them without looking at your hands.
- Use the improved clinch for mono and fluoro on most flies and lures.
- Switch to the Palomar for braid, especially when fishing heavy cover.
- Try the uni knot when you need a versatile option that works on everything.
- Choose the non-slip loop knot for crankbaits, poppers, and any lure that needs a wide action.
- Always wet the line before tightening—this one habit prevents most knot failures.
- Inspect your line and knot before every cast. Ten seconds of checking saves ten minutes of re-tying.
- Keep a knot-tying tool like the HOOK-EZE combo clipped to your vest for quick, reliable knots in any condition.
The fish don’t care how expensive your rod is or how realistic your fly looks. They care about the presentation. A secure knot that delivers your lure with the right action is the foundation of every successful cast. Master these knots, and you’ll spend less time re-tying and more time fighting fish.