You’ve probably been there. You tie on a new crankbait, make a perfect cast along a weed line, and feel that heavy thump. You set the hook, the rod loads up, and then the line goes slack. The lure is gone. More often than not, the culprit isn’t the fish or the line. It’s the knot. A knot that slipped, cinched down wrong, or simply wasn’t the right one for the material you were using.
This guide covers the practical side of how to tie a bass fishing lure so it holds when it matters. You’ll learn the four knots that cover nearly every bass fishing situation, how to match them to braided line, fluorocarbon, and monofilament, and a simple 5-second test to verify your work before every cast. We’ll also get into the snap versus direct tie debate and a retie schedule based on what you’re throwing and where you’re throwing it.

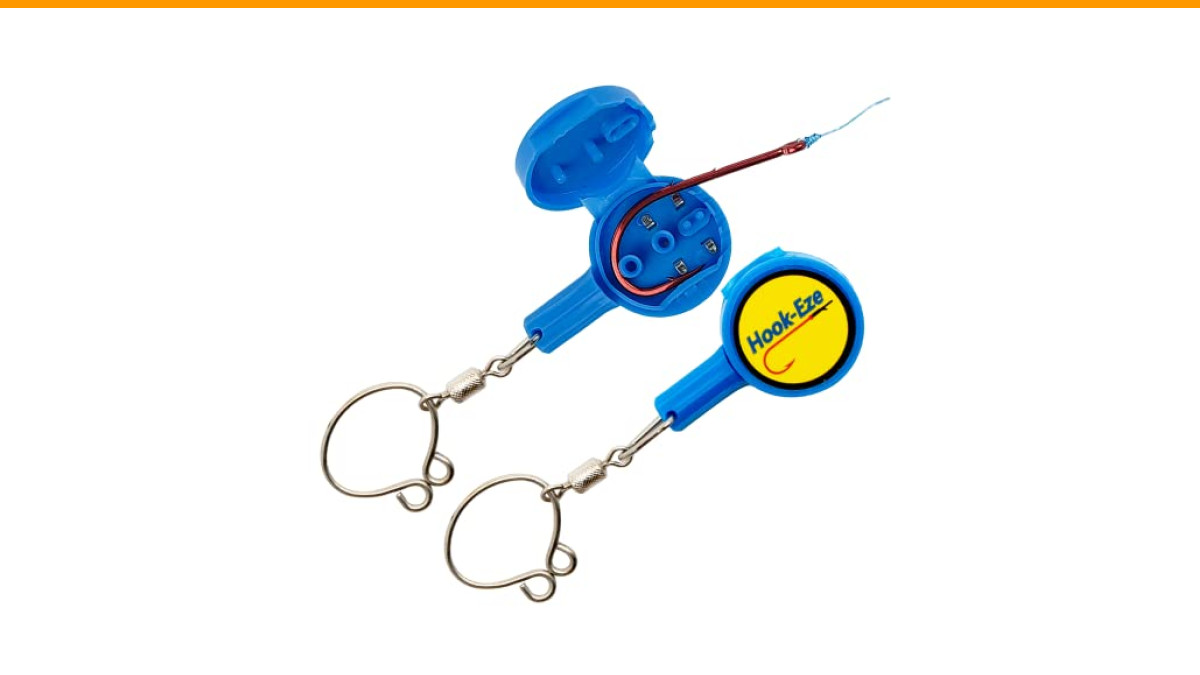
HOOK-EZE
HOOK-EZE 2X Fishing Knot Tying Tool, Standard Size - Safety Device & Line Cutter - Multifunctional Fishing Accessories - Covers Fully Rigged Hooks - Blue
- Everybody Can Tie Their Own Tackle Safely: Prevent fish hook injuries by covering the sharp barb on the fishing hook when tying fi…
- Ideal For Tying A Variety of Fishing Tackle: Suitable for fishing hooks sized from a standard 4/0 down to the smallest hook size #…
- Suitable for Anglers of All Ages and Experience: Perfect for fishermen with dexterity issues such as arthritis as well as young be…
If you have dexterity issues, cold hands, or just want a faster way to tie in low light, a tool like the HOOK-EZE 2X Fishing Knot Tying Tool can take the frustration out of the process. It covers the hook barb while you work, so you don’t stab yourself, and it includes a line cutter for trimming tags.
Why Knot Choice Matters More Than Lure Color
Lure color catches fishermen. Knots catch fish. A bass doesn’t care if your crankbait is chartreuse or shad-colored, but it cares a lot if your line snaps on the hookset. The knot is the weakest link in your entire setup, and it’s the only part you have complete control over.
Knot strength isn’t just about the number on the package. A knot that holds 95% of line strength on a dry, cold day might fail at 70% if it wasn’t lubricated properly. More importantly, different line materials behave differently under pressure. Braid is slick and can slip on itself. Fluorocarbon is stiff and can push a knot open. Monofilament has stretch and memory that can work against you.
Most anglers use one knot for everything. That’s a mistake. The knot that works perfectly for a flipping jig on 65-pound braid is the wrong choice for a finesse worm on 8-pound fluorocarbon. Matching the knot to the material and the lure action is what separates anglers who lose lures from those who don’t.
The 4 Knots Every Bass Angler Must Master
You don’t need a dozen knots. You need four, and you need to be able to tie them without thinking. These cover every scenario from heavy cover flipping to finesse fishing.
Palomar Knot (Best for Braid)
The Palomar is the strongest knot for braided line, period. It’s also one of the easiest to tie, which is a rare combination. The double line through the eye acts as a cushion against the abrasive nature of braid. I’ve seen this knot hold on 50-pound braid when a fish wraps around a stump and the line is screaming off the reel.
It’s not perfect for everything. The Palomar is bulky, and it can be tough to get through the small eyes on some crankbaits. But for jigs, Texas rigs, and spinnerbaits on braid, it’s my go-to.
Improved Clinch Knot (Best for Mono/Fluoro)
This is the classic knot that most of us learned as kids. It’s reliable on monofilament and fluorocarbon, provided you tie it correctly. The key is the extra turn through the loop and making sure the coils lay neatly against each other. A sloppy Improved Clinch with crossed coils will fail at half strength.
One thing to watch: on heavy fluorocarbon (20-pound and up), the Improved Clinch can slip under a hard hookset. The line is too stiff to grip itself effectively. For heavy fluoro, you’re better off with a Palomar or a uni knot.
Non-Slip Loop Knot (Best for Action Lures)
Walk the dog with a topwater. Swim a jerkbait. Crank a squarebill through rocks. All of these lures have a built-in action that gets muted when you tie directly to the eye. A non-slip loop knot, like the Rapala knot, leaves a small loop that lets the lure pivot freely. That freedom translates to wider wobbles and a more erratic, natural presentation.
The trade-off is strength. A loop knot uses fewer wraps and creates a hinge point. It’s not the knot for heavy cover or big fish around thick vegetation. Save it for open water and lighter line.
Uni Knot (Best for Snaps and Swivels)
The uni knot is a workhorse. It’s a sliding knot that can be tied to a snap, a swivel, or directly to a lure. It’s also the easiest knot to tie when your hands are cold or wet because the cinch-down is forgiving. You can tie it with a few extra wraps for more security on lighter line, or fewer wraps for speed.
I use the uni knot almost exclusively when I’m attaching a snap. It cinches down tight against the snap’s eye and doesn’t slip, even with braided line. It’s not the sleekest knot, but it’s reliable.
Matching the Knot to Your Line Type and Lure
Here’s the decision matrix I use on the water. It’s simple, and it’s based on years of losing lures to learn what fails.
| Line Type | Best Knot | Why It Works | When to Avoid |
|---|---|---|---|
| Braided Line | Palomar | Double line grips slick braid; retains high knot strength | Small-eyed lures; bulky knot won’t pass through |
| Monofilament | Improved Clinch | Stretchy mono cinches down tight and grips well | Heavy mono (20lb+) where it can slip |
| Fluorocarbon | Palomar or Uni | Stiff fluoro needs a knot that grips itself; these do | Improved Clinch on heavy fluoro |
| Topwater / Jerkbait | Non-Slip Loop | Preserves lure action; allows free pivot | Heavy cover; loop is a weak point |
| Snap / Swivel | Uni | Slides down tight; secure on metal eyes | None, it’s the best all-around for this |
This table is a starting point. The conditions change things. If you’re flipping heavy grass with 65-pound braid, the Palomar is the only choice. If you’re throwing a finesse worm on 8-pound fluoro, a small Palomar works, but the uni knot might be easier to tie with small line.
Step-by-Step: Tying Each Knot Without Fumbling
Speed comes from repetition, not from rushing. Here’s how to tie each one cleanly, every time.
Palomar Knot
- Double about 6 inches of line and pass the loop through the hook eye.
- Tie a loose overhand knot with the doubled line, leaving the hook hanging.
- Pass the loop (the hook end) over the hook itself.
- Pull the tag end and the standing line in opposite directions to cinch down.
- Trim the tag end to about 1/8 inch.
The trick is to moisten the knot before cinching it tight. A dry knot generates friction that can weaken the line, especially with braid.
Improved Clinch Knot
- Pass the line through the hook eye and leave about 6 inches of tag.
- Wrap the tag end around the standing line 5 to 7 times.
- Pass the tag end through the small loop right above the eye.
- Then pass the tag end through the big loop you just created.
- Pull the tag end to snug the wraps down, then pull the standing line to seat it.
Make sure the wraps don’t overlap each other. They should sit side by side like a spring. If they bunch up, the knot will slip.
Non-Slip Loop Knot
- Tie a loose overhand knot in the line about 8 inches from the end.
- Pass the tag end through the hook eye and back through the overhand knot.
- Wrap the tag end around the standing line 4 to 5 times.
- Pass the tag end back through the overhand knot, going the opposite way.
- Pull the standing line to tighten, leaving a small loop above the eye.
You want the loop to be about a quarter-inch long. Too big, and it looks sloppy. Too small, and it restricts the lure’s movement.
Uni Knot
- Pass the line through the hook eye and double back, forming a loop.
- Make 5 to 6 wraps with the tag end around the doubled line.
- Moisten and pull the tag end to tighten the wraps.
- Slide the knot down to the eye, then pull the standing line to seat it.
The uni knot takes a bit of practice to get the wraps to lay evenly. Once you get it, it’s fast and secure.
The 5-Second Pull Test: Verify Your Knot Before Casting
Tying a knot is only half the job. You have to verify it’s going to hold under the pressure of a hookset. This is the step most anglers skip, and it’s the reason they lose lures on the first cast.
After you cinch the knot down, grab the hook or lure with one hand and the line with the other. Give it a sharp, hard pull — as hard as you would when setting the hook on a 5-pound bass. If the knot slips, it will visibly move or the line will slide through the eye. If it holds, you’re good to go.
This test takes five seconds. It’s not about pulling until something breaks. It’s about making sure the knot is seated properly and isn’t going to slip under load. A knot that passes this test is a knot you can trust. A knot that fails is a lure you just saved from the bottom of the lake.
Do this for every lure, every time. It becomes a habit, and it’s the single best way to prevent knot failure.
Common Mistakes That Snap Lines (And How to Fix Them)
Most knot failures aren’t random. They’re caused by specific, avoidable mistakes.
- Not wetting the line. Dry line creates friction when you cinch the knot, which generates heat and weakens the line. Always moisten with saliva or water before pulling tight.
- Rushing the cinch. Pulling the knot tight too fast can cause the wraps to jump and cross. Pull slowly and steadily to let the knot seat properly.
- Leaving a long tag end. A long tag can catch on the rod guides or pick up weeds, creating drag that can pull the knot loose. Trim it to 1/8 inch.
- Using the wrong knot for the line. Tying an Improved Clinch with heavy braid is a recipe for failure. Braid is too slick and will slip through the wraps.
- Not checking for nicks. After a day of fishing, check the last few feet of line for abrasions. A nick in the line, right above the knot, is a break waiting to happen.
Snap vs. Direct Tie: When to Use Each
The snap versus direct tie argument is older than most bass boats. Both have a place, and the right choice depends on the lure and the situation.
A snap lets you change lures in seconds without retying. That’s a huge advantage when the fish are keying in on a specific color or action and you need to cycle through options quickly. It also adds a bit of weight and flash, which can trigger reaction strikes on spinnerbaits or crankbaits.
But a snap changes the action of some lures. A suspending jerkbait, for example, relies on a specific balance point. The extra weight of a snap can make it sink instead of suspend. A topwater popper might lose its subtle “spit” because the snap alters the angle of the pull.
My rule of thumb is simple. Use a snap for moving baits — crankbaits, spinnerbaits, chatterbaits — where you’re changing lures often and the action is aggressive enough to mask the snap’s presence. Tie directly for finesse baits, topwater, and any lure where a subtle presentation is critical. A direct tie also gives you better feel for bottom contact when fishing a jig or a Texas rig.
Retie Frequency: How Often Is Too Often?
Your knot doesn’t last forever. It degrades with every cast, every hit, and every time it rubs against cover. The question is how often you should retie.
For flipping and pitching heavy cover, retie after every fish, and inspect your knot after every few casts. The line is grinding against wood, grass, and rocks, and the knot takes the brunt of that abuse. One bad hookset on a frayed knot is all it takes to lose a big fish.
For cranking rocks or fishing around docks, retie every 15 to 20 minutes. The constant abrasion weakens the line right above the knot. If you feel a “tick” when you’re reeling, that’s your line hitting something hard. Retie immediately.
For open-water fishing with topwater or jerkbaits, you can go longer. Retie every hour or so, or whenever you switch lures. The line isn’t taking the same abuse, but the constant casting and retrieving still stresses the knot.
Here’s a practical schedule I follow:
- Heavy cover (grass, wood, rocks): Retie after every fish, inspect every 5 casts.
- Moderate cover (docks, scattered rocks): Retie every 20 minutes.
- Open water (topwater, jerkbaits): Retie every hour or on lure change.
- After any backlash: Cut the line and retie. A backlash can create a weak spot that will snap under pressure.
Retying isn’t a waste of time. It’s insurance against losing a $10 lure and the fish of the day.
Knot Tying in Bad Conditions (Wind, Cold, Low Light)
Fishing rarely happens in perfect conditions. You’ll tie knots in the dark, in the wind, with numb fingers. You need a strategy for these situations.
First, slow down. The urge to rush when your hands are cold is strong, but it leads to mistakes. Take a breath, get the line in a comfortable position, and focus on the steps.
Second, shorten your line. A long tag end is harder to manage in the wind. Keep the tag end to about 4 inches, and you’ll have less line flapping around.
Third, use a tool. A knot tying tool like the HOOK-EZE is designed for exactly these moments. It covers the hook barb so you don’t stab yourself when your grip is weak, and it holds the hook steady while you work. The built-in line cutter also saves you from fumbling for a separate tool in the dark. It’s not a crutch — it’s a way to tie a reliable knot when your hands are shaking from cold.
Practice tying knots in bad conditions at home. Tie a knot with your eyes closed. Tie one with gloves on. Tie one in the yard when it’s windy. The more you practice under stress, the more automatic it becomes on the water.
Pro Tips for Perfect Knots Every Time
These are the small things that make a big difference in knot reliability.
- Use a quality line clipper. A dull knife or your teeth can leave a jagged edge that weakens the knot. A sharp blade cuts clean.
- Pull the tag end, not the standing line, to cinch most knots. This seats the wraps evenly.
- Check the knot after a few casts. A knot can loosen slightly after repeated casting stress. A quick re-tighten can prevent a failure.
- Match the hook eye size. A knot tied to a tiny eye with thick line is a weak point. If the line looks too thick for the eye, use a snap or a smaller-diameter line.
- Don’t over-tighten. Pulling a knot with all your strength can damage the line, especially with fluorocarbon. Pull until it’s snug, then give it one firm, final pull.
Frequently Asked Questions
What is the strongest knot for braided line?
The Palomar knot is the strongest and most reliable knot for braided line. The double line through the hook eye grips the slick braid better than any other knot, and it retains a high percentage of the line’s breaking strength. It’s also simple to tie, which reduces the chance of error.
Should I wet my line before tightening a knot?
Yes, always. Wetting the line with saliva or water lubricates it, reducing friction as the knot cinches down. This prevents heat buildup that can weaken the line and allows the wraps to seat smoothly. This is especially important for braided and fluorocarbon lines.
How can I tie a fishing knot with cold or wet hands?
Use a knot tying tool. A tool like the HOOK-EZE covers the hook barb and holds it steady, so you don’t need as much fine motor control. You can also practice tying knots with gloves on at home to build muscle memory. The key is to slow down and not rush the process.
Is a loop knot better than a direct tie for crankbaits?
For most crankbaits, yes. A non-slip loop knot allows the lure to pivot freely, which maximizes its wobble and action. A direct tie restricts that movement and can mute the lure’s action. The exception is when you’re fishing heavy cover and need maximum knot strength; then a direct Palomar is safer.
How often should I re-tie my lure?
It depends on the cover and lure type. For heavy cover, retie after every fish. For moderate cover, retie every 20 minutes. For open water, retie every hour or when you change lures. Always retie after a backlash, because the line can be weakened.
Final Cast: Your Knot Checklist
You don’t need to overthink this. The information above is a system, not a set of random tips. Here’s the checklist I run through every time I tie on a lure.
- Choose the right knot for the line type and lure action. Palomar for braid, Improved Clinch for light mono, Uni for snaps.
- Moisten the line before cinching. Every time.
- Pull the knot tight slowly and steadily, making sure the wraps lay flat.
- Trim the tag end to 1/8 inch with a sharp cutter.
- Perform the 5-second pull test. Hard.
- Retie on a schedule based on the cover you’re fishing.
- Inspect your knot and line for nicks after every few casts.
Follow that list, and you’ll stop losing lures to bad knots. The fish will still win sometimes, but it won’t be because of your tie.