You buy a new baitcaster, spool it up in a hurry, and the first cast turns into a nest of line that looks like a bird built a home in your reel. It happens to everyone. The problem rarely sits with the rod or the reel. It sits with how the line went on the spool in the first place.
This guide walks through the full process of stringing a baitcasting rod, from backing tape to the final knot on your lure. You’ll learn why line tension matters, how to fix uneven line lay, and what to do when the line digs into itself on the spool. By the time you finish, you’ll know exactly what to do before your next cast.

Beyond Braid
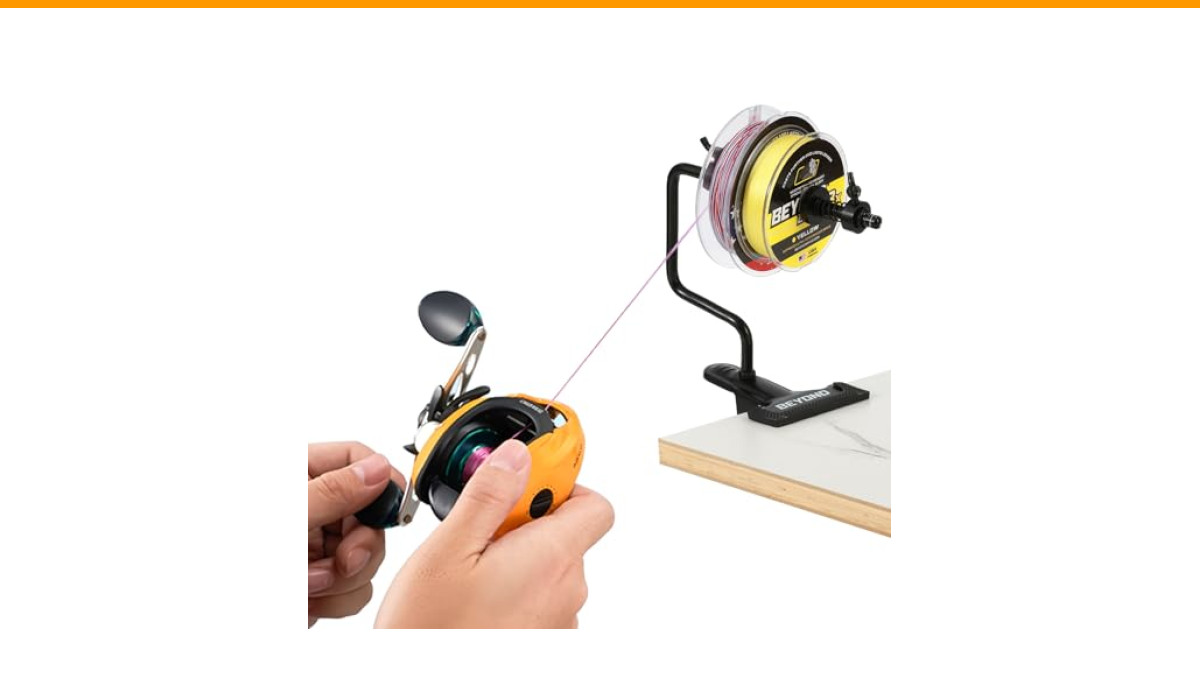
Beyond Braid EZ Fishing Line Spooler
- TABLE MOUNTING CLIP/PORTABLE - Our fishing line spooler features a heavy duty non slip clip at the base that fits nearly every kin…
- SPOOL UP TIGHT IN SECONDS - Switch out your line fast without the mess. Loading up fresh braid or mono tightly onto your reel, thi…
- FITS MOST SIZE SPOOLS- Will fit almost every type of fishing line spool from small to large. Ideal for spooling up with 100yd, 150…
If you’re tired of wrestling with a bucket and a pencil while trying to spool fresh line, a tool like the Beyond Braid EZ Fishing Line Spooler takes the two-person hassle out of the job. It clamps to a table or rod and holds the filler spool steady so you can focus on tension and line lay instead of chasing a rolling spool across the garage floor.
Why Proper Spooling Matters for Baitcasters
Baitcasting reels differ from spinning reels in one critical way: the spool itself spins during the cast. That spinning spool creates inertia. If the spool spins faster than the line leaves the rod tip, the line piles up into a backlash. It’s physics, not bad luck.
Line lay dictates how the line leaves the spool. A spool filled evenly with tight, level line lets the line peel off smoothly. A spool filled unevenly—with lumps, valleys, or loose loops—creates friction and erratic release. That’s where backlashes come from.
Spooling a baitcaster correctly also prevents line memory. Monofilament and fluorocarbon hold the shape of the spool. If you spool them with too little tension, they coil up and cause wind knots. If you spool them too tight, you stretch the line and weaken it. There’s a sweet spot, and this guide shows you how to find it.
Tools and Materials You Need Before Starting
Gather everything before you touch the reel. Running back and forth mid-spooling is how mistakes happen.
- Your baitcasting rod and reel
- Fresh line (braided, monofilament, or fluorocarbon)
- Scissors or line cutters
- Electrical tape or backing tape (for braided line)
- A damp rag or paper towel
- A line spooler or a pencil and a friend
- A small screwdriver for spool tension adjustments
One note on line choice: braided line has zero stretch and fantastic sensitivity, but it slips on the spool if you don’t use backing. Monofilament stretches and holds knots well but suffers from memory. Fluorocarbon sinks fast and resists abrasion but is stiff and needs extra tension when spooling. Match the line to your fishing style, not just the rod rating.
Step 1: Preparing the Reel Spool (Backing and Tension)
Start with a clean, dry spool. Remove any old line completely. Check the spool for nicks or burrs—those catch line and cause weak spots.
If you’re using braided line, apply two or three wraps of electrical tape around the bare spool before adding line. Braid is slick. Without tape or a monofilament backing, the braid spins freely on the spool when a fish makes a hard run. That free-spinning braid ruins your drag and costs you the fish.
Alternatively, fill the spool about one-third full with monofilament, then tie on your braid with a double uni knot. The mono grips the spool, and the braid grips the mono. This method adds a little stretch to an otherwise zero-stretch setup, which helps when fighting big fish.
Set the spool tension knob before you add line. Turn it until the spool has a slight side-to-side wobble, then tighten it until the wobble disappears. This gives you a baseline. You’ll fine-tune it after the line is on.
Step 2: Threading the Line Through the Rod Guides
Run the line through each guide, starting at the tip and working down toward the reel. Most anglers do this backward, but starting at the tip prevents the line from twisting around the rod blank.
Open the reel’s levelwind or bail, then pass the line through the rod guides one at a time. Keep the line tight as you go. Loose line during this step creates tangles before you even start spooling.
Check that the line sits inside every guide insert, not on the frame. A line running over a guide frame wears down quickly and snaps at the worst moment.
Step 3: Securing the Line to the Spool (Arbor Knot)
The arbor knot is the standard for attaching line to a baitcaster spool. It’s simple, strong, and doesn’t slip under load.
- Wrap the line around the spool once.
- Tie an overhand knot in the tag end, leaving about six inches of tag.
- Tie a second overhand knot in the tag end, about two inches from the first.
- Pull the main line tight so the two knots slide together against the spool.
- Trim the tag end close to the knot.
Test the knot by pulling hard on the main line. If it slips, retie it. A slipping arbor knot means your line spins on the spool, and you’ll discover it when a big fish runs.
For braided line, some anglers prefer the Palomar knot to the spool because it grips better. Both work. The arbor knot is faster; the Palomar is stronger. Pick one and practice it until it’s automatic.
Step 4: Spooling with Correct Tension and Line Lay
This is where most people mess up. They crank the reel handle and hope for the best. The result is a spool with a mountain in the middle or a valley on each side.
Apply firm, consistent pressure with your thumb and index finger on the line just ahead of the reel. The line should feel snug but not stretched. You’re looking for the line to lay flat, level, and tight against the spool.
Keep the filler spool flat, with the label facing up. This matters more than most people realize. If the label faces down, the line comes off the filler spool with a twist. That twist transfers to your reel spool and causes wind knots on the cast.
Fill the spool until the line sits about 1/8 inch below the spool’s outer edge. Overfilling causes line to catch on the frame and backlash. Underfilling reduces casting distance because the line has more friction leaving the spool.
How to Fix Uneven Line Lay (Convex vs. Concave)
Look at your spool after filling. A flat, even surface is the goal. Anything else needs correction.
Convex (bulging in the middle): The line piles up in the center. This happens when line tension is too low, or the levelwind moves faster than the line builds. Fix it by increasing thumb pressure and re-spooling. If the reel has adjustable levelwind tension, tighten it slightly.
Concave (dips in the middle): The line builds up at the edges. This happens with too much tension or a levelwind that moves too slowly. Reduce thumb pressure and re-spool. Loosen the levelwind tension if your reel allows it.
Uneven (one side higher): The line piles on one side. This indicates the levelwind isn’t traveling the full width of the spool, or the line is coming off the filler spool at an angle. Reposition the filler spool so the line feeds straight into the levelwind.
Each fix requires stripping the line and starting over. It’s tedious, but a bad line lay will cause backlashes all day. Spend the ten minutes now to save hours of picking birdsnests later.
Step 5: Final Knots and Terminal Tackle Setup
Once the spool is full, tie on your terminal tackle. For most applications, the Palomar knot is the best choice for braid and fluorocarbon. It retains nearly 100% knot strength and is easy to tie in low light.
For monofilament, a improved clinch knot works well. Wet the knot before cinching it down. Dry knots generate heat from friction, which weakens the line.
After tying, test the drag system. Set the drag to about one-third of the line’s breaking strength. Pull line off the reel against the drag to confirm it runs smooth. If it stutters, the line might be digging into itself—a sign of overfilling or poor line lay.
Adjust the brake settings and spool tension knob for the lure you’re throwing. A heavy lure needs less tension; a light lure needs more. Start with the brakes at 70% and dial back as you get comfortable.
Common Spooling Mistakes and How to Fix Them
| Problem | Cause | Fix |
|---|---|---|
| Birdsnest on first cast | Spool overfilled or line lay uneven | Strip line, re-spool with even tension, leave 1/8 inch gap at spool edge |
| Loose loops on spool | Insufficient tension during spooling | Re-spool with more thumb pressure; check filler spool orientation |
| Line digs into itself | Line too loose or spool overfilled | Re-spool tighter; reduce line capacity; use backing tape for braid |
| Wind knots on cast | Line twist from filler spool label facing down | Flip filler spool so label faces up; strip and re-spool |
| Line slips on spool | Braid without backing tape or mono backing | Add electrical tape or mono backing before spooling braid |
One more thing to watch: line capacity. Check your reel’s specs and match the line diameter to the spool capacity. A 150-yard spool of 30-pound braid fits differently than a 150-yard spool of 50-pound braid. If you’re unsure, check the current price and specs on Amazon for your reel model.
Pro Tips for Line Maintenance and Storage
Fresh line loses performance over time, especially monofilament and fluorocarbon. UV light and heat break down the polymers. Store your reels out of direct sunlight when not in use.
Check the first few feet of line before every trip. That’s the section that rubs against rocks, docks, and fish teeth. If it feels rough or frayed, cut it off and retie your terminal tackle.
For braided line, flip the line on the spool halfway through the season. The line near the spool arbor rarely sees use, while the outer layers wear out. Re-spooling with the line reversed doubles the life of your braid.
Line conditioner helps with monofilament memory. Apply it before spooling and let it dry. It softens the line and reduces coiling. It’s not a replacement for proper tension, but it helps.
Finally, keep a spare spool of line in your tackle bag. A birdsnest that can’t be untangled isn’t the end of the trip if you have backup line and a spooling tool.
Frequently Asked Questions
How tight should the line be when spooling a baitcaster?
The line should feel snug but not stretched. You want enough tension to lay the line flat against the spool without deforming it. A good test: run your thumb over the spool after filling. It should feel smooth and level, with no soft spots or bumps.
Does the filler spool label need to face up or down?
Face the label up. This lets the line come off the filler spool in the same direction it goes onto the reel spool. Facing it down introduces a twist that causes wind knots on the cast. This applies to monofilament, fluorocarbon, and braid alike.
How much line should I put on a baitcasting reel?
Fill the spool until the line sits about 1/8 inch below the outer edge. Overfilling causes the line to catch on the frame and backlash. Underfilling reduces casting distance because the line has more friction leaving the spool. Check your reel’s line capacity rating for the specific line diameter you’re using.
Why does my braided line slip on the spool?
Braided line is slick and has no stretch. Without backing, it can spin freely on the spool under load. Fix this by wrapping electrical tape around the bare spool before spooling, or by filling the spool one-third with monofilament first and tying the braid to it.
Can I fix uneven line lay without stripping the line?
No. Uneven line lay means the line is already wound incorrectly. You have to strip it and re-spool with proper tension. Trying to fix it by casting or adjusting the brakes won’t work. The line will continue to build up in the same spots.
What to Remember Next Time You Spool Up
- Use backing tape or mono for braid to prevent slippage.
- Keep the filler spool label facing up to avoid line twist.
- Apply firm, consistent thumb pressure while spooling.
- Stop filling at 1/8 inch below the spool edge.
- Check line lay after filling; fix any convex, concave, or uneven spots immediately.
- Match line weight to lure weight, not just rod ratings.
- Store reels out of sunlight and inspect the first few feet of line before each trip.
Spooling a baitcaster correctly takes about fifteen minutes the first time. It takes five once you’ve done it a few times. The payoff is fewer backlashes, longer casts, and more confidence in your gear. That’s worth the extra effort.