
Why Braid Demands a Different Spooling Approach Than Mono
You bought a nice baitcaster and a spool of 30-pound braid. You got home, filled the reel, and headed to the pond. First cast: a massive backlash that took ten minutes to untangle. Second cast: another one. The problem isn’t your thumb. It’s how you spooled the reel.
Monofilament has memory. It coils off the spool in the same shape it was stored. Braided line has zero memory, which is great for casting distance but terrible for sloppy spooling. If you lay braid onto the reel spool with uneven tension or loose wraps, the line buries into itself on the retrieve. Then it digs in on the next cast, and you get a backlash that looks like a bird’s nest.

Beyond Braid
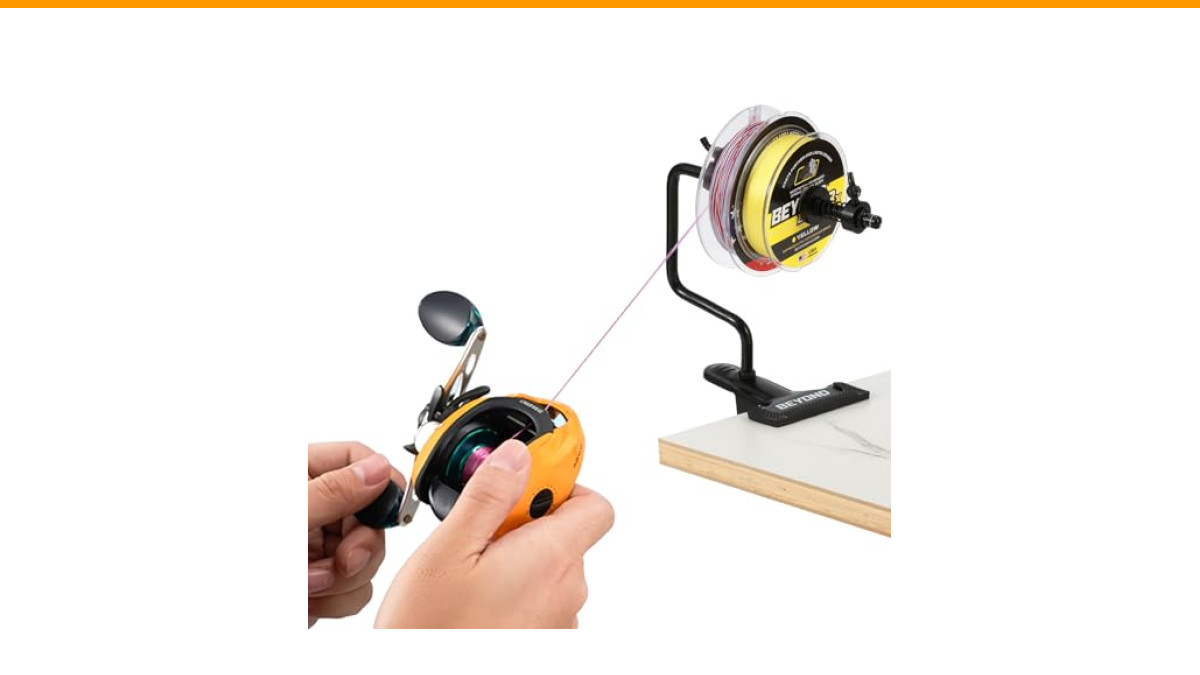
Beyond Braid EZ Fishing Line Spooler | Portable table-mounted spooler for spinning and baitcasting reels
- TABLE MOUNTING CLIP/PORTABLE - Our fishing line spooler features a heavy duty non slip clip at the base that fits nearly every kin…
- SPOOL UP TIGHT IN SECONDS - Switch out your line fast without the mess. Loading up fresh braid or mono tightly onto your reel, thi…
- FITS MOST SIZE SPOOLS- Will fit almost every type of fishing line spool from small to large. Ideal for spooling up with 100yd, 150…
This guide covers the exact process I use for every baitcaster I own. You’ll learn why each step matters, what tools actually help, and how to fix the common mistakes that cause wind knots and line twist. I’ve tested these methods on freshwater bass rigs and saltwater setups. They work.
If you’re tired of fighting with a pencil and a bucket of water, a dedicated tool like the Beyond Braid EZ Fishing Line Spooler removes most of the guesswork. It clamps to a table and holds the line spool under tension so you can focus on the reel, not on keeping the spool from spinning wild.
Tools You Need for a Flawless Spool Job
You don’t need a garage full of gear. But a few specific items make the difference between a smooth spool and a frustrating one.
- Line spooler or winder: A simple tool that holds the bulk spool and applies drag. The Beyond Braid spooler fits spools from 100 yards up to 2026 yards, which covers nearly everything you’ll buy.
- Electrical tape: For standard spools that aren’t braid-ready. You’ll wrap the arbor to prevent the braid from slipping.
- Mono backing line: Old 10- or 12-pound mono works fine. It saves expensive braid and gives the braid something to bite into.
- Scissors or line cutters: Sharp blades make clean cuts. Dull ones crush the line.
- A damp cloth: Run the braid through it while spooling. This adds slight friction and keeps the line cool.
- Line conditioner: Optional but useful. A product like Reel Magic or KVD Line & Lure reduces friction and helps prevent wind knots.
One thing I skip: the bucket of water. Some anglers swear by soaking the bulk spool. It works for mono, but braid doesn’t absorb water. It just makes a mess. A wet cloth gives you the same tension control without the splash.
Step 1: Prepare the Reel and Rod Assembly
Start with a clean reel. Remove any old line completely. Check the spool for corrosion or rough edges, especially if you fish saltwater. A burr on the spool lip will fray braid in a single cast.
Mount the reel on your rod before spooling. Here’s why: the line must pass through the rod guides in the same path it will travel during casting. If you spool with the reel off the rod, the line enters the level wind at a different angle. That angle change creates line twist that shows up later as wind knots.
Thread the line through the rod guides from the tip down to the reel. Open the bail (or release the level wind on a baitcaster) and tie your line to the spool. This setup takes two minutes and saves you from re-spooling after your first trip.
Step 2: Decide on Backing—Mono, Tape, or Braid-Ready?
Braid is slippery. On a smooth metal or graphite spool, it can slip under load, especially when you set the hook on a big fish. The reel spool turns, but the line doesn’t. That’s called spool slippage, and it ruins your day.
Some reels come with a braid-ready spool. These have rubber inserts or a textured surface that grips the braid. If your reel has this, you can tie braid directly to the spool with an arbor knot. No backing needed.
Most reels under $200 don’t have braid-ready spools. You have two options: mono backing or electrical tape.
When to Use Mono Backing vs. Electrical Tape
Mono backing is the traditional choice. Fill the spool about one-third full with mono, then tie the braid to the mono with an Albright or double-uni knot. The mono grips the spool naturally because it has stretch and memory. This method adds a few yards of stretch to your setup, which can help absorb shock on hooksets.
Electrical tape is faster. Wrap two or three layers of tape around the spool arbor, covering the entire surface where the line will sit. Then tie the braid directly to the spool. The tape gives the braid something to grip. This method is lighter and lets you put more braid on the reel.
My preference: tape for freshwater bass reels, mono for saltwater or any reel that might see a 30-pound fish. The extra stretch of mono backing acts as a shock absorber when a big fish makes a sudden run. Tape doesn’t provide that.
Step 3: Tie the Perfect Arbor Knot to the Spool
If you’re tying braid directly to the spool, use an arbor knot. It’s simple and holds well on braid.
- Wrap the line around the spool arbor once.
- Tie an overhand knot in the tag end, leaving a 4-inch tail.
- Tie a second overhand knot in the main line, about 2 inches above the first.
- Pull the tag end to snug the first knot against the spool, then pull the main line to seat the second knot against the first.
- Trim the tag end close.
The double knot creates a cinch that won’t slip. Test it by pulling hard on the line. If it moves, redo it. A slipping arbor knot is the number one cause of spool slippage, and it’s completely avoidable.
Step 4: Thread Through the Level Wind and Rod Guides
Run the line through the level wind eye, then through each rod guide from the tip down. Make sure the line sits in the guides properly, not wrapped around the rod blank. This is the same path the line takes on a cast, so it must be identical during spooling.
Close the level wind or engage the reel. You want the line to lay evenly across the spool as it fills. If the level wind is disengaged, the line piles up in one spot, and you get an uneven spool that causes casting problems.
Step 5: Maintain Constant Tension (The #1 Secret)
Here’s the truth: loose line on the spool is the root cause of most wind knots and backlashes. When braid sits loose, the top layers shift during the cast. The line leaves the spool in a clump, not a smooth flow. That clump hits the rod guides and forms a knot.
You need steady, firm tension while spooling. Not so tight you stretch the line, but enough that the line lays flat against the spool with no gaps. I aim for the tension you’d feel when reeling a medium-sized crankbait through a slow retrieve.
Use your thumb and forefinger to pinch the line just ahead of the reel. This creates friction. Run the line through a damp cloth for extra drag. Keep the pressure constant. If you let up for even a second, you’ll get a loose wrap that becomes a problem later.
Using a Line Winder or Drill for Speed
Hand spooling works, but it’s slow. A line winder or a drill attachment speeds things up dramatically. The Beyond Braid spooler holds the bulk spool under tension while you crank the reel handle. No second person needed.
If you’re using a drill, go slow. Set the drill to a low speed, around 200 RPM. Fast spinning creates heat, and heat damages braid. It also makes it hard to control tension. A drill is great for filling the spool quickly, but you must keep your thumb on the line to maintain pressure.
The trade-off: a drill can overfill the spool fast. You’ll be halfway through the bulk spool in thirty seconds. Keep the drill steady and check the fill level every few seconds.
Step 6: Fill to the Optimal Level—Don’t Guess
Overfilling a baitcaster is the fastest way to create backlashes. The line should sit about 1/16 of an inch below the spool lip. That’s roughly the thickness of a credit card. If the line is flush with the lip or above it, the line will overrun on the cast. The result is a backlash on every single cast.
Underfilling is also a problem. If the line sits too low, it creates more friction as it leaves the spool, reducing casting distance. You’ll also have less line capacity, which matters if a big fish runs deep.
The 1/16-inch rule applies to braid specifically. Braid is thinner than mono of the same test, so you can fit more of it. A reel rated for 150 yards of 12-pound mono will hold roughly 200 yards of 30-pound braid.
Step 7: Set the Brakes and Test for Wind Knots
After spooling, set the reel’s brake system before your first cast. Start with the brakes at 70-80% of maximum. This is more than you’ll need for distance, but it prevents the initial backlash while you test the spool.
Make a few practice casts in an open area. Watch the line as it leaves the spool. If you see loops or the line fluffs up, you have a tension problem. Re-spool with more pressure.
Check for wind knots by running your hand along the line from the reel to the tip. Any small loop or twist will catch your fingers. A single wind knot can ruin a fishing trip, so fix it before you head out.
Troubleshooting Common Spooling Mistakes
Even with careful technique, things go wrong. Here’s a quick diagnostic table for the most common issues and their fixes.
| Symptom | Likely Cause | Quick Fix |
|---|---|---|
| Line digs into the spool on retrieve | Spooled too loose, or braid buried under itself | Re-spool with 30% more tension; use a line conditioner |
| Wind knots within first 10 casts | Line twist from spooling with the reel off the rod | Re-spool with the reel mounted on the rod; check line path through guides |
| Uneven line lay (high in the middle) | Level wind not tracking evenly, or spooled too fast | Slow down; manually guide the line with your finger to distribute it |
| Spool slippage when hooking a fish | No backing on a smooth spool | Add electrical tape or mono backing; re-tie with a proper arbor knot |
| Line has memory or coils after storage | Braid stored under tension for weeks | Let the line sit loose overnight; apply line conditioner; re-spool if coils persist |
| Backlash on every cast | Overfilled spool (line above the lip) | Remove line until it sits 1/16 inch below the lip |
Pro Tips for Extending Braid Lifespan
Braid lasts a long time, but it’s not indestructible. Here are a few things I’ve learned from years of fishing braid on baitcasters.
Match braid color to water clarity. In clear water, use a low-visibility color like green or white. In stained or muddy water, high-visibility colors like yellow or orange help you see subtle bites. The color doesn’t affect the fish much in dirty water, but it affects your ability to detect a strike.
Trim the first 10 yards regularly. The line closest to your lure takes the most abuse from casting and contact with structure. Trim it off every few trips to expose fresh line.
Store reels with the line loose. Don’t leave your drag tightened overnight. Release the tension so the braid doesn’t develop memory coils from sitting under pressure.
Use a line conditioner. It reduces friction, which means fewer wind knots and longer casts. It also helps the line slide through the rod guides more smoothly.
Check the line for nicks after fishing around rocks or wood. Braid doesn’t stretch, so any nick weakens it significantly. Run your fingers along the line and feel for rough spots.
Frequently Asked Questions
Can I spool braid directly onto a standard baitcaster spool?
Technically yes, but it will likely slip. Standard spools are smooth, and braid has no grip. Wrap the spool arbor with two layers of electrical tape first. That gives the braid something to bite into. If your reel has a braid-ready spool with rubber inserts, you can skip the tape.
How much mono backing should I use under braid?
Fill the spool about one-third full with mono. That’s enough to prevent slippage without wasting braid capacity. Use a heavier mono, around 12-15 pound test, so it doesn’t stretch too much under load.
Why does my braid keep digging into itself on the spool?
You spooled it too loose. Braid has no memory, so it doesn’t push back against the layers above it. When the line is loose, the top layers sink into the lower ones. Re-spool with significantly more tension, and consider using a line winder to maintain consistent pressure.
What’s the best knot to connect braid to mono backing?
Use an Albright knot or a double-uni knot. Both work well and are easy to tie. The Albright is stronger but slightly more complex. The double-uni is simpler and works fine for most applications. Practice both and use whichever you can tie confidently in low light.
How often should I replace braid on my baitcaster?
Braid doesn’t have a set lifespan like mono. It lasts until it gets damaged or the color fades so much you can’t see it. Check the first 20 yards for nicks and abrasions. If you find any, trim them off. Replace the entire spool when the line looks frayed or feels rough along its length.
Final Verdict: Master the Spool, Master the Cast
Spooling a baitcaster with braid isn’t hard, but it rewards attention to detail. Most anglers blame their casting technique for backlashes when the real culprit is a poorly spooled reel.
- Always mount the reel on the rod before spooling. Line path matters.
- Use electrical tape or mono backing on standard spools to prevent slippage.
- Maintain firm, constant tension. Loose line is the enemy.
- Fill the spool to 1/16 inch below the lip. Overfilling guarantees backlashes.
- Consider a line winder or spooling tool like the Beyond Braid EZ Spooler to keep tension consistent.
- Test with brakes set high before adjusting for distance.
- Condition the line and store reels with tension released to extend braid life.
Spool it right once, and you’ll fish with confidence. Spool it wrong, and you’ll spend your day picking out knots. The choice is yours.
