You’re on the river at dawn. The trout are sipping something tiny, but your box is full of streamers and one beat-up nymph pattern. You don’t have the right fly, and the fish know it. That’s the moment tying your own flies stops being a hobby idea and starts being the answer.
This guide walks you through making your own fly fishing lures from scratch. You’ll learn the tools, the materials, and two proven patterns: a Parachute Adams dry fly and a Woolly Bugger streamer. I’ll also cover the mistakes that ruin most beginners’ first dozen flies and how to avoid them. By the end, you’ll have flies that catch fish, not just decorations for your hat.

Creative Angler
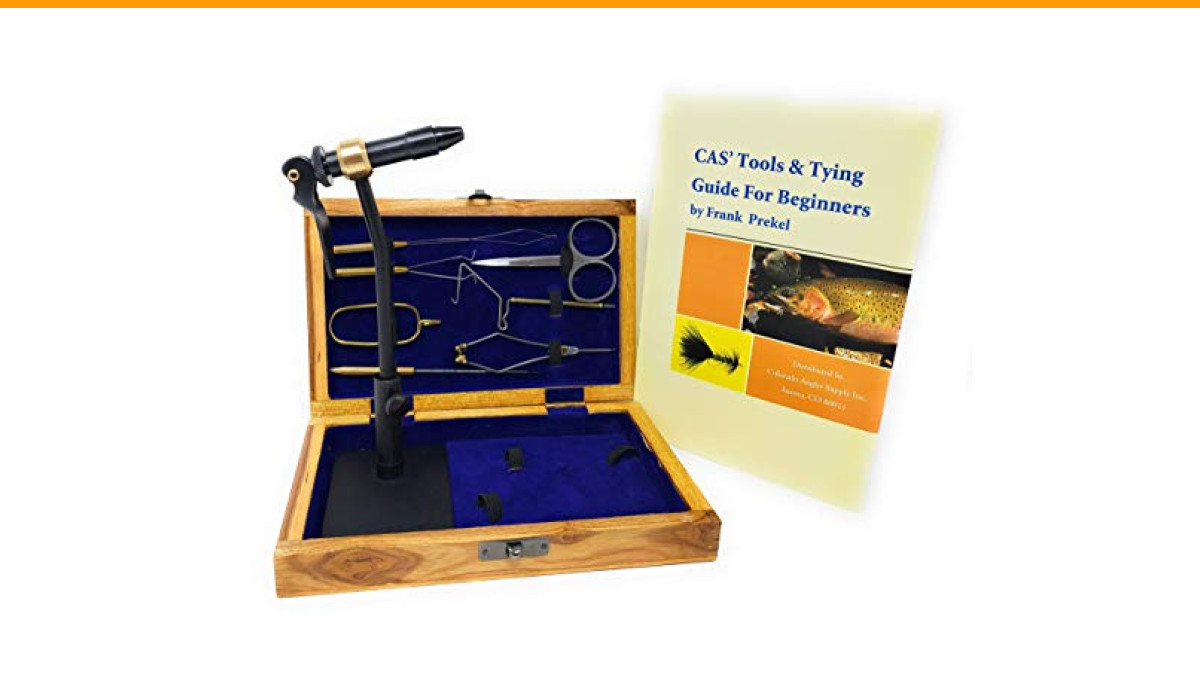
Colorado Anglers Fly Tying Standard Tool Kit with Wooden Box & Book, Rotary Vise, Bobbin, Scissors, Whip Finisher, Complete Set for Beginners & Pros
- COMPLETE FLY TYING STARTER SET IN ELEGANT WOODEN BOX: Dive into fly tying with Colorado Anglers' all-in-one kit! Housed in a styli…
- PREMIUM ROTARY VISE FOR PRECISION TYING: At the heart of this kit is a top-quality rotary fly tying vise, offering 360-degree rota…
- ESSENTIAL TOOLS FOR CRAFTING FLIES: Equip yourself with high-quality fly tying tools designed for efficiency and precision. The ki…
Before you start, consider the Colorado Anglers Fly Tying Standard Tool Kit. It bundles a rotary vise, bobbin, scissors, whip finisher, and starter materials in a wooden box. That removes the guesswork of buying tools piecemeal, which is a real hurdle when you’re just starting out.
Why Tie Your Own Flies? (Beyond Saving Money)
Money is the obvious reason. A single hand-tied fly costs maybe $0.50 to $1.00 in materials. A store-bought fly runs $2.50 to $4.00. If you lose five flies a day on a rocky river, the math works out fast.
But the real payoff is control. You can match a specific hatch color that stores don’t stock. You can tie a size 18 mayfly when the shop only carries size 14. You can experiment with weight, profile, and materials until you find what the fish in your home water actually want.
There’s also the quiet satisfaction of catching a fish on something you made. It’s a different feeling. It makes the whole experience more personal.
Essential Tools and Materials for Beginners
You don’t need a $300 setup to tie fishable flies. You need a solid vise, a few good tools, and materials for two or three patterns. That’s it.
The Must-Have Fly Tying Vise and Tools
The vise is the heart of your bench. It holds the hook while you work. A rotary vise lets you spin the hook 360 degrees, which makes wrapping thread and hackle much easier. The Colorado Anglers kit includes a rotary vise that handles hooks from size 8 down to size 22. That covers trout, panfish, and most bass patterns.
You’ll also need four tools:
- Bobbin – holds the thread spool and lets you control tension. A ceramic-tip bobbin prevents thread fraying.
- Scissors – sharp, fine-point scissors for trimming hackle and dubbing. Cheap scissors will frustrate you.
- Whip finisher – creates a clean, tight knot at the head of the fly. Hand-tying the knot works, but the tool is faster and more consistent.
- Head cement – seals the thread head so the fly doesn’t unravel after a few casts.
Skip the gadgets. A bodkin (needle) for picking out dubbing and a hackle pliers for gripping small feathers are nice extras, but you can start without them.
Choosing Your First Threads, Hooks, and Dubbing
Thread comes in different sizes and colors. Start with 8/0 or 140-denier thread in black or white. It’s strong enough for most patterns but thin enough for small flies. Use white thread for light-bodied flies and black for dark ones.
Hooks matter more than most beginners realize. For dry flies, use a light-wire hook like a Tiemco 100 or Mustad R50. For nymphs and streamers, a heavier-wire hook like a Tiemco 3761 or Mustad 9672 works better. Match the hook size to the fish you’re after:
- Panfish: size 10 to 14
- Trout: size 12 to 20
- Bass: size 2 to 8
Dubbing is the fuzzy material that forms the body of the fly. Natural dubbing (rabbit, muskrat, hare’s ear) holds water and gives a soft, lifelike profile. Synthetic dubbing (Antron, Ice Dub) is shinier and floats better. For your first flies, a simple hare’s ear dubbing in natural brown works for almost everything.
Understanding Fly Patterns: Dry Flies, Nymphs, and Streamers
There are three main categories of flies, and each imitates a different food source.
Dry flies float on the surface and imitate adult insects like mayflies, caddis, and midges. They’re the classic image of fly fishing. The challenge is keeping them floating, which means using floatant and tying with buoyant materials like elk hair and deer hair.
Nymphs imitate the immature, underwater stage of insects. They fish below the surface, often with a weighted head or bead to get down fast. Nymphs catch more fish than any other category, but they’re less glamorous.
Streamers imitate baitfish, leeches, and crayfish. They’re larger, heavier, and fished with an active retrieve. Streamers are the best choice for big trout and bass because they trigger a predatory response.
For this guide, you’ll tie one dry fly and one streamer. That gives you a surface option and a subsurface option, which covers most fishing situations.
Step-by-Step: Tying Your First Attractor Dry Fly
The Parachute Adams is the perfect first dry fly. It’s not a specific insect; it’s an attractor pattern that looks like many different mayflies. It floats well, is visible in rough water, and catches fish across North America. Here’s how to tie it.
Step 1: Securing the Hook and Starting the Thread
Place a size 14 dry fly hook in your vise. Tighten the jaws so the hook doesn’t move when you pull on it. Start your thread about one eye-width behind the hook eye. Wrap the thread rearward in tight, touching turns until you reach the bend of the hook. This forms the base for everything else.
Pro tip: keep your thread tension even. If you pull too hard, you’ll bend the hook. Too loose, and everything will spin.
Step 2: Tying the Tail and Dubbing the Body
Cut a small bunch of grizzly hackle fibers, about the length of the hook shank. Tie them in at the bend so they extend past the hook. This is the tail. Keep it sparse – a bushy tail looks wrong and won’t float well.
Now, make a dubbing loop. Take a small pinch of dubbing and twist it onto the thread. Wrap the dubbing forward in touching turns to form a tapered body. Stop about one-third of the way down the hook shank. Leave room for the wing and hackle.
Step 3: Wrapping the Hackle and Forming the Head
Select a grizzly hackle feather with fibers that are slightly longer than the hook gap. Tie it in at the front of the body. Then, take a small bunch of white calf tail or deer hair and tie it in upright. This is the wing post. Trim the butts.
Wrap the hackle around the wing post, not the hook shank. This creates the parachute effect – the hackle lies flat on the water. Make three or four wraps, then tie off the hackle.
Step 4: The Whip Finish and Applying Head Cement
Trim the excess wing post. Use your whip finisher to tie off the thread at the head of the fly. This creates a smooth, secure knot. Apply a small drop of head cement to the knot and let it dry.
That’s it. You’ve tied a Parachute Adams. It should float with the hackle touching the water and the wing pointing up.
Step-by-Step: Tying a Simple Woolly Bugger (Streamer)
The Woolly Bugger is the most versatile streamer ever created. It imitates a leech, a baitfish, or a dragonfly nymph. If you only tie one streamer pattern, make it this one.
Start with a size 8 streamer hook. Secure it in the vise and start your thread at the eye, wrapping back to the bend. Tie in a marabou tail – a small bunch of marabou fibers about one and a half hook lengths long. Marabou breathes and moves in the water, which is what makes this fly deadly.
Next, tie in a piece of chenille at the bend. Wrap it forward in tight turns to form the body. Stop at the hook eye. Now, tie in a grizzly hackle feather at the front and spiral it rearward over the body, then forward again. This gives the fly its buggy, segmented look. Tie off the hackle, whip finish, and cement the head.
The Woolly Bugger works in still water and moving water. Strip it fast for aggressive fish, or let it sink and retrieve slowly for finicky ones.
Common Beginner Mistakes and How to Fix Them
Every tier makes these mistakes. Here’s how to fix them before they waste your materials.
- Over-dubbing: You put too much dubbing on the thread, and the body looks like a fuzzy sausage. Fix: use half the dubbing you think you need. You can always add more, but you can’t remove it easily.
- Poor thread tension: Loose thread means the materials spin around the hook. Fix: maintain firm, even tension. Practice wrapping thread on a bare hook until it feels natural.
- Uneven wings: The wing post tilts to one side, making the fly sit crooked. Fix: tie the wing in with even pressure on both sides of the post. Take your time.
- Too much head cement: You glop it on, and it runs down the hook shank. Fix: use a pin or bodkin to apply a tiny drop. Less is more.
- Dull scissors: You’re crushing the hackle instead of cutting it. Fix: sharpen your scissors or buy better ones. It’s worth the money.
How to Choose the Right Hook Size for Your Target Fish
Hook size is not a suggestion; it’s a critical variable. Trout feeding on size 20 midges won’t touch a size 10 streamer. Bass chasing bluegill won’t eat a size 18 dry fly. Match the hook to the fish and the hatch.
| Target Fish | Hook Size Range | Best Fly Types | Notes |
|---|---|---|---|
| Panfish (bluegill, crappie) | 10 – 14 | Small poppers, nymphs, dry flies | Go small. Panfish have small mouths. |
| Trout (streams and rivers) | 12 – 20 | Dry flies, nymphs, small streamers | Match the hatch. Carry multiple sizes. |
| Bass (largemouth, smallmouth) | 2 – 8 | Streamers, large poppers, Clouser Minnows | Heavy wire hooks stand up to strong jaws. |
| Steelhead/Salmon | 2 – 6 | Egg patterns, flesh flies, large streamers | Use strong hooks; these fish fight hard. |
When in doubt, take a look at what’s hatching on the water. Turn over rocks and look for nymphs. Match the size and color of what you find. That’s the real secret.
Storing and Maintaining Your Homemade Flies
Hand-tied flies are investments of time. Store them properly and they last for years. Here’s what works:
- Dry them completely before putting them in a box. Wet flies rust hooks and rot feathers. Lay them on a towel for a few hours after fishing.
- Use a fly box with individual slots or foam strips. This keeps hooks from tangling and protects delicate hackle.
- Add a silica gel packet to your fly box. It absorbs moisture and prevents rust.
- Check hooks for rust at the start of each season. A rusty hook is a weak hook.
If a fly gets crushed or the hackle mats down, you can often revive it. Hold it over a steaming kettle for a few seconds – the steam will fluff the hackle back up.
Frequently Asked Questions
Is tying my own flies actually cheaper than buying them?
Yes, but only after you get past the initial tool investment. A starter kit plus materials for a few patterns runs about the same as 30 to 40 store-bought flies. After that, each fly costs pennies in materials. If you fish a lot and lose flies regularly, you’ll break even within a season.
How long does it take to tie a single fly?
A beginner takes 20 to 30 minutes for a Parachute Adams. After a few dozen flies, that drops to 5 to 10 minutes. The Woolly Bugger is faster – most tiers can crank one out in under 5 minutes once they have the hang of it.
What’s the best thread size for beginners?
Use 8/0 or 140-denier thread. It’s strong enough for size 8 hooks but thin enough for size 20 dry flies. Avoid heavy 3/0 thread until you’re tying large streamers or saltwater patterns.
Can I tie flies without a rotary vise?
You can, but you’ll fight the hook constantly. A rotary vise lets you spin the work instead of reaching around it. It makes wrapping hackle and dubbing much smoother. If you’re serious about tying, get a rotary vise from the start.
Why do my dry flies sink after a few casts?
Two reasons: you’re using too much dubbing, or you’re not applying floatant. Pick the dubbing out so the fly is fluffy, not dense. Then apply a silicone-based floatant to the hackle and tail before fishing. Reapply as needed.
Final Cast: Are Homemade Lures Worth It?
Yes, with one caveat: it takes patience. Your first few flies will be ugly. The proportions will be off, the hackle will be uneven, and you might want to throw them in the trash. Don’t. Keep them. Tie a dozen more, and you’ll see progress.
The real value isn’t just the money saved. It’s the ability to sit at a bench on a winter evening and tie the exact fly you’ll need in June. It’s the confidence of casting a pattern you crafted yourself. And it’s the moment a trout rises to your Parachute Adams and you know, without a doubt, that you earned it.
- Start with a rotary vise and four basic tools: bobbin, scissors, whip finisher, and head cement.
- Tie a Parachute Adams for dry fly action and a Woolly Bugger for subsurface fishing.
- Match hook size to your target species – trout need size 12-20, bass need size 2-8.
- Use less dubbing than you think. Sparse flies catch more fish than bushy ones.
- Dry your flies completely before storing them to prevent rust and rot.
- Expect to spend 20 minutes on your first fly and 5 minutes after practice.
- Keep your first ugly flies. They’re proof of progress.