
You know the feeling. You open the tackle box, and the pack of Yamamoto Senkos you paid eight bucks for last week is down to three worms. One is torn in half, and the other two are so mangled they look like they fought a losing battle with a pike. The cost of quality soft plastics has gone through the roof. It is the single most annoying recurring expense in bass fishing.
Making your own soft baits solves that problem permanently. This guide walks you through the entire process, from melting plastisol to demolding a finished worm that swims exactly how you want it to. You will learn the exact temperatures, the right additives for salt and scent, and how to fix the common mistakes that ruin a batch. You will walk away with the knowledge to produce a bag of baits for pennies, not dollars.

CooB
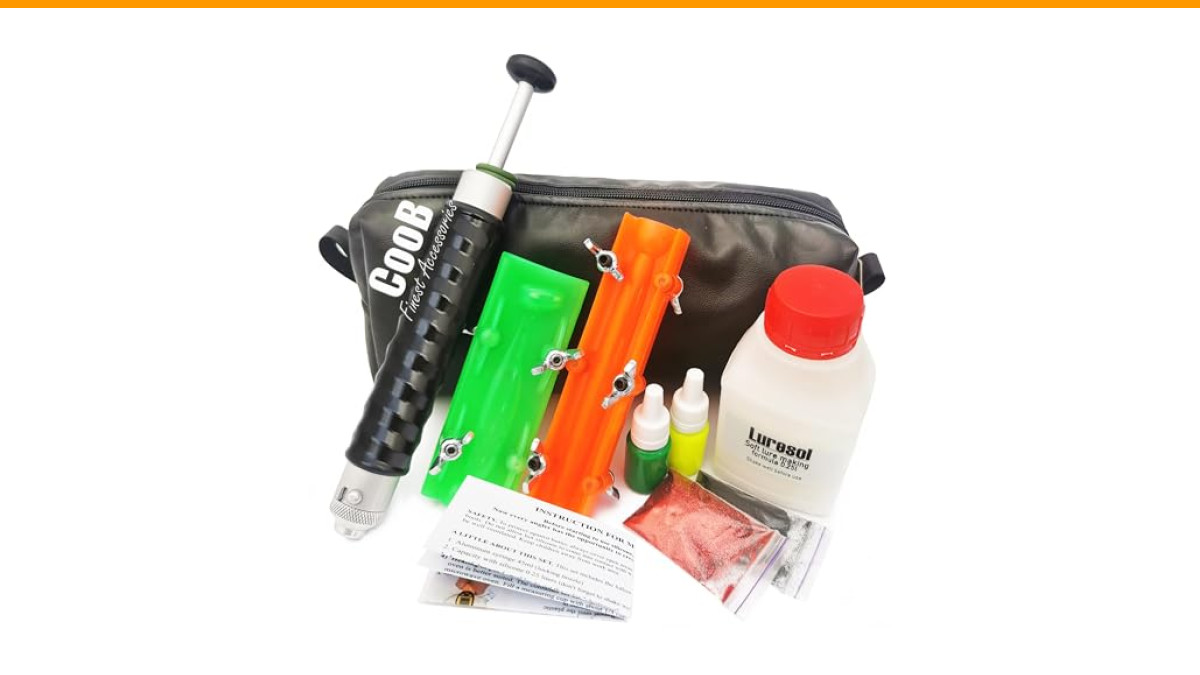
CooB Starter Kit Aluminum Injector, Soft Plastiс Form Lure Making Injection | Premium Kit for Fishing Molds Lures Making. 1.5 oz Aluminum Injector. Durable Hard Plastic Molds
- Premium Starter Kit for Soft Plastic Lure Lures Making Injection, Fishing Forms Lures
- Please Note: Color of Forms may be different than on Photo. Two Plastic High Density Forms (Senko 5'' worm and Easy shiner 4'' sha…
- 45ml / 1.5 oz Aluminum Injector (with locking nozzle)
If you are starting from zero, a kit like the CooB Starter Kit Aluminum Injector gets you going immediately. It includes two plastic molds (a 5-inch Senko worm and a 4-inch shad), a 45ml aluminum injector, and a bottle of medium softener. It is a solid shortcut because it removes the guesswork of buying mismatched parts.
Why Make Your Own Soft Baits? (The Real Cost Savings)
Let’s talk numbers. A gallon of quality plastisol runs about $50 to $60. A standard 5-inch stick worm weighs roughly 3.5 grams. A gallon of plastisol weighs about 3,785 grams. Do the math, and you get over 1,000 worms per gallon. Even after adding salt, softener, and scent, you are looking at a cost of roughly $0.06 to $0.08 per bait.
Compare that to the $6 to $8 you pay for a pack of ten. You are saving about 90% per bait. It is not a small margin. It is the difference between hesitating to throw a jig into a rocky bank and throwing it with confidence because you know you have 500 more at home.
There is also the time factor. Once you set up your station, you can pour or inject 50 to 100 baits in an hour. That includes cooling time. The initial investment in a Presto Pot, molds, and an injector pays for itself after the first two or three sessions of heavy fishing.
Safety First: Essential Gear and Workspace Setup
Plastisol is a liquid plastic suspended in a carrier. It is safe when handled correctly, but you cannot treat it like candle wax. The liquid itself is a skin irritant, and the fumes, while not toxic in small quantities, are unpleasant. You need proper ventilation. Open a window and run a fan. If you have a garage door, crack it open. Do not work in a sealed room.
You need a dedicated heat source. A Presto Pot (the deep fryer) is the standard choice because it has a thermostat that holds temperature within a few degrees. Do not use a microwave for anything beyond reheating small test batches. Microwave heating creates hot spots that scorch the plastisol, leaving you with a lumpy, burnt mess that ruins the mold.
Here is the non-negotiable gear list:
- Heat-resistant gloves: Nitrile gloves for handling the raw plastic, and a pair of thick silicone oven mitts for handling the hot injector and molds.
- Safety glasses: Splashes happen. Hot plastisol sticks to skin and causes real burns.
- Paper towels and isopropyl alcohol: For cleaning up spills immediately. Plastisol cleans up easily with alcohol before it cures.
Materials and Tools: What You Actually Need (and What to Skip)
You do not need a lab-grade setup. Here is the breakdown of what matters and what is a waste of money.
| Tool | Essential? | Why It Matters |
|---|---|---|
| Presto Pot (or controlled heat source) | Yes | Holds 300-350°F consistently. A stove pan overheats and scorches plastic. |
| Aluminum Injector (45ml or larger) | Yes | Injection molding forces plastic into every detail of the mold. Hand pouring leaves air pockets. |
| Two-piece aluminum molds | Yes | Need a sprue hole and vent lines. Cheap plastic molds work, but aluminum lasts forever. |
| Plastisol (soft or medium hardness) | Yes | Start with medium. Soft (finesse) is too fragile for beginners. |
| Liquid colorant | Yes | A few drops go a long way. Start with chartreuse or motor oil. |
| Scent (optional) | No | Anise or garlic oil. Add after the plastic is melted, not before. |
| Salt (optional) | No | Adds weight and sinking rate. Too much makes the bait tear easily. |
Skip the expensive ‘professional’ molds at first. The CooB kit mentioned earlier includes two high-density plastic molds that are perfect for learning. They are forgiving and do not require clamping pressure. You can upgrade to aluminum molds later once you stop making beginner mistakes.
The Step-by-Step Soft Bait Making Process
This process assumes you are using an injector. Hand pouring works for simple stick baits, but injection molding is the only way to get crisp fins and tails on a shad. The steps are the same for both, but the injection method gives you a better product.
Step 1: Melting the Plastisol
Pour your plastisol into the Presto Pot. Turn the heat to 350°F. Stir it occasionally with a wooden stick. The plastic will go from cloudy to clear as it heats. The sweet spot is between 320°F and 340°F. At 350°F, you risk burning the plastic. At 300°F, the plastic is too thick to inject properly.
Use a thermometer to verify the pot’s thermostat. Many Presto Pots run hot or cold by 10-15 degrees. Trust the thermometer, not the dial. Once the liquid is clear and thin like syrup, it is ready.
Step 2: Coloring and Adding Scent/Salt
Turn the heat down to 300°F. Add your colorant. Start with 3-4 drops. Stir it in completely. The color will deepen as the plastic cools, so do not overdo it. A light chartreuse looks bright in the water. A dark motor oil looks almost black in the package.
If you are adding salt, do it now. Use fine popcorn salt, not kosher salt. Kosher salt is too flaky and creates weak spots. Add 1 tablespoon per cup of plastisol for a slow sink. Add 2 tablespoons for a fast sink. Remember that salt makes the plastic brittle. If you add too much, the bait snaps in half on the hookset.
Add scent last. Two or three drops of anise oil per cup is plenty. The scent does not infuse well if the plastic is too hot, so wait until it drops below 320°F.
Step 3: Injecting or Pouring the Mold
Close your mold and hold it together with your fingers or a rubber band. If you are using the injector, draw the hot plastic into the barrel. Work fast; the plastic cools quickly. Insert the nozzle into the sprue hole and push the plunger with steady, even pressure. You want to fill the cavity completely but not force plastic out the vents. Over-injecting creates flash (thin plastic fins) that you have to trim.
For hand pouring, use a small ladle or a measuring cup with a spout. Pour slowly into the sprue hole. Tilt the mold slightly to let air escape. You will get more air pockets with pouring, which is why injection is the preferred method.
Step 4: Cooling, Demolding, and Trimming
Set the filled mold aside. Wait 2 to 3 minutes for thin baits like worms, and 4 to 5 minutes for thick baits like craws. Do not rush this. If you demold too early, the plastic is still soft and will stretch out of shape.
Open the mold and peel the bait out. It will still be warm. Use a pair of scissors to trim off the sprue (the plastic nub at the head) and any flash along the vent lines. Cut flush with the bait’s body. A sharp razor blade works better than scissors for getting a clean, flat head.
Troubleshooting Common Problems (Quick-Fix Chart)
Everyone messes up their first batch. Here is how to fix the most common defects without throwing away your materials.
| Problem | Cause | Fix |
|---|---|---|
| Air bubbles in the body | Plastic too thick, or injected too fast | Heat plastic to 340°F. Inject slower. Tap the mold on the table before cooling. |
| Dents or sink marks on the back | Plastic contracted as it cooled | This happens with thick baits. Inject a second small shot of plastic into the sprue hole after 30 seconds to compensate. |
| Bait tears when demolding | Plastic too cool, or over-injected | Wait longer before demolding. Also check for flash that is locking the bait into the mold. |
| Cloudy or milky appearance | Plastisol not heated enough | The plastic did not fully cure. Reheat the bait in the pot and re-inject. |
| Burned or brown spots | Plastic overheated | Scrap that batch. You cannot fix burnt plastic. Turn the heat down. |
Advanced Techniques: Hardness, Flotation, and Multi-Color Baits
Once you master the basics, you start tuning the bait to the conditions. The hardness of the plastic is controlled by the ratio of plastisol to softener. Most plastisol comes in a ‘medium’ hardness. Add 5% softener (by volume) to get a finesse worm that wiggles in the current. Add 10% and it becomes almost jelly-like, which works for drop-shot baits but tears easily.
For swimbaits, you want a firmer plastic. Use the plastisol straight, without softener. You can also add a hardener, but that is rarely necessary. A firmer bait holds its shape during a fast retrieve and does not sag on the hook.
Flotation is a different game. Standard plastisol sinks. To make a floating frog or a suspending jerkbait, you need to add micro-balloons (glass bubbles). Mix in 1 teaspoon per cup of plastisol. Stir gently to avoid crushing the bubbles. The bait will float, but it will also be more brittle. Test it on a scrap piece before committing to a full batch.
Multi-color baits are easier than they look. You inject a base color, then use a syringe to inject a second color into the tail or belly. The key is to inject the second color while the first is still hot. If the first color has cooled, the two layers will not bond and the tail falls off.
Mold Maintenance and Safe Disposal
Your molds and injector will last for years if you treat them right. After each session, wipe the mold cavities with a paper towel dipped in isopropyl alcohol. This removes the plastic residue and the salt buildup. Do not use water; it causes rust on aluminum molds.
Store the molds with a light coat of silicone spray. This prevents corrosion and helps the baits release easier next time. The injector needs the same treatment. Pull the plunger out, clean the barrel, and wipe the O-ring with a bit of vegetable oil to keep it pliable.
Disposal is where most hobbyists cut corners. Leftover plastisol cannot go down the drain. It will solidify and clog your pipes. Let it cool in the pot, peel it out as a solid rubber disc, and throw it in the trash. Paper towels soaked in plastisol are considered hazardous waste in some municipalities. Let them dry out completely and dispose of them in a sealed bag.
Frequently Asked Questions (FAQ)
Can I use a microwave to melt plastisol?
Yes, but only for small batches under 100ml. Use a microwave-safe cup and heat in 30-second bursts, stirring between each. The risk is uneven heating. A hot spot can boil and splatter, which is dangerous. A Presto Pot is safer and more consistent for any real volume.
How long do homemade soft baits last on the shelf?
Indefinitely, if stored properly. Keep them in a sealed plastic bag away from direct sunlight. The plasticizer can leach out over time, making the bait stiff. Adding a drop of softener to the bag helps. Do not store them in the same tackle box as hard baits; the hooks will gouge the soft plastic.
Why do my baits sink too fast?
You added too much salt. Salt is dense. A heavy bait falls fast and sits flat on the bottom. If you want a neutral buoyancy, cut the salt in half and add a drop of scent instead. This is a common mistake when copying a brand like Zoom, which uses a high salt content.
Can I recycle my failed baits?
Absolutely. This is the biggest advantage of making your own. Collect all your torn baits, sprue pieces, and flash. Throw them back into the Presto Pot at 350°F. They will melt down into a ‘recycled’ color that is usually a muddy brown. You can add fresh colorant to darken it. Do not mix recycled plastic with fresh plastic in the same pot; the consistency will be uneven.
What is the best hook for homemade soft plastics?
It depends on the bait. For stick worms, use a 3/0 or 4/0 EWG worm hook. For shad bodies, use a weighted swim jig head with a wide gap. The key is to match the hook size to the bait’s thickness. A thick bait on a thin hook will spin on the retrieve. A thin bait on a thick hook will tear at the nose.
What to Do With Your First 100 Baits
You will have a learning curve. Your first ten baits will have air bubbles or look lumpy. That is normal. By the time you finish your first cup of plastisol, you will have a rhythm.
- Start with a single color and a single mold. Master the process before you buy more gear.
- Keep a notebook. Write down the exact temperature, softener ratio, and salt amount for each batch. You will forget the perfect recipe by next month.
- Test every bait in a glass of water before you take it fishing. You want to see the action and the sink rate.
- Trim the sprue flush. A nub on the head will catch on the hook gap and ruin the bait’s action.
- Do not throw away your mistakes. Recycle them into the next batch.
- Wear gloves. Hot plastisol burns are painful and take weeks to heal.
- Check the current price on the CooB starter kit before you buy anything else. It is the cheapest way to test if this hobby is for you.
