You’re three miles offshore, the sun’s hammering down, and you’ve just landed a solid redfish. It’s flopping on the deck of your kayak, and suddenly the real question hits you: what do I do with it now? If you’ve ever stuffed a fish into a dry bag and prayed, or clipped it to a stringer and watched it get picked apart by crabs, you know the panic. The difference between a fish that tastes like the ocean and one that tastes like regret comes down to the first few minutes after the hook comes out.
This guide walks you through a complete fish quality protocol — from the moment the fish hits your deck to the moment it hits your cooler. You’ll learn why the clock starts ticking immediately, how to bleed and cool fish the right way, when a livewell actually makes sense versus a cooler, and how to rig cheap DIY solutions that work. No vague advice, just concrete numbers and methods you can use on your next trip.

QualyQualy
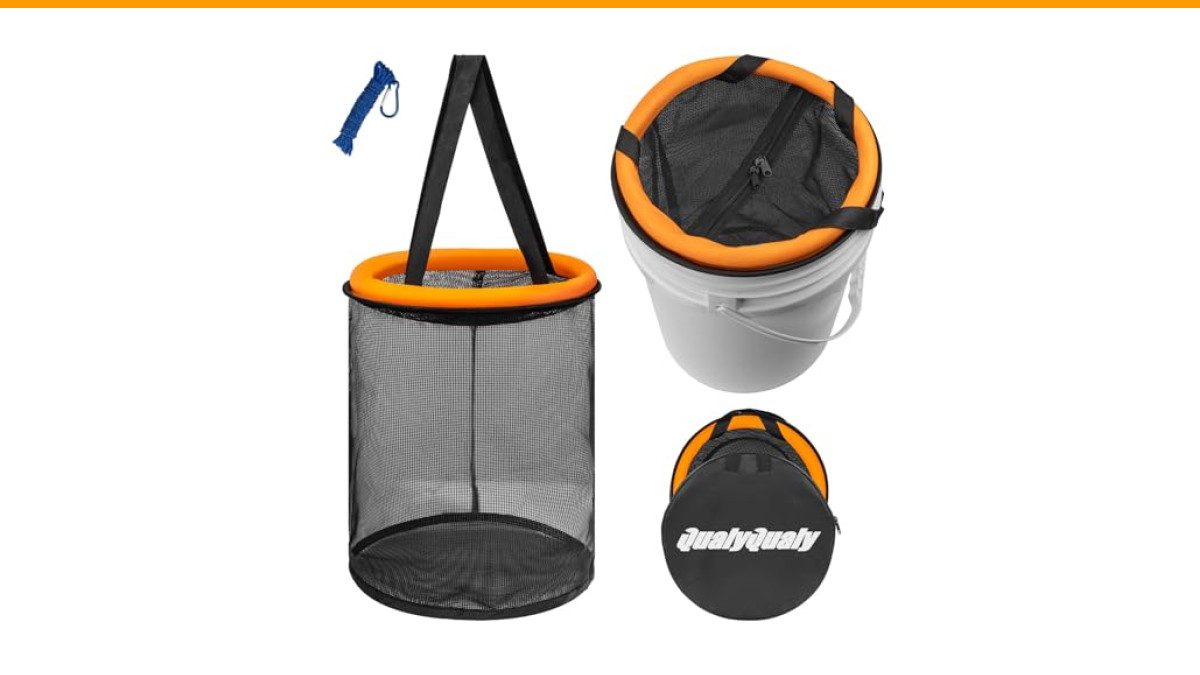
QualyQualy Floating Fish Basket for 5 Gallons Buckets, Foldable Fishing Basket Bait Net for Live Caught, Rubber Coated Mesh Fish Holder for Kayak Fishing Live Well Baitfish Minnow Bucket
- Perfect for 5-Gallon Fishing Buckets: Engineered with an 11.6" diameter elastic steel ring, our Floating fish basket for live caug…
- Fish-Safe Rubber Coated Mesh: Features tangle-free, non-abrasive rubber coating that protects fish scales and slime coat. Reinforc…
- Ultra-Portable Foldable Fishing Basket: Collapses flat to just 11.6” diameter for effortless storage in the included carry bag. Li…
One piece of gear that solves a common problem is a floating fish basket that clips to your kayak. The QualyQualy Floating Fish Basket snaps into a standard 5-gallon bucket and keeps bait or catch alive alongside your boat without dragging in the current. It’s a simple way to hold fish in the water while you keep paddling, and it folds flat when you’re done.
The 5-Minute Rule: Why Immediate Fish Care Matters
Fish meat degrades fast. Once a fish dies, enzymes in its muscle tissue start breaking down proteins, and bacteria multiply quickly at warm temperatures. The difference between premium sashimi-grade meat and mushy, fishy-tasting fillets is measured in minutes, not hours.
Here’s the rule: within five minutes of landing a fish you intend to keep, you should have it bled, gutted, and placed on ice or into a livewell. That’s not a suggestion; it’s the standard that separates serious anglers from everyone else. If you’re fishing for catch and release, the same urgency applies — the less time a fish spends out of water, the better its chances of swimming away healthy.
Why five minutes? Research on fish muscle shows that rigor mortis sets in faster at higher temperatures, and that’s when texture starts to suffer. A fish left on a hot kayak deck for fifteen minutes will have noticeably softer, worse-tasting meat than one cooled immediately. The same fish, same day, same water — the only difference is how fast you acted.
So build the habit. The moment a keeper hits the deck, your hands move: one hand pins the fish, the other grabs your pliers, knife, and a towel. You don’t chat, you don’t take a photo, you don’t reach for another lure. You process the fish first, then celebrate.
The Bleed, Gut, and Cool Sequence (The “BGC” Method)
Most anglers skip bleeding because it seems messy or unnecessary. It’s neither. Bleeding removes blood from the muscle tissue, which carries a metallic, unpleasant flavor and accelerates spoilage. A properly bled fish tastes cleaner and keeps longer.
Here’s the sequence I use, and it works for everything from stripers to snapper:
- Bleed it. Cut the gill rakers on both sides, or make a clean cut through the isthmus (the thin membrane between the gills). Hold the fish by the tail and let it bleed into the water or a bucket for 30-60 seconds. Don’t skip this — the difference in meat quality is dramatic.
- Gut it. Insert your knife at the vent and slice up toward the head, staying shallow to avoid puncturing the guts. Remove the entrails and scrape out the kidney line along the spine with your thumb or a spoon. Rinse the cavity with seawater.
- Cool it immediately. Get the fish into a cooler with ice slurry (more on that below) or into a livewell. The goal is to drop the core temperature below 40°F as fast as possible. If you’re using a cooler, make sure the fish is fully submerged in the slurry, not just sitting on top of ice.
The BGC method takes about two minutes once you’re practiced. That’s two minutes that buys you hours of better-tasting fish. If you’re fishing in hot weather, carry a small spray bottle of seawater to rinse blood off your deck and keep things tidy.
Storage Showdown: Livewell vs. Cooler vs. Stringer
You’ve got three main options for holding fish on a kayak, and each has a place. The trick is knowing which one fits your situation — not just what’s easiest to rig up.
| Method | Best For | Time-to-Ice | Key Trade-off |
|---|---|---|---|
| Livewell (bucket + aerator) | Tournaments, catch-and-release, keeping bait alive | N/A — fish stay alive | Requires power for aerator; adds weight and complexity |
| Hard cooler with ice slurry | Keeping fish fresh for hours, multi-day trips | Keeps fish below 40°F for 6+ hours with good ice | Bulky, takes up deck space, needs draining |
| Soft cooler with ice | Short trips, light packing | Keeps fish below 40°F for about 2 hours | Poor insulation; ice melts fast in heat |
| Stringer (rope or chain) | Shoreline fishing, short holds, current water | N/A — fish stay alive but stressed | Risky in murky water; predators can steal your catch |
Each method has a specific job. Don’t try to use a stringer as a cooler, and don’t expect a soft cooler to hold ice in 90-degree heat. Match the tool to the trip.
When to Use a Stringer (and When to Avoid It)
Stringers are the oldest trick in the book, and they have a place — but it’s smaller than most anglers think. A stringer works well when you’re fishing from shore or a dock, in clear water, and you’re only holding fish for an hour or two. The fish stay alive, which keeps the meat fresh, and you don’t need ice.
On a kayak, though, a stringer is a liability. It drags in the water, creates drag while you paddle, and can snag on submerged branches or rocks. Worse, in murky water or areas with crabs, turtles, or seals, your catch becomes an easy meal. I’ve lost fish to a bull shark on a stringer in the Gulf — never again.
If you do use a stringer, clip it to a cleat or pad eye near the stern, not the side, and keep the line short. Check it every few minutes. And never use a stringer in water over 80°F; the stress of being dragged behind a kayak can kill fish quickly, and the meat quality drops fast.
The Ice-to-Fish Ratio for Maximum Cooling
Ice slurry is the gold standard for fish storage, but most people get the ratio wrong. A few ice cubes in the bottom of a cooler won’t do anything. You need enough ice to completely submerge the fish in cold water — that’s what transfers heat away from the meat fastest.
The rule: use two parts ice to one part water by volume. That creates a slurry at about 32°F, which is cold enough to chill fish rapidly without freezing them. If you’re using crushed ice, it melts faster but cools quicker. Block ice lasts longer but doesn’t surround the fish as well.
For a typical kayak trip, plan on 5-10 pounds of ice per fish, depending on the size and the outside temperature. In summer, double that. And here’s a pro tip: add a handful of salt to the slurry — it lowers the freezing point and keeps the water colder longer. Just don’t use so much that you’re pickling the fish.
Drain the cooler every few hours and add fresh ice. Melted freshwater dilutes the slurry and warms up fast. A cooler with a drain plug makes this easy — tilt it, drain, add ice, and you’re back in business.
DIY and Budget-Friendly Storage Hacks
Not everyone wants to drop money on a fancy livewell system. The good news is that a few simple materials can get you 90% of the way there.
The $15 Milk Crate Livewell Conversion
This is the classic kayak angler hack, and it works. You’ll need a milk crate, a 5-gallon bucket, a small 12V aerator pump, and some zip ties.
- Place the bucket inside the milk crate. The crate keeps it stable on the deck.
- Drill a small hole near the top of the bucket for the aerator tube, or just run the tube over the rim.
- Attach the aerator pump to the crate with zip ties, and wire it to a small 12V battery (a sealed lead-acid or lithium pack works).
- Fill the bucket with fresh seawater, drop in your fish or bait, and turn on the aerator.
That setup keeps bait lively for hours and can hold a few keeper fish for a short period. It’s not a replacement for a proper livewell on a long tournament day, but for most recreational trips, it’s plenty. The key is to change the water every 30-45 minutes — pump out a few cups and replace it with fresh seawater to keep oxygen levels up and ammonia down.
If you want something even simpler, a floating fish basket like the QualyQualy Floating Fish Basket clips to the side of your kayak and holds fish in the water without any power or setup. It’s a good middle ground between a stringer and a full livewell.
How to Measure and Release Fish Without a Ruler
Regulations don’t care if you forgot your tape measure. Keeping an undersized fish can cost you a hefty fine, and releasing a fish that’s been out of water too long can kill it. You need a way to measure on the water, and you already have the tools.
The simplest method: mark your paddle. Take a permanent marker and draw a line at the legal minimum length for the species you’re targeting. Hold the paddle next to the fish — if the fish doesn’t reach the line, it goes back. This works for most species and takes ten seconds to set up.
Another trick: use your rod. Most rods have guides spaced at predictable intervals. For example, on many rods, the distance from the tip to the first guide is about 12 inches, and the distance between guides is roughly 6 inches. Count the guides to estimate length. It’s not exact, but it’s close enough to avoid a ticket.
For catch and release, handle the fish as little as possible. Wet your hands before touching it, support the belly, and use a dehooking tool if the hook is deep. If the fish is exhausted, hold it in the water facing into the current and move it gently back and forth until it swims off on its own. Don’t toss it back like a football — that can damage its swim bladder.
Seasonal Adjustments: Heat Waves vs. Cold Fronts
Your storage strategy has to change with the weather. A cool spring day is forgiving; a 95-degree July afternoon is not.
In extreme heat (90°F+), ice melts at an alarming rate. A soft cooler won’t cut it — you need a hard cooler with thick insulation, and you need to pre-chill it the night before. Put a bag of ice in the cooler at home, let it sit overnight, and dump the water before you load fish in. That drops the interior temperature dramatically and gives your ice a head start.
You also want to limit how often you open the cooler. Every time you lift the lid, cold air escapes and warm air rushes in. Organize your fish so you don’t have to dig for the one you want — put the biggest fish at the bottom and the ones you’ll eat first on top.
In freezing temperatures, the problem flips. Your fish can freeze to the bottom of the cooler or the bag if they’re wet and the air is cold enough. That ruins the texture. The fix: dry the fish with a towel before placing it in the cooler, and use a layer of newspaper between fish and ice. The paper absorbs moisture and provides a barrier against direct contact with the ice.
Cold weather also means your livewell water will be cold, which is actually good for fish — they need less oxygen and produce less waste. But if the water drops below 40°F, the fish may go into shock. Monitor the water temperature and add a little warm water if you need to bring it up.
The Ultimate Kayak Fish Storage Checklist
Here’s what to pack and do on every trip, in order:
- Pre-chill your cooler the night before with a bag of ice.
- Pack 5-10 pounds of ice per fish, plus a few handfuls of salt.
- Carry a sharp knife, pliers, and a towel within arm’s reach.
- Bleed every fish within one minute of landing it.
- Gut the fish before it goes into the cooler or livewell.
- Submerge fish in ice slurry, not just on top of ice.
- Drain and refresh the slurry every 2-3 hours.
- Mark your paddle with legal minimum lengths before you launch.
- In heat, limit cooler openings and pre-chill everything.
- In cold, dry fish and use newspaper to prevent freezing to the bag.
- If using a livewell, change water every 30-45 minutes.
- Never use a stringer in water over 80°F or in murky water with predators.
Print this list and keep it in your tackle bag. It takes a few trips to make the routine automatic, but once you do, you’ll notice the difference in every meal.
FAQ: Keeping Fish Alive vs. Fresh
Is it better to keep fish alive on a stringer or put them on ice immediately?
For meat quality, ice wins almost every time. A fish on a stringer stays alive but stressed, and stress hormones affect the meat’s taste and texture. A fish placed directly into an ice slurry goes through a rapid, clean death that preserves the flesh better. Use a stringer only for short holds in cool, clear water.
How long can a fish survive in a 5-gallon bucket livewell?
With a good aerator and regular water changes, a few small fish or a handful of bait can survive for several hours. The limiting factors are oxygen depletion and ammonia buildup from fish waste. Change 20-30% of the water every 30 minutes, and don’t overcrowd — one fish per 2 gallons of water is a safe rule.
Can I use ice from my drink cooler to chill fish?
Technically yes, but it’s a bad idea. Drink ice is usually warmer and less dense than fish ice, and it melts faster. More importantly, you’ll be sacrificing your drinking water on a hot day. Pack separate ice for fish — it’s cheap insurance.
What’s the best way to bleed a fish on a kayak without making a mess?
Cut the gills while the fish is still in the water, or use a small bucket filled with seawater to bleed it into. A lot of anglers use a 2-gallon bucket with a lid — cut the gills, drop the fish in, and let it bleed out. The blood stays contained and you can dump it overboard when you’re done.
Does gutting a fish immediately really make a difference?
Yes, a big one. The guts contain enzymes and bacteria that start breaking down the meat from the inside out. Gutting a fish within five minutes of landing it can add a day of shelf life to the fillets. It also removes the messiest part of the fish, so your cooler stays cleaner.
Putting It All Together: Your New Fish Care Routine
The difference between a mediocre fish dinner and an exceptional one isn’t luck — it’s process. Start with the 5-minute rule, commit to the bleed-gut-cool sequence, and match your storage method to the conditions. A hard cooler with ice slurry is the most reliable choice for most trips; a livewell is for tournaments and catch-and-release; a stringer is a last resort.
Practice the routine on your next few trips until it feels natural. You’ll find that you spend less time fiddling with gear and more time fishing. And when you pull a perfect, clean fillet out of the cooler at the end of the day, you’ll know the effort was worth it.
One last tip: invest in a floating fish basket for those days when you want to keep a few fish alive without the hassle of a livewell. It clips to your kayak, keeps fish in the water, and folds flat for storage. Check the current price on Amazon if that fits your style.
Tight lines, and may your next cooler be full of ice and your fillets be the envy of the dock.