A Humminbird Fish Finder is a great tool for fishing. It helps you find fish easily. But how do you hook it up? This guide will show you step-by-step how to do it. It’s simple. Let’s get started!
What You Need
First, gather everything you need. Here is a list:
- Humminbird Fish Finder
- Fish Finder Mount
- Power Cable
- Transducer
- Screws and Bolts
- Drill
- Wrench
- Wire Strippers
- Electrical Tape
- Battery
- Manual
Now, you have everything ready. Let’s move on to the next step.
Step 1: Mount the Fish Finder
Find a good spot on your boat. It should be easy to see. It should not block your view. Use the mount that came with your fish finder. Attach it to the boat. Use the screws and bolts. Make sure it is tight. Your fish finder should be secure.
Step 2: Install the Transducer
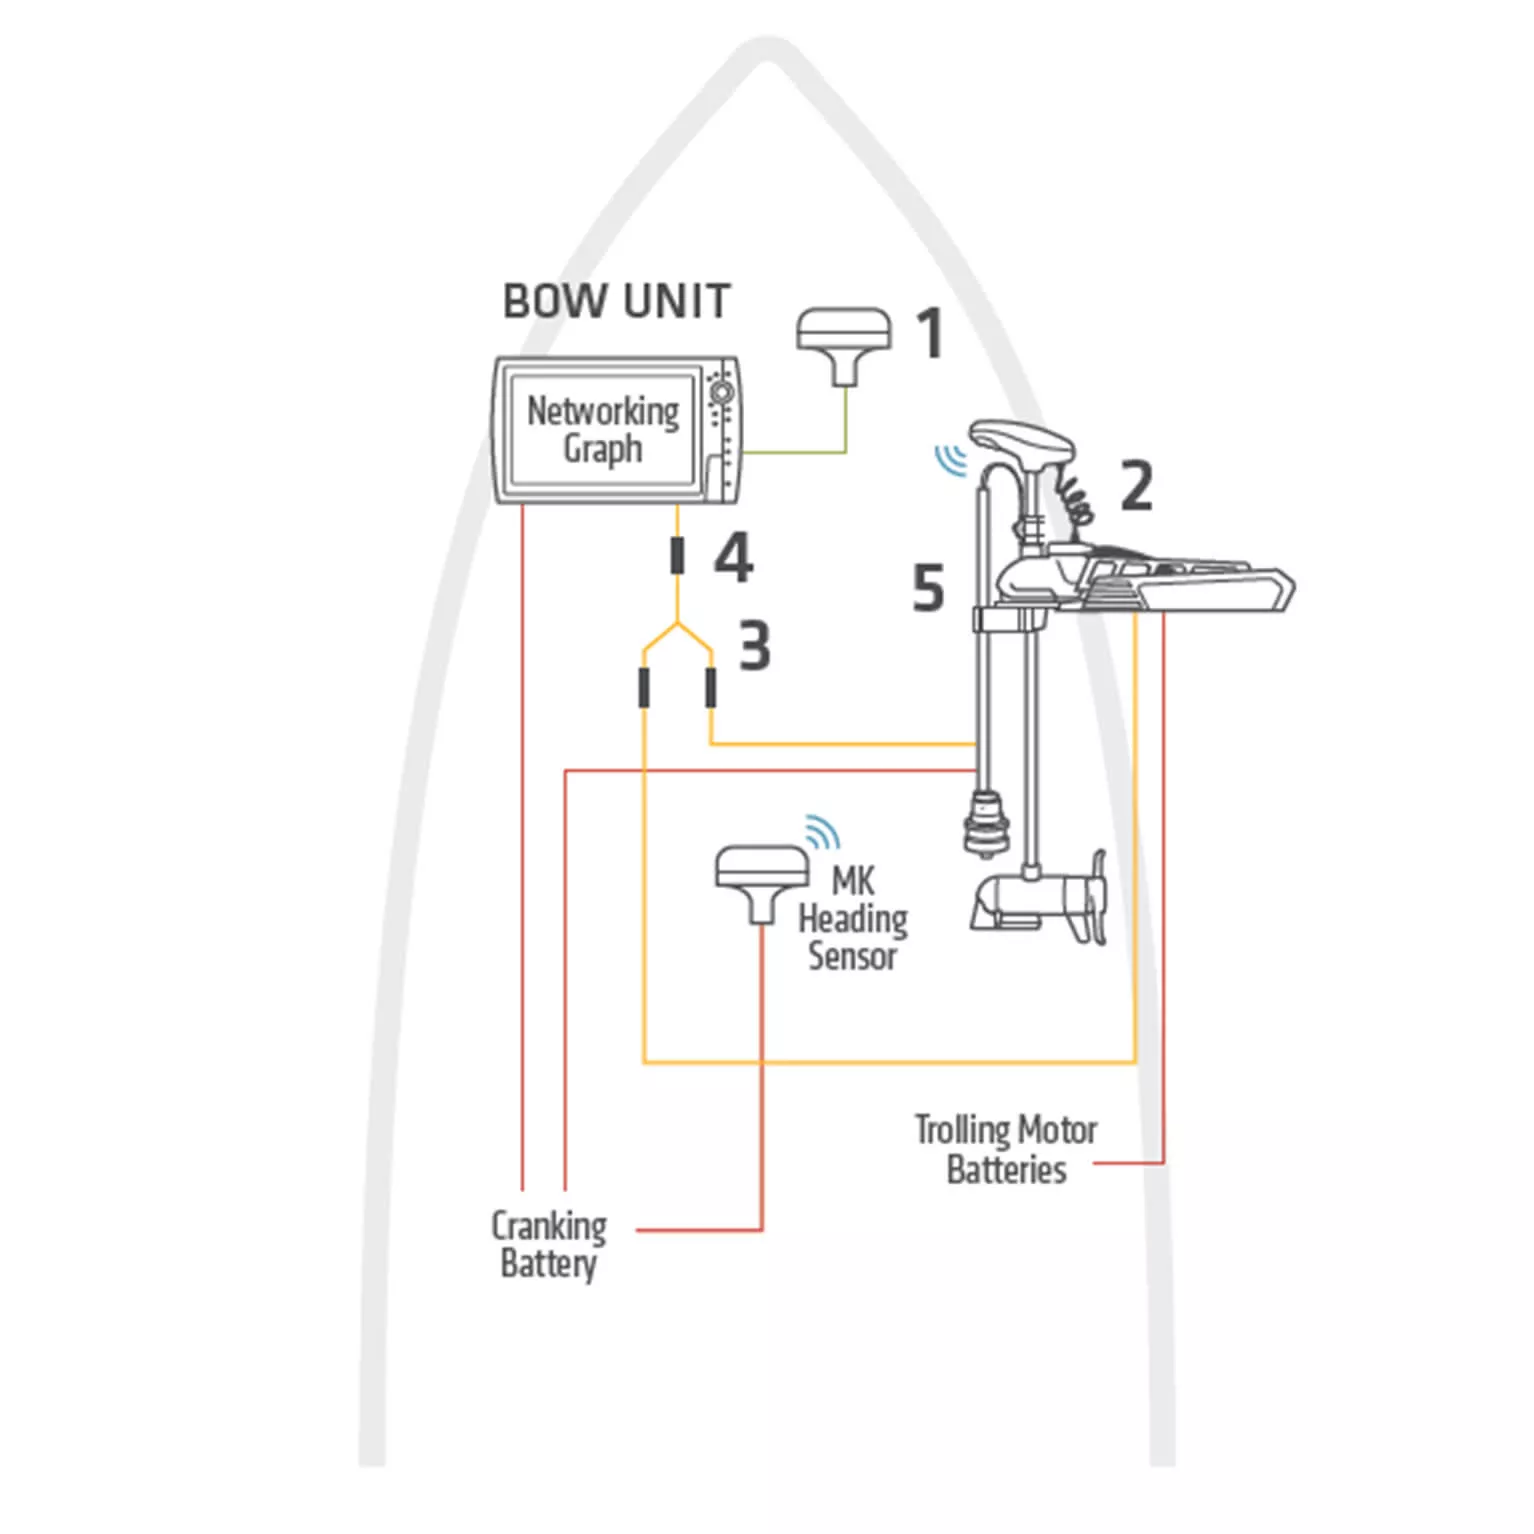
The transducer goes in the water. It sends signals to find fish. Find a spot on the bottom of your boat. It should be near the back. Make sure it is in the water when you move. Use the drill to make holes. Attach the transducer with screws. Make sure it is tight. Run the cable to your fish finder.

Credit: www.catfishedge.com
Step 3: Connect the Power Cable
Your fish finder needs power. Take the power cable. Connect it to your battery. Use the wire strippers to strip the ends. Connect the red wire to the positive terminal. Connect the black wire to the negative terminal. Use the wrench to tighten the connections. Wrap the connections with electrical tape. This keeps them safe. Now, run the power cable to your fish finder.
Step 4: Plug in the Cables
Now, take the cables. Plug them into the fish finder. The transducer cable goes in the transducer port. The power cable goes in the power port. Make sure they are tight. Your fish finder is now connected.

Credit: humminbird.johnsonoutdoors.com
Step 5: Turn On the Fish Finder
Press the power button. Your fish finder should turn on. If it does not, check the connections. Make sure everything is tight. If it still does not work, check the battery. It may need to be charged.
Step 6: Adjust the Settings
Your fish finder has many settings. Take time to adjust them. The manual will help you. Here are some basic settings:
- Sensitivity: This helps you see more fish. Turn it up to see more. Turn it down to see less.
- Depth: Set the depth range. This helps you see the bottom. It also helps you find fish.
- Fish ID: This shows fish icons. Turn it on to see fish icons. Turn it off to see arches.
Play with the settings. Find what works best for you.
Step 7: Go Fishing!
Your fish finder is ready. Go out on the water. Use your fish finder to find fish. Remember to keep an eye on the screen. It will show you where the fish are. Have fun fishing!
Tips for Using Your Fish Finder
Here are some tips to help you use your fish finder:
- Read the Manual: The manual has lots of good information. Read it to learn more about your fish finder.
- Keep it Clean: Wipe the screen with a soft cloth. This helps you see better.
- Check the Battery: Make sure the battery is charged. This keeps your fish finder working.
- Practice: Use your fish finder often. The more you use it, the better you will get.
Frequently Asked Questions
What Tools Do I Need To Install A Humminbird Fish Finder?
You need a screwdriver, drill, and wiring kit.
How Do I Mount The Transducer?
Mount the transducer on the boat’s hull. Follow the instructions in the manual.
Can I Install A Humminbird Fish Finder Myself?
Yes, you can. Follow the installation manual step-by-step.
Where Should I Place The Fish Finder On My Boat?
Place it where you can easily see and use it.
Conclusion
Hooking up a Humminbird Fish Finder is easy. Just follow these steps. You will be ready to fish in no time. Remember to keep your fish finder clean. Check the battery often. Read the manual. Most importantly, have fun. Happy fishing!
