You’ve just bought a new rod and reel, or maybe you’re digging an old combo out of the garage. You tie on a lure, flip the bail, and cast. The lure flies ten feet, the line explodes into a nest of loops, or worse, the whole spool peels off and tangles around the handle. We’ve all been there. Most anglers blame the reel or the line, but the real culprit is usually a poor string-up job.
This guide walks through the exact steps for every major reel type, the tension rules that prevent bird nests and wind knots, and the fixes for line memory that competitors only mention in passing. You’ll also learn how to use a line winder and a partner to make the job easier, plus a pre-fishing checklist to test your setup before you waste a day on the water.

Piscifun
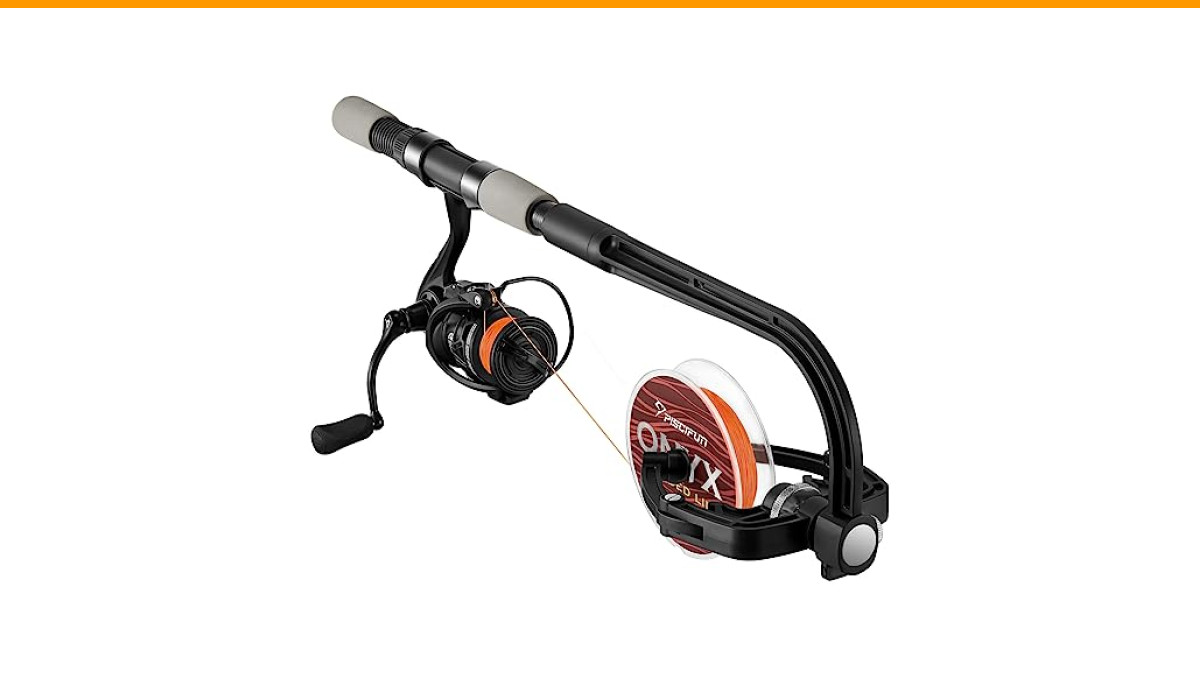
Piscifun Fishing Line Spooler, Portable Winder for Fishing Reels
- Compact and lightweight, easy to remove and install
- Adjustable Spool Width Control / Spring-loaded tension ensures even spooling
- The Suction Cup at the bottom could adsorb on any smooth surface, especially on glass material with water on
One tool that saves a ton of frustration is a portable line spooler. The Piscifun Fishing Line Spooler clamps onto any smooth surface with a suction cup and holds the bulk spool steady while you crank. It keeps tension even, which is half the battle when filling a reel. It’s not a magic wand, but it beats balancing a spool on a pencil between your knees.
Why a Perfect String Setup Matters More Than You Think
Line that’s spooled wrong causes more lost fish than a bad knot ever will. If the line goes on too loose, it digs into itself on the cast, creating friction that kills distance. If it goes on too tight, the spool can spring line off in coils, which leads to wind knots and tangles.
Uneven spooling is another killer. Line piled up at one end of the spool comes off in jerky bursts, which ruins accuracy and can cause backlash on baitcasters. The shape of the line on the spool should look like a flat-topped cylinder, not a cone or a pyramid.
There’s also the question of line twist. Monofilament and fluorocarbon have memory. If you spool them backwards (off the side of the bulk spool instead of over the top), you’re baking twists into the line that will show up as loops on your next cast. The fix is simple once you know the direction, and we’ll cover it below.
What You Need Before You Start (Tools & Gear)
You don’t need a tackle shop full of tools, but a few items make the job dramatically easier:
- Line spooler or winder – Keeps the bulk spool from spinning free and applies consistent tension.
- Scissors or line cutters – A dull knife crushes the line and weakens it.
- A pencil or dowel – For the old-school method of having a friend hold the spool.
- A damp cloth – Adds friction for tension and cools the line as it runs through your fingers.
- Line conditioner – Helps with memory on mono and fluoro, though it’s optional.
Match the line weight to your rod’s lure rating. A rod rated for 1/4 to 3/4 ounce lures pairs well with 8 to 12 pound test monofilament. A heavy flipping stick rated for 1 to 4 ounces wants 20 to 30 pound braid. The rod’s line rating, usually printed above the handle, is a safe starting point. Going too heavy reduces castability, and too light invites break-offs on the hookset.
How to String a Spinning Reel (The Most Common Setup)
Spinning reels are the workhorses of freshwater fishing. They’re forgiving for beginners but picky about spooling direction. Get this wrong and you’ll spend all day picking out wind knots.
Step 1: Threading the Line Through the Rod Guides
Open the bail by flipping it up. Run the line from the bulk spool through the first guide closest to the reel, then up through each guide to the tip. Keep the line in front of the reel spool, not wrapped around the reel body. Thread it from the bottom guide upward, not from the tip down.
If you’re using a line winder, place the bulk spool so the line comes off the top in a straight line to the reel. The Piscifun spooler’s suction cup holds the spool flat on a table or windshield, which keeps the line angle consistent. That consistency prevents the line from stacking unevenly.
Step 2: Securing the Line to the Spool (Arbor Knot)
The arbor knot is the standard for attaching line to the spool. Wrap the line around the spool once, then tie an overhand knot in the tag end. Tie a second overhand knot in the main line about 4 inches up. Pull the tag end so the first knot slides down to the spool and the second knot jams against it. Trim the tag end close.
This knot holds well under tension and doesn’t slip on a smooth spool. For braided line, some anglers add a piece of electrical tape over the knot to prevent slippage on the first few cranks. It’s a small step that saves a headache.
Step 3: Filling the Spool with Correct Tension
Close the bail and start cranking. The line must come off the bulk spool in the same direction it will leave the reel. For most spinning reels, that means the line comes off the bulk spool clockwise when viewed from the front. If you see the line twisting into loops as it goes on, flip the bulk spool over.
Apply tension by pinching the line between your thumb and forefinger a foot above the reel. The line should feel snug, like you’re pulling a stubborn weed. Too loose and the line will dig in; too tight and it’ll coil. Fill the spool to within 1/8 inch of the lip. Overfilling causes loops to fly off on the cast. Underfilling reduces casting distance because the line has to climb over the spool edge.
How to String a Baitcasting Reel (Avoiding the Bird’s Nest)
Baitcasters are less forgiving than spinning reels. The spool spins with the cast, and any inconsistency in line lay causes backlash. The string-up process is similar, but the tension rules are stricter.
Thread the line through the rod guides, then through the level-wind eye on the reel. Tie the arbor knot to the spool. Close the level-wind and start cranking. The line must come off the bulk spool so it enters the level-wind without crossing itself. If the line twists, you’ll see it immediately as a spiral on the spool.
The critical part is tension. Baitcasting spools are lighter and more sensitive to loose line. Apply firm pinch tension, but don’t squeeze so hard that you stretch the line. Fill the spool to about 1/8 inch from the top of the spool’s bevel. Overfilling a baitcaster is the fastest route to a backlash that takes twenty minutes to untangle.
One trick: after filling, tie on a heavy practice plug and make a few casts with the brake set high. This seats the line and reveals any uneven spots. If you see gaps or ridges, strip the line off and redo it. It takes five minutes and saves an hour on the water.
How to String a Spincasting Reel (Push-Button Simplicity)
Spincasting reels, like the classic Zebco 33, are the easiest to string. There’s no bail to flip and no level-wind to align. The line goes through the nose cone and out the hole in the front.
Open the faceplate by turning it counterclockwise. Tie the arbor knot to the spool. Close the faceplate, then thread the line through the rod guides. Press the push-button and start cranking. The button releases the spool so line can wind on without engaging the pickup pin.
Tension is less critical here because the spool is enclosed, but still aim for a full spool without bulging. A bulging spool causes the line to catch on the inside of the cone. If you’re replacing line on an old reel, check the drag washers while the spool is out. They’re cheap and often worn.
How to String a Fly Reel (Backing, Line, and Taper)
Fly reels follow a different logic. You start with a thin backing line, then the fly line, then a leader. The backing fills the spool so the fly line sits at the correct diameter, and it gives you extra length when a fish runs far.
Tie the backing to the spool with an arbor knot. Crank on the backing until the spool is about half full. The exact amount depends on the reel’s capacity, but a good rule is to fill until the backing reaches the spool’s arbor diameter plus about 1/4 inch. Then tie the fly line to the backing with an albright knot or a nail knot.
Wind the fly line on with moderate tension. Fly line is thick and doesn’t dig in as easily as mono, but it can still stack if you rush. The line should fill the spool to within 1/8 inch of the rim. Attach the leader with a loop-to-loop connection. Test the drag by pulling line off against the reel’s drag setting. It should feel smooth, not jerky.
Fly line memory is less of an issue than with mono, but a line that’s been stored coiled for months will have a set. Stretch it gently between your hands before spooling to relax the coils.
5 Common Mistakes That Ruin Your Setup (And How to Fix Them)
- Spooling line in the wrong direction – This causes line twist that shows up as loops on the cast. Fix: strip the line off, flip the bulk spool, and re-spool. Check the direction by letting out 10 feet of line and watching for spirals.
- Filling the spool too full – Line jumps off in coils and tangles. Fix: strip off line until the fill is 1/8 inch below the spool lip. Use a line winder with adjustable spool width to avoid this from the start.
- Using too much tension – Stretched line creates memory and reduces strength. Fix: back off the pinch pressure. The line should be snug, not tight enough to hum.
- Ignoring line memory on mono – Old monofilament holds coils from the bulk spool. Fix: use line conditioner before spooling, or soak the spool in warm water for 10 minutes before filling.
- Not matching line to rod power – A heavy line on a light rod kills casting distance and can break the rod on a hookset. Fix: check the rod’s line rating and stay within it. For braid, use a lighter test than mono because braid has no stretch.
Pro Tips: Using a Line Winder and Partner Techniques
You don’t need a partner if you have a line winder. The Piscifun spooler holds the bulk spool flat and lets you control tension with the spring-loaded arm. It’s especially helpful for braided line, which tends to slip off a hand-held spool. The suction cup works best on a clean, smooth surface; a drop of water on the glass helps it grip.
If you’re going old-school with a friend, here’s the method. Put a pencil through the bulk spool’s hole. Have your partner hold the pencil horizontally, with the spool spinning freely. You crank the reel and pinch the line for tension. The partner’s job is to keep the spool level and stop it from wobbling. Wobble causes uneven line lay.
For braided line, consider a monofilament backing. Braid is thin and can slip on a smooth spool. Fill the spool halfway with mono, then tie the braid to the mono with a double uni knot. This saves money (braid is pricey) and gives the braid something to bite into. The ratio is roughly 50/50 for most reels, but adjust based on the spool’s capacity.
One more tip: after spooling, tie the line to a stationary object and walk backwards, letting out 30 to 40 yards of line under light tension. This seats the line on the spool and exposes any twists. Reel it back in with your fingers pinching lightly. You’ll feel any rough spots immediately.
Pre-Fishing Checklist: Test Your Setup Before You Cast
Before you make that first cast, run through this quick list. It takes two minutes and catches most problems.
- Check the spool fill: line should sit 1/8 inch below the lip on spinning and baitcasting reels.
- Look at the line lay: it should be flat and even, with no ridges or valleys.
- Pull 10 feet of line off the reel and inspect for twists or loops. If you see any, re-spool.
- Test the drag: set it to about one-third of the line’s breaking strength. Pull line off against the drag; it should come out smoothly.
- Make a practice cast in an open area with a heavy lure. Watch the line come off the spool. If it billows or loops, the tension during spooling was wrong.
- Check the rod guides for nicks or cracks. A chipped guide will fray your line in ten casts.
Frequently Asked Questions (Line Memory, Backing, and More)
Why does my monofilament line keep coiling up no matter how I spool it?
Monofilament has a plastic memory that holds the shape of the bulk spool. Even with perfect spooling, it will coil until it’s been stretched by casting. Use line conditioner before you spool it, and after the first trip, stretch the line by pulling 20 yards off the reel and walking it tight. The coils will relax after a few casts. If the line is more than a year old, replace it. Old mono gets brittle and holds memory worse.
How much backing do I need for braided line?
For most spinning reels, a 50/50 split works well. Fill the spool halfway with monofilament, then tie on your braid and fill the rest. The mono backing should be the same test or slightly lighter than the braid. A heavier mono backing can create a step where the braid meets it, which causes uneven line lay. For baitcasters, you can use less backing, about one-third of the spool, because the spool is narrower.
Should I wet the line before spooling?
For monofilament and fluorocarbon, yes. Wetting the line as it goes on helps it seat tighter and reduces heat from friction. Run the line through a damp cloth while you crank. For braided line, it doesn’t matter as much, but a wet cloth still helps keep tension even. Just don’t soak the spool itself, as water can get inside the reel and corrode the bearings.
Can I string a fishing rod without a line winder?
Absolutely. The pencil-and-partner method works fine. But a winder helps in one specific way: it keeps the bulk spool from spinning on its own. When a bulk spool spins free, it overruns and dumps line in loops. The Piscifun spooler’s spring-loaded tension prevents that overrun. If you’re doing this alone, a winder is nearly essential. If you have a patient friend, the pencil method is fine.
How do I know if my line is on the spool too tight or too loose?
Pinch the line between your fingers as it goes on. If you can easily stop the line with a light pinch, it’s too loose. If your fingers hurt after a few cranks and the line feels like wire, it’s too tight. A good test: after filling, press your thumb against the line on the spool. It should have a slight give, like a firm pillow, not rock hard. If it’s rock hard, strip it off and redo with less tension.
What to Remember Next Time You Spool Up
- Match line weight to your rod’s rating, and use braid one test lighter than mono.
- Spool spinning reels with the line coming off the top of the bulk spool to avoid twist.
- Fill all reels to within 1/8 inch of the lip, no more, no less.
- Use a line winder or a partner to keep tension even and prevent overruns.
- Add monofilament backing for braid to prevent slippage and save money.
- Treat mono with line conditioner before spooling to reduce memory.
- Test your setup with a practice cast before you head out, and check your drag while you’re at it.
Stringing a rod is a twenty-minute job that pays off all season. Get it right once, and you’ll never go back to fighting tangles.