You’ve lost a dozen soft plastics to snags in one afternoon, and the tackle shop wants four bucks apiece for replacements that barely last a trip. Sound familiar? Most anglers hit that point where buying soft baits gets old. The good news is you can pour your own lures at home for pennies each, and the molds themselves are cheaper than you think.
This guide walks you through the entire process: choosing the right silicone, building a mold box, mixing and pouring, and then moving up to two-part injection molds for high-detail baits. You’ll also learn how to heat plastisol safely, layer colors, fix common defects, and store molds so they last for years. No fluff, just the practical steps I’ve learned from pouring hundreds of worms and swimbaits.

FusionX Fishing Lures
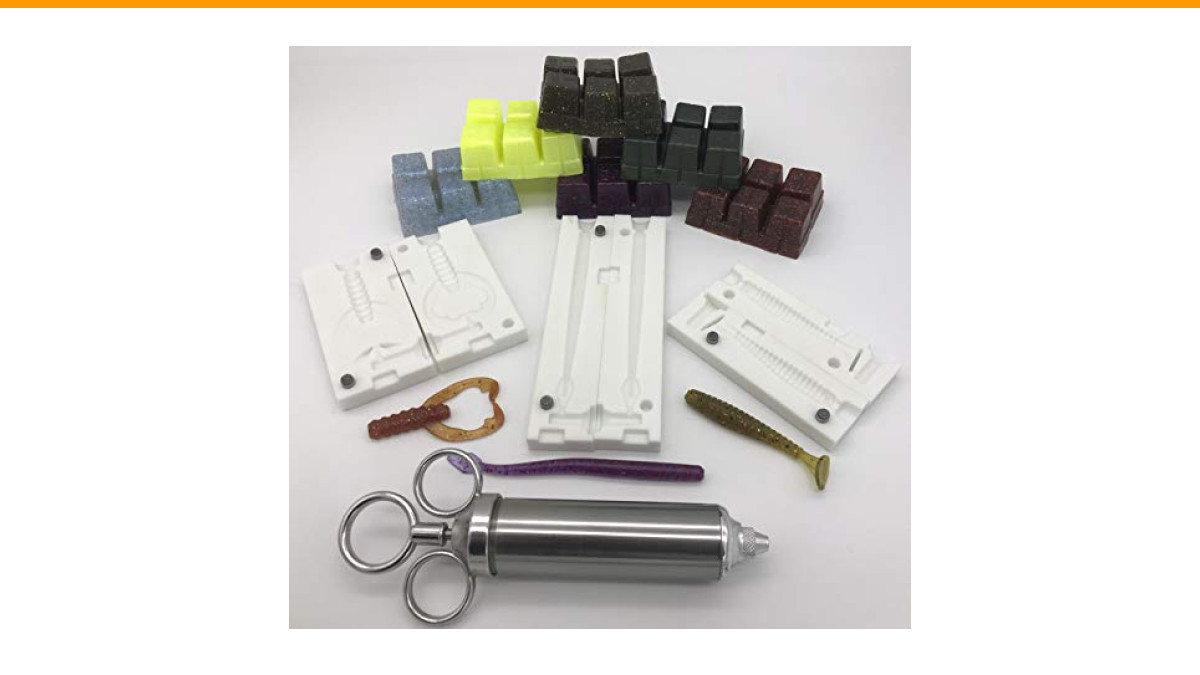
INJEX Petite BASS Lure Making Kit - 3 Soft Plastic Injection Fishing Lure MOLDS Injector 6 Resin Colors - FusionX Fishing
- 3 - CNC Machined High Density Resin Injection Molds ( 5" Worm, 3" Swim Bait, 2-1/2" Craw)
- FusionX Fishing 60 Degree Taper Stainless Steel Mold Injector
- 6 Colors of X-Cube Plastic Resin
If you want to skip the trial-and-error phase, a starter kit like the INJEX Petite BASS Lure Making Kit gives you three CNC-machined resin molds (a 5-inch worm, a 3-inch swim bait, and a 2.5-inch craw), a stainless steel injector, and six colors of X-Cube plastic resin. It’s a solid way to learn the basics before you invest in raw silicone and custom masters. Check the current price on Amazon if that interests you.
Why DIY Lure Molds Beat Buying Off-the-Shelf
Let’s talk numbers. A bag of quality soft plastics runs $5 to $8 for five to ten baits. A gallon of plastisol costs about $50 to $60 and yields roughly 200 to 300 worms depending on size. That’s 20 to 30 cents per bait, plus colorant and glitter. Even with mold costs, you break even after a few sessions.
Molds are the real investment. A single-cavity aluminum mold for a popular worm might set you back $30 to $60. But making your own silicone mold costs $15 to $25 in materials for a block that can pour dozens of baits. The trade-off is durability: aluminum lasts thousands of pours, while silicone molds start wearing after a few hundred, especially with hot plastisol.
There’s another advantage: customization. You can copy a favorite store-bought lure that’s been discontinued, or design your own profile with a tail that wiggles just right. That’s impossible with commercial molds unless you’re ordering custom CNC work, which is pricey.
So the real question isn’t whether DIY saves money—it does. It’s whether you enjoy the tinkering. If you like tuning your own gear, mold making fits naturally. If you’d rather fish, maybe stick to buying. But most anglers I know get hooked on the first successful pour.
Essential Materials: Silicone, Plastisol, and the Right Tools
Before you mix anything, gather these basics:
- Silicone rubber (platinum-cure or tin-cure) for the mold
- Plastisol (liquid PVC) for the baits
- Mold box (LEGO bricks, acrylic sheets, or foam board)
- Master lure (the bait you’re copying)
- Release agent (spray or brush-on)
- Heat source (microwave or double boiler)
- Thermometer (candy thermometer works)
- Mixing cups and stir sticks
- Glitter, colorant, and scent (optional)
For silicone, you’ll see two types. Tin-cure (like Mold Max) is cheaper and easy to use, but it shrinks slightly and can inhibit cure if it touches certain plastics. Platinum-cure (like Smooth-On OOMOO or Dragon Skin) has less shrinkage and better detail, but it costs more and hates sulfur-based clays. For most lure masters, platinum-cure is worth the extra few bucks.
Understanding Shore Hardness and Mold Life
Shore A hardness tells you how flexible the cured silicone is. A Shore A of 10 is very soft, almost jelly-like, and great for thin, detailed lures like worms. A Shore A of 30 is firmer, holds up better to repeated injections, and resists tearing when you pop out baits with sharp appendages.
For open-pour molds, I prefer Shore A 10 to 20 because it flexes enough to release a worm without ripping. For injection molds, Shore A 25 to 35 is better—it maintains cavity shape under pressure and lasts longer. The trade-off is that harder silicone captures fine details like scale patterns less crisply. If you’re copying a soft plastic with subtle texture, go softer. If you’re pouring hundreds of baits, go harder.
Mold life also depends on how you treat it. Hot plastisol (around 350°F) degrades silicone faster than cooler pours. Using a release agent every few pours helps. And never let a mold sit with plastisol inside—it cures solid and can tear the cavity when you try to remove it.
Step-by-Step: Creating a One-Part Open-Pour Mold
Open-pour is the easiest way to start. You embed the master lure halfway in silicone, let it cure, and pour plastisol into the cavity. It works best for flat or half-round baits like finesse worms or creature baits.
Building the Mold Box and Securing the Master
First, get a mold box. LEGO bricks are perfect because they’re modular and waterproof. Build a rectangle about an inch larger than your master on all sides and at least an inch deep. Seal the bottom with a flat piece of acrylic or a smooth plastic plate.
Place your master lure in the box. For a one-part mold, you only want half of the lure exposed. Press it gently into a small amount of clay or hot glue to hold it in place. Make sure the hook hangers or any hardware are removed—you’re molding the body only. For a worm, that means the tail lies flat; for a craw, you might need to pin the claws down.
Spray the master and the box with release agent. This prevents the silicone from sticking to the lure or the box walls. Let it dry for a few minutes.
Mixing, Degassing, and Pouring the Silicone
Mix your silicone according to the manufacturer’s ratios. For most two-part silicones, that’s 1:1 or 10:1 by volume. Stir thoroughly but slowly to avoid introducing air bubbles. Then degas. You can use a vacuum chamber, but a simpler trick is to pour the mixed silicone into a thin stream from one cup to another a few times—this pops many bubbles. Or just let it sit for 5 minutes after mixing.
Pour the silicone into a corner of the mold box, letting it flow over the master. Pour slowly to minimize bubbles. Fill to at least 1/4 inch above the highest point of the lure. Let it cure per the instructions—typically 4 to 24 hours for platinum-cure, less for tin-cure.
Once cured, remove the silicone block from the box. You’ll see a cavity shaped like the top half of your lure. That’s your mold. To pour, heat plastisol, pour it into the cavity, let it cool, then peel the bait out. Simple.
Leveling Up: Building a Two-Part Injection Mold
Open-pour gives you flat, one-sided baits. For a realistic 3D worm or a swimbait with a paddle tail, you need a two-part mold that encloses the lure completely. Injection molding forces plastisol into the cavity under pressure, capturing every detail.
Creating Keys and Sprues for Perfect Alignment
Start with your master lure suspended in the mold box. You’ll pour the first half of silicone, let it cure, then flip it and pour the second half. To keep the two halves aligned, you need keys—small depressions or bumps in the first half that fit into matching holes in the second. You can make keys by pressing a small ball bearing or a pencil eraser into the first half before it cures, or by cutting small notches after.
You also need a sprue—the channel through which plastisol flows into the cavity. For a worm, place a small tube (like a drinking straw) at the head of the lure, extending above the mold surface. When you pour the first half, the straw creates a hole. After both halves are cured, that hole becomes the injection port.
Venting is another piece. Air needs to escape as plastisol enters. Use a thin blade to cut a shallow channel from the tail of the lure to the edge of the mold. This prevents air pockets that cause voids.
Low-Cost Injection Methods (Syringe vs. Press)
You don’t need a $200 injection press. A large syringe (60cc) works for small baits. Heat the plastisol, draw it into the syringe, and inject into the sprue hole. The trick is to keep the plastisol hot enough to flow but not so hot it burns the silicone. A turkey baster works for open-pour, but for injection, a syringe gives you control.
Another option is a modified caulk gun. Remove the plunger and attach a metal tube that fits the sprue. Fill the tube with plastisol, then squeeze the trigger to push it into the mold. This works well for larger lures and gives you more pressure than a syringe.
Whichever method you use, inject slowly. Fast injection traps air. Hold the mold closed with rubber bands or clamps—the INJEX kit doesn’t include clamps, so you’ll need to buy a couple of spring clamps from the hardware store.
Pouring and Injecting Your First Lures
Heating Plastisol Safely and Avoiding Bubbles
Plastisol needs to reach about 350°F to fully fuse. A microwave is easiest: heat in 30-second bursts, stirring between each, until it’s clear and smooth. Use a microwave-safe cup with a handle—it gets hot. A double boiler on the stove is safer but slower. Either way, never leave it unattended. Overheated plastisol burns and releases fumes you don’t want to breathe.
Bubbles are your enemy. They come from two sources: air stirred into the liquid, and moisture in the mold. To minimize, stir slowly and let the plastisol sit for a minute after heating. Before pouring, lightly spray the mold cavity with release agent and wipe it out—this also displaces air. For injection, fill the syringe slowly and tap it to dislodge bubbles before injecting.
Layering Colors and Adding Glitter
Want a two-tone bait? Inject one color, let it cool for a minute, then inject a second color into the same cavity. The first layer forms a skin, and the second flows around it, creating a marbled effect. For a flake effect, add glitter to the plastisol before heating. Stir it in thoroughly, then heat. The glitter won’t melt, but it will suspend evenly.
For a laminated worm—where the tail is one color and the body another—you need a two-part mold with separate sprue holes for each section. That’s advanced. Start with simple marbling; it looks great and is easy.
Add scent (like garlic or salt) after heating, but before pouring. Stir it in. Salt also adds weight and makes the bait sink faster. Use fine salt for a subtle effect, or coarse for a crunchy texture.
Troubleshooting: Fixing Bubbles, Tears, and Warped Lures
Bubbles in the bait are cosmetic. You can pop them with a pin after the bait cools, but the hole remains. Better to prevent them: inject slower, vent more, or lower the plastisol temperature slightly (but keep it above 320°F).
Tears in the mold happen when you pull a bait out too forcefully or when the silicone is too soft. Patch a tear with a dab of fresh silicone and let it cure. For large tears, you might need to re-pour the mold. To avoid tears, use release agent and flex the mold gently from the edges, not the middle.
Warped lures come from uneven cooling. Let the mold cool slowly at room temperature. Don’t put it in the fridge to speed things up—rapid cooling causes warpage. If a bait comes out bent, reheat it in warm water (150°F) and straighten it by hand while it cools.
Mold Maintenance and Storage for Longevity
After each session, clean the mold with warm soapy water and a soft brush. Dry it completely. Store silicone molds flat, away from sunlight and heat. UV light degrades silicone over time. A plastic bin with a lid works well.
Every few pours, spray a silicone-safe release agent inside the cavity. This prevents plastisol from sticking and extends mold life. Also, check for plastisol residue in the sprue or vent channels—use a toothpick to clear it.
If you’re using the INJEX kit molds, they’re resin, not silicone. Resin molds are more rigid and don’t flex, so you need to be extra careful when removing baits. Use a release agent every time. They also don’t tolerate high heat as well as silicone, so keep your plastisol around 340°F max.
Frequently Asked Questions
Can I use any silicone for lure molds?
No. You need a two-part silicone rubber, not caulk or craft silicone. Look for mold-making silicone (like Smooth-On OOMOO or Dragon Skin). Check the Shore hardness—for lures, Shore A 10 to 30 is ideal. Avoid silicone with added fillers; they reduce detail.
How long does a DIY silicone mold last?
With proper care, a silicone mold can last for 100 to 300 pours. The exact number depends on the silicone’s hardness, the complexity of the lure (thin tails tear faster), and how hot you run your plastisol. Using a release agent and not overheating will extend its life.
Do I need a vacuum chamber to degas silicone?
No, but it helps. A vacuum chamber removes air bubbles from the mixed silicone before pouring, which means fewer surface defects on the mold. If you don’t have one, you can pour the silicone in a thin stream and tap the mold box on the counter to release bubbles. It’s not perfect, but it works for most lures.
What’s the best way to heat plastisol without a microwave?
A double boiler on the stove is the safest alternative. Fill a pot with water, bring it to a simmer, and place a metal or glass container with plastisol inside. Stir constantly until it reaches 350°F. This takes longer than a microwave but gives you more control and reduces the risk of burning.
Can I make a mold from a store-bought soft plastic lure?
Yes, but with caveats. Store-bought baits often have a glossy finish that may not capture fine details, and they might be made of a material that inhibits silicone cure. Wash the bait with soap and water, then spray it with a release agent. If the silicone doesn’t cure, use a different master or apply a thin coat of clear acrylic spray as a barrier.
The Bottom Line: Is It Worth the Effort?
- DIY molds cost $15 to $25 in silicone versus $30 to $60 for a single commercial mold.
- Plastisol brings per-bait cost down to 20 to 30 cents, so you recoup your investment quickly.
- Open-pour molds are perfect for flat baits and beginners; injection molds handle 3D profiles but require more setup.
- Shore A 10 to 20 for open-pour, Shore A 25 to 35 for injection—choose based on detail and durability needs.
- Always degas silicone and vent your injection molds to avoid bubbles.
- Heat plastisol to 350°F, but never above 360°F, to avoid burning.
- Store molds flat in a cool, dark place and use release agent every few pours to extend their life.
Making your own lure molds isn’t hard, but it does take patience. The first few baits might look rough. Keep notes on what works—temperature, injection speed, release agent frequency—and you’ll be pouring tournament-ready plastics in no time. That’s the real payoff: catching fish on a bait you made yourself.