
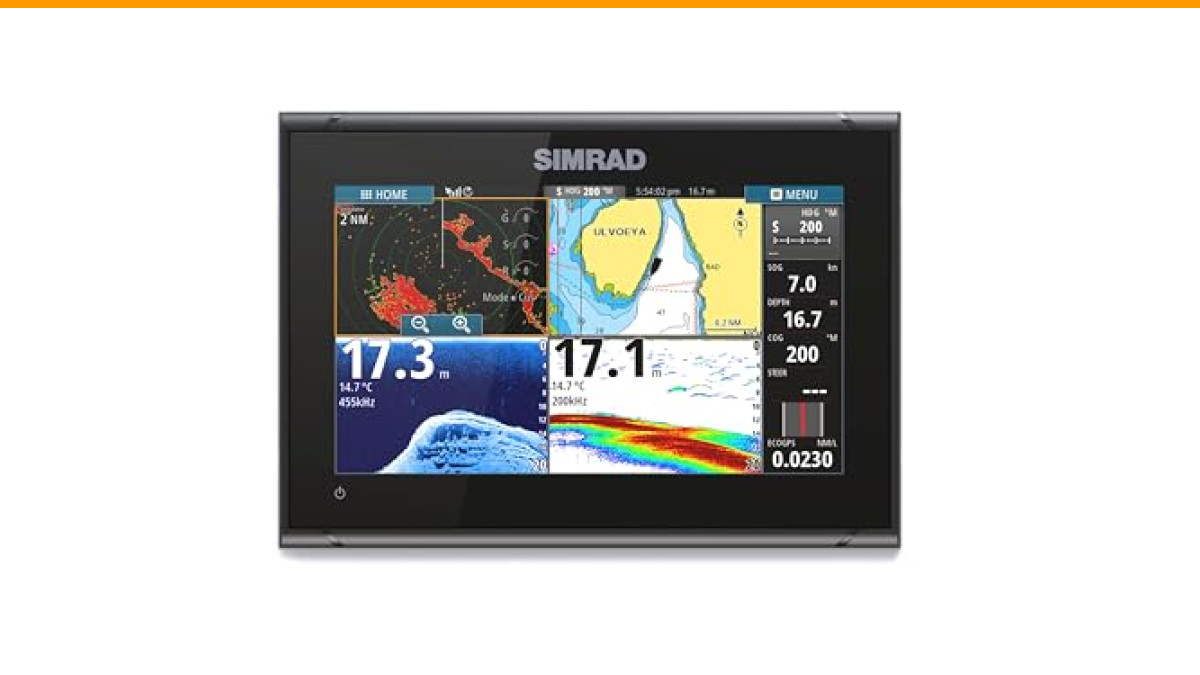
Before You Start: Understanding Your Simrad Display and Keypad
You just mounted your Simrad, powered it on, and now you’re staring at a screen full of numbers and a blinking cursor. The first instinct is to press buttons randomly. Don’t. The learning curve is shorter than you think if you understand the basic layout first.
Every Simrad unit, from the compact GO7 to the larger NSS evo3S, uses the same core logic. The keypad on the right side controls the cursor. The rotary dial (or the plus/minus keys on older models) adjusts zoom and gain. The center button confirms selections. That is 90% of what you need to operate the unit.

Simrad
Simrad GO9 XSE Chartplotter and Fishfinder with 83/200 Transom Mount Transducer and C-MAP Discover Chart Card, 9 Inch Screen, Black, 000-16293-001
- MULTIFUNCTION DISPLAY: With GO9, add GPS navigation, sonar support, radar capability, and much more to your boat: perfect for spor…
- C-MAP DISCOVER: Included C-MAP DISCOVER card with full-featured Vector Charts, Custom Depth Shading, Tides & Currents, C-MAP high-…
- HDI TRANSDUCER WITH BUILT‑IN SONAR: Includes 83/200 kHz HDI transducer support for clear CHIRP sonar and DownScan Imaging to help…
Spend ten minutes in your driveway with the unit powered on. Press the Pages button and scroll through the different views. You’ll see Sonar, Chart, and Radar options. Each press of the power button cycles through backlight levels. A quick press of the power key opens the settings menu for screen brightness and night mode. Set the brightness to about 60% during the day; anything higher washes out the screen in direct sunlight.
If you have the Simrad GO9 XSE chartplotter and fishfinder, you get a 9-inch screen that makes split-screen views usable without squinting. The included C-MAP Discover card covers US and Canadian waters with detailed bathymetry, which helps you find drop-offs before you even turn on the sonar.
Step-by-Step Sonar Setup: Transducer, Frequency, and CHIRP Selection
Before touching the software, verify the transducer installation. The 83/200 kHz HDI transducer that ships with the GO9 needs to sit slightly below the hull. If it sits flush with the bottom of the boat, it will read surface turbulence instead of the bottom. The back of the transducer should sit about 1/8-inch lower than the front edge.
Now power on the unit and press the Pages button. Select Sonar. You’ll see a single-frequency view by default. Press the Menu key twice to open the full sonar settings menu. Scroll to Sonar Setup and select Transducer Type. Choose the correct model from the list. If you have the standard HDI, select that. Using the wrong transducer profile makes the unit display garbage data.
Next, set the frequency. Here is the rule of thumb:
- Use 200 kHz for shallow water under 100 feet. It gives you the best target separation and a narrow cone that shows fish arches clearly.
- Use 83 kHz for water deeper than 150 feet. The wider cone covers more area, but you lose some detail.
- Use CHIRP (when available) as your default. CHIRP sweeps a range of frequencies instead of sending a single tone. It produces a cleaner image with less noise.
For the GO9, enable CHIRP by going into Sonar Setup and selecting Sonar Mode. Choose CHIRP, then select the frequency range. Medium CHIRP (85-135 kHz) is the best all-around choice. It works in both fresh and saltwater without much adjustment.
How to Adjust Gain, Range, and Color for a Clear Picture
Gain is the most misunderstood setting on any fish finder. It controls the sensitivity of the receiver. Too high, and the screen fills with clutter. Too low, and you miss fish and bottom detail.
Here is the click-by-click process for the GO9:
- Press the Menu key once. This opens the quick settings bar.
- Scroll to Gain and press the center button.
- Select Auto first. Let the unit run for two minutes. Watch the bottom trace.
- If the bottom line looks thick and fuzzy, reduce gain manually by 10-15%. Press the Menu key, select Gain, then choose Manual. Use the rotary dial to lower it.
- If you see only a faint bottom line, increase gain by 10%.
The goal is a clean bottom line with a few scattered dots above it. If you see a solid red band across the screen, your gain is too high. Turn it down until the band breaks up into individual pixels.
Range is simpler. Press the plus and minus keys on the keypad to zoom in and out. Set the range so the bottom occupies the lower third of the screen. That gives you the most water column coverage while keeping bottom detail visible. For deep water, enable Auto Range and let the unit track the bottom. It works well enough that you rarely need manual range control.
Color palette matters more than people think. Press Menu, scroll to Palette, and try the different options. The Blue palette works best in bright sunlight. The Classic palette (white background with black bottom) is easier to read in low light. I prefer the Sepia palette for freshwater because it shows soft mud bottoms better than the high-contrast palettes.
Reading the Screen: Identifying Fish, Structure, and Bottom Hardness
You see a red arc on the screen. Is it a fish? Not always. A classic fish arch appears when the fish passes through the center of the sonar cone. The signal returns stronger as the fish enters the cone, peaks at the center, then fades as it exits. That produces the arch shape.
Straight lines or dashes are usually bait balls or schooling fish that are too dense to resolve individually. A thick, continuous line that sits just off the bottom is often a thermocline — a layer of water with a different temperature. Fish will hold just above or below this line, so it’s worth marking.
Bottom hardness is visible in the thickness and color of the bottom return. A hard bottom (rock, gravel, shell) produces a thin, bright line with a strong second echo directly below it. A soft bottom (mud, silt, heavy vegetation) produces a thick, darker line with no second echo. Use this to find transitions — where rock meets sand — because fish love those edges.
To see structure clearly, switch to DownScan Imaging. Press the Pages button, select Split Screen, then choose Sonar + DownScan. The DownScan view shows a photo-like image of the bottom. You’ll see individual rocks, logs, and small depressions that the standard CHIRP view might blur together. This split-screen setup is the most effective way to cover water and identify targets quickly.
Setting Waypoints, Marking Hotspots, and Using the MOB Function
When you see something interesting on the sonar, mark it immediately. Press the Waypoint key (the flag icon on the keypad). A waypoint drops at your current GPS position. Name it something useful like “Rock Pile 45ft” instead of leaving it as “WP001.” You’ll thank yourself next season.
To edit a waypoint name, highlight it on the chart, press the center button, and select Edit Waypoint. You can change the icon, name, and depth. This takes about twenty seconds and makes your waypoint list actually useful.
The MOB (Man Overboard) function is critical and often overlooked. Press and hold the MOB key (usually the power key on older models, or a dedicated key on newer units) for three seconds. The unit drops a waypoint, switches to the chart view, and displays a line from your current position back to the MOB point. Practice this once in your driveway so you know which key does what. In a real emergency, you won’t have time to read the manual.
You can also drop a waypoint directly from the sonar screen using the cursor. Press the cursor key to activate the cursor on the sonar display. Move it to a target on the screen, then press the center button and select Drop Waypoint. This is useful when you see a fish arch at 30 feet and want to return to that exact spot later.
Troubleshooting: Fixing Noise, Air Bubbles, and Lost Bottom Signal
Three problems account for 90% of Simrad support calls. Here’s how to fix each one.
No bottom reading. Check the transducer cable connection first. It should click firmly into the back of the unit. Then check the transducer mounting. If the boat is on a trailer, make sure the transducer isn’t tucked up into the trailer bunk. Finally, verify the transducer is in the water. At planing speed, a transom-mounted transducer can pop out of the water if it’s mounted too high. Reposition it so the bottom of the transducer sits at least 1/4-inch below the hull line.
Noise and interference. You’ll see random dots or vertical streaks on the screen. This is usually electrical interference from the engine’s alternator or the trolling motor. Turn off the trolling motor and see if the noise disappears. If it does, you need a separate transducer for the trolling motor. For engine noise, check that the transducer cable isn’t routed alongside the engine wiring. Move it to the opposite side of the boat.
Air bubbles under the transducer. At speed, you’ll lose the bottom signal intermittently. This is cavitation — air bubbles passing over the transducer face. The fix is to lower the transducer one notch on the mounting bracket. You want the water to flow smoothly over the face. If it’s already at the lowest setting, add a small wedge plate to angle it down slightly.
One more thing: if the unit freezes or behaves erratically, do a soft reset. Press and hold the power key for 10 seconds until the unit shuts down completely. Then power it back on. This clears the memory cache without erasing your waypoints or settings.
Pro Tips for Saltwater vs. Freshwater and Shallow vs. Deep Water
Saltwater and freshwater behave differently on sonar. Saltwater is denser, so the signal travels faster and returns stronger. You can run slightly lower gain in saltwater. Freshwater, especially in lakes with heavy algae, scatters the signal. You’ll need to increase gain by 10-20% to see the same detail.
In shallow water (under 20 feet), turn the frequency up to 200 kHz and increase the scroll speed. The faster scroll speed prevents targets from being stretched horizontally across the screen. Set the scroll speed to maximum in the Sonar Setup menu.
In deep water (over 300 feet), switch to 83 kHz or low CHIRP (40-60 kHz). The lower frequency penetrates deeper with less signal loss. Increase the gain slightly and use the Auto Range setting so the unit can track the bottom as it gets deeper. Also, reduce the scroll speed to 50% — the sonar needs more time to receive the return signal from deep water.
For saltwater bottom fishing, use the DownScan view more often than the standard CHIRP view. DownScan shows you the exact structure where snapper or grouper hold. For trolling in open water, stick with the standard CHIRP view and look for bait balls in the water column.
Quick Reference Settings Chart for Common Scenarios
| Scenario | Frequency | Gain | Range | Scroll Speed | Palette |
|---|---|---|---|---|---|
| Shallow freshwater (0-30 ft) | 200 kHz | Auto + 10% | 30 ft | Max | Sepia |
| Deep freshwater (30-150 ft) | Medium CHIRP | Auto | Auto | 75% | Blue |
| Shallow saltwater (0-40 ft) | 200 kHz | Auto – 10% | 40 ft | Max | Classic |
| Deep saltwater (150-400 ft) | Low CHIRP | Auto + 5% | Auto | 50% | Blue |
| Trolling in open water | Medium CHIRP | Auto | 60 ft | 75% | Sepia |
| Bottom fishing on structure | 200 kHz + DownScan | Manual + 15% | 80 ft | Max | Classic |
These settings are starting points, not rules. Water clarity, algae bloom, and bottom composition all affect the picture. Run these, then adjust gain by 5% increments until the screen looks clean.
Frequently Asked Questions
Why is my Simrad fish finder not showing the bottom?
Check the transducer cable connection first. If that’s solid, verify the transducer is in the water at speed. A transducer mounted too high will lose the bottom when the boat planes. Lower it one notch on the bracket. Also, confirm you selected the correct transducer type in the Sonar Setup menu.
What does CHIRP actually do on a Simrad?
CHIRP sends a sweep of frequencies (e.g., 85-135 kHz) instead of a single pulse. This gives you better target separation and a cleaner image, especially in deep water or around structure. The downside is slightly slower update speed compared to broadband sonar. For most anglers, CHIRP is the better default.
How do I mark a fish on my Simrad sonar screen?
Press the cursor key to activate the cursor on the sonar display. Move the cursor over the fish arch using the directional pad. Press the center button and select Drop Waypoint. The waypoint saves with the GPS position and depth of that target.
Can I use my Simrad in both fresh and saltwater?
Yes, the unit and the included HDI transducer handle both. You need to adjust the gain and frequency per the chart above. Saltwater requires slightly lower gain due to higher density. Freshwater with heavy algae requires higher gain. No hardware change is needed.
What is the difference between DownScan and regular sonar?
Regular sonar (CHIRP or broadband) sends a cone-shaped beam and shows fish arches. DownScan sends a thin, focused beam that produces a photo-like image of the bottom. DownScan shows structure detail like rocks and logs, but it has a narrower coverage area and doesn’t show fish arches as well. Use them together in split-screen for the best results.
Final Thoughts on Getting the Most From Your Simrad
You don’t need to master every menu to be effective with a Simrad fish finder. The core skills are simple: set the frequency for your depth, adjust gain until the screen is clean, and learn to read the difference between a fish arch and a thermocline.
- Start with Auto gain and adjust manually by 10% increments — it’s faster than you think.
- Use split-screen (CHIRP + DownScan) for bottom fishing; it shows both fish and structure.
- Mark waypoints with descriptive names like “Rock Pile 45ft” — generic names become useless.
- Practice the MOB function once before you need it. It takes five minutes.
- Lower the transducer one notch if you lose bottom signal at speed. That fixes most cavitation issues.
- Match frequency to depth: 200 kHz for shallow, 83 kHz or low CHIRP for deep.
- Keep a soft reset (hold power for 10 seconds) in your back pocket for frozen screens.
The GO9 XSE is a capable unit out of the box. The included transducer and C-MAP card cover most coastal and inland scenarios. Spend one afternoon on the water with this guide and you’ll be reading the screen like you’ve owned it for years.
