To tie line onto a fishing reel, start by threading the line through the reel’s guide, and then tie an arbor knot around the spool. This will secure the line onto the fishing reel.
Now, let’s dive into the step-by-step process of how to tie line onto a fishing reel. Fishing is a popular outdoor activity that requires various techniques and skills. One essential skill every angler needs to master is tying line onto a fishing reel.
Properly securing the fishing line onto the reel is crucial to ensure a successful and enjoyable fishing experience. In this guide, we will walk you through the step-by-step process of how to tie line onto a fishing reel, providing you with all the necessary information you need to get started. So, grab your fishing reel and let’s begin!

Credit: en.wikipedia.org
Understanding Fishing Line Types And Reel Compatibility
When it comes to tying line onto a fishing reel, it’s important to understand the different types of fishing lines and ensure they are compatible with your reel. Choosing the right fishing line for your reel can greatly impact your fishing success.
Here, we will discuss the various fishing line types and their characteristics, as well as how to ensure compatibility between the fishing line and reel.
Different Types Of Fishing Lines And Their Characteristics
- Monofilament: This type of fishing line is widely used due to its affordability and versatility. It is made from a single strand of nylon, which gives it added strength and durability. Monofilament lines are known for their high knot strength and resistance to abrasion. They are suitable for a wide range of fishing applications, from freshwater to saltwater.
- Fluorocarbon: Fluorocarbon lines are known for their low visibility in the water. They are made from a dense material that closely resembles water, making it difficult for fish to detect. Fluorocarbon lines also have a high level of abrasion resistance, making them ideal for fishing in rocky areas.
- Braided: Braided lines consist of multiple strands of synthetic fibers such as dyneema or spectra. They are known for their high strength-to-diameter ratio, allowing anglers to use thinner lines without sacrificing strength. Braided lines have minimal stretch, which enhances sensitivity and allows for better hook sets. They are commonly used for fishing techniques that require strong and durable lines, such as deep-sea fishing or heavy cover fishing.
Choosing The Right Fishing Line For Your Reel
- Consider the fishing technique: Different fishing techniques require specific types of lines. For example, if you are planning to fish in clear water conditions, a fluorocarbon line would be a better choice due to its low visibility. On the other hand, if you are targeting larger fish species or fishing in heavy cover, a braided line would provide the necessary strength.
- Match the line weight to the reel: It is crucial to match the line weight to the reel’s recommended specifications. Using a line that is too heavy or too light for the reel can affect its performance and could even lead to equipment failure. Check the reel’s documentation or consult with a fishing expert to determine the appropriate line weight for your reel.
- Consider the fishing environment: The fishing environment plays a significant role in determining the fishing line type. For example, if you are fishing in freshwater, a monofilament line would be suitable due to its versatility and cost-effectiveness. On the other hand, if you are fishing in saltwater, a fluorocarbon line’s resistance to corrosion would be advantageous.
Ensuring Compatibility Between The Fishing Line And Reel
- Check the reel’s specifications: Before purchasing a fishing line, verify the reel’s specifications to ensure compatibility. Look for information regarding the recommended line weight and type. This will help you select the appropriate fishing line for your reel.
- Consider the reel’s line capacity: Another factor to consider is the reel’s line capacity. Each reel has a specific capacity, which refers to the maximum amount of line it can hold. Ensure that the fishing line you choose fits within the reel’s capacity to avoid any issues while spooling.
- Consult with fishing experts: If you are unsure about the compatibility between your fishing line and reel, it’s always helpful to consult with fishing experts or visit a local tackle shop. They can provide guidance based on their experience and help you make an informed decision.
By understanding the different types of fishing lines and their characteristics, selecting the right fishing line for your reel, and ensuring compatibility, you can maximize your chances of successful fishing adventures. Remember to always follow the manufacturer’s recommendations and take into account the specific fishing conditions you will be facing.
Happy fishing!
Step-By-Step Guide To Tying Line Onto A Fishing Reel
Selecting The Proper Knot For Your Fishing Line And Reel Type
When it comes to tying line onto a fishing reel, selecting the right knot is crucial for ensuring strength and security. Different knots work better with specific types of fishing line and reel. Here are some key points to consider when choosing the proper knot:
- Consider the fishing line type: Monofilament, fluorocarbon, and braided lines each have different characteristics that may affect knot strength. Be sure to select a knot that is suitable for your specific line type.
- Know your reel type: Different reels, such as spinning reels, baitcasting reels, and fly reels, may require different knots to secure the line properly. Take into account the specific requirements of your reel when selecting a knot.
- Consider the fishing technique: Certain knots perform better for particular fishing techniques, such as casting, trolling, or bottom fishing. Choose a knot that best suits the fishing style you’ll be using.
Preparing The Line And Reel For Tying The Knot
Before tying the knot, it’s important to properly prepare both the fishing line and the reel to ensure a secure connection. Follow these steps:
- Unspool the line: Start by unspooling the fishing line from the reel’s spool. Allow enough line for the desired length and the knot tying process.
- Remove any twists or kinks: Inspect the line for any twists, kinks, or tangles. Smooth out any irregularities by running your fingers along the line or stretching it gently.
- Wet the line: To reduce friction and increase knot strength, wet the line by either dipping it in water or moistening it with saliva. This will help the knot tighten smoothly and prevent damage to the line.
- Prepare the reel: Ensure that the reel’s spool is clean and free of debris that could hinder the knot’s proper seating. A clean spool provides a better surface for the knot to grip.
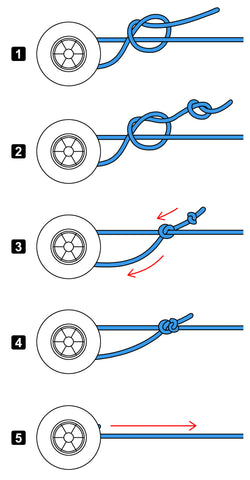
Step-By-Step Instructions For Tying The Selected Knot
Now that you’ve selected the appropriate knot and prepared the line and reel, follow these step-by-step instructions to tie the knot:
- Start by forming a loop: Create a loop in the line, leaving enough tag end to work with. The size of the loop will depend on the specific knot you’ve chosen.
- Wrap the tag end around the standing line: Take the free end of the line (tag end) and wrap it around the standing line. The number of wraps will vary depending on the knot instructions.
- Thread the tag end through the loop: After completing the necessary wraps, thread the tag end through the loop you created in step 1. Ensure that the tag end exits on the same side it entered.
- Moisten the knot: Wet the knot with water or saliva before gradually pulling it tight. This will prevent friction and help the knot seat properly.
- Tighten the knot: Hold both the standing line and the tag end and pull them simultaneously to tighten the knot. Avoid jerky or excessive force that could damage the line.
Testing The Knot’S Strength And Security
Once you’ve tied the knot, it’s essential to test its strength and security before heading out to fish. Here’s how to evaluate the knot:
- Firmly tug the line: Give the line a firm but controlled tug to ensure the knot does not slip or come undone. If the knot slips or fails, it’s crucial to re-tie it before fishing.
- Check the knot’s appearance: Inspect the knot visually to ensure it has properly seated and appears tight and secure. Look for any signs of looseness or irregularity that may compromise its strength.
- Test with a gentle pull: Apply a gentle pulling force to the line to test the knot’s stability. It should hold securely without any slippage or weakening.
Remember, it’s important to tie the knot correctly and test its strength every time you re-spool your reel or change fishing lines. Taking the time to tie a proper knot and ensuring its security will help prevent any frustrating line breaks or lost fish while out on the water.
Pro Tips And Best Practices For Tying Line Onto A Fishing Reel
When it comes to tying line onto a fishing reel, there are a few pro tips and best practices that can make the process easier and more effective. Follow these guidelines to maintain tension, avoid line twists, secure the line, prevent slippage, trim excess line, and avoid common mistakes.
Tips For Maintaining Tension And Avoiding Line Twists During The Tying Process
During the tying process, it’s crucial to maintain tension on the line to prevent twists and ensure a secure connection. Here are some tips to help you achieve this:
- Hold the line between your thumb and index finger while tying the knot to keep it taut.
- Use a tensioning tool or a pencil to create tension on the line while tying the knot.
- Avoid over-tightening the knots, as this can lead to line breakage or weaken the knot’s integrity.
Suggestions For Securing The Line And Preventing Slippage
To secure the line and prevent any slippage, follow these suggestions:
- Use an appropriate knot for the type of line and reel you are using. Common knots for securing the line to the reel include the arbor knot, uni knot, and improved clinch knot.
- Ensure that the knot is properly tightened by giving it a firm tug after tying it.
- Consider using a drop of water or saliva on the line before tightening the knot to ensure a smoother and tighter connection.
Advice On Trimming Excess Line And Preventing Snags
After tying the line onto the reel, it’s important to trim any excess line to prevent snags and maintain a clean setup. Here’s what you should do:
- Leave a small amount of line, about 1/8 to 1/4 inch, beyond the knot to provide some flexibility.
- Use sharp scissors or line clippers to trim the excess line close to the knot.
- Be careful not to cut the knot or any nearby lines while trimming.
Common Mistakes To Avoid When Tying Line Onto A Fishing Reel
To ensure a successful tie and avoid any potential issues, keep these common mistakes in mind:
- Avoid rushing the tying process. Take your time to ensure each knot is properly formed and tightened.
- Don’t forget to wet the line before tightening the knot, especially when using monofilament or fluorocarbon lines.
- Be cautious not to overtighten the knots, as this can weaken their strength.
- Remember to trim excess line, as loose ends can cause tangles or reduce casting distance.
By following these pro tips and best practices, you can confidently tie line onto your fishing reel, ensuring a secure connection and enhancing your overall fishing experience. Happy fishing!
Conclusion
Tying line onto a fishing reel may seem like a simple task, but it is an essential skill for every angler. By following the steps outlined in this guide, you will be well-equipped to handle any fishing situation. Remember to first choose the right type and weight of line for your specific needs.
Then, master the art of tying popular fishing knots such as the improved clinch knot, the palomar knot, or the uni knot. These knots are not only strong and reliable, but they are also easy to tie. Practice makes perfect, so take the time to familiarize yourself with these knots until you can tie them with ease.
Lastly, always test your knots before heading out on the water to ensure they are secure. With the knowledge and skills gained from this guide, you are now ready to embark on your fishing adventures with confidence. Happy fishing!