
You bought a new reel, grabbed a spool of braid, and sat down to load it. Ten minutes later you’re untangling a mess that looks like a bird built a nest in your line guides. Sound familiar? Most anglers learn to spool a reel the hard way — by ruining a spool of line and wasting half a morning.
The good news is that spooling a reel correctly isn’t complicated once you understand why line twists happen. It comes down to one simple rule: line must come off the filler spool the same direction it goes onto the reel. Miss that, and you’ll fight wind knots all day.

Beyond Braid
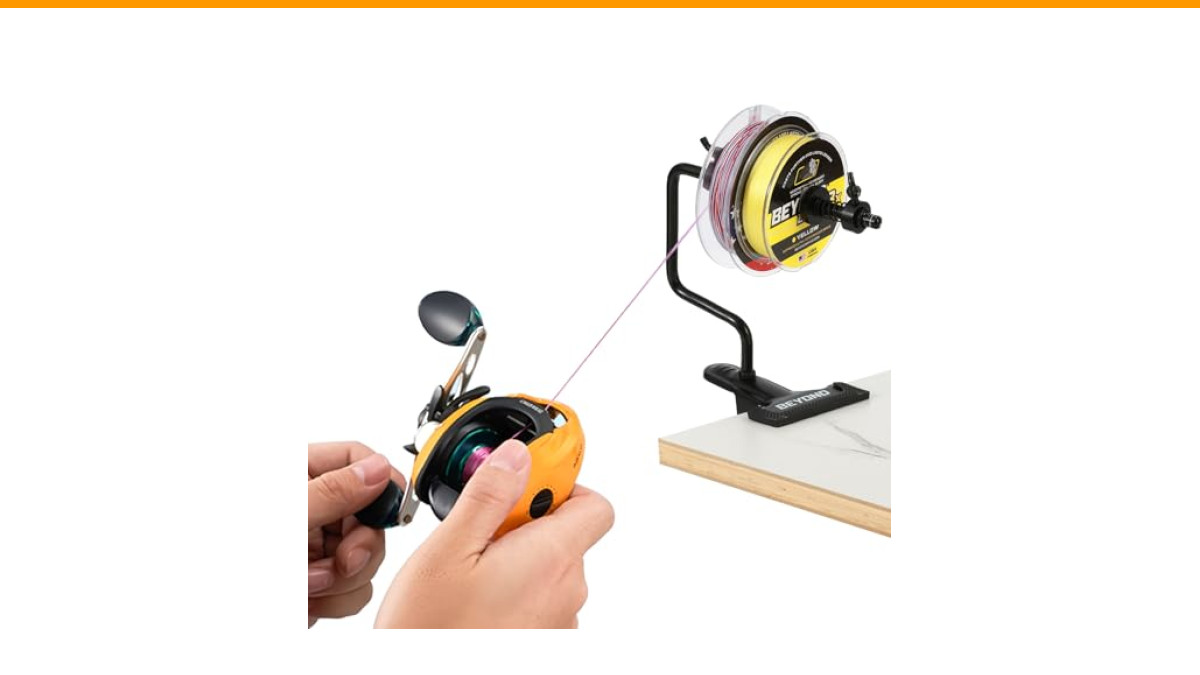
Beyond Braid EZ Fishing Line Spooler
- TABLE MOUNTING CLIP/PORTABLE - Our fishing line spooler features a heavy duty non slip clip at the base that fits nearly every kin…
- SPOOL UP TIGHT IN SECONDS - Switch out your line fast without the mess. Loading up fresh braid or mono tightly onto your reel, thi…
- FITS MOST SIZE SPOOLS- Will fit almost every type of fishing line spool from small to large. Ideal for spooling up with 100yd, 150…
This guide walks you through the exact steps for spinning and baitcasting reels, including the two-person method, using a drill for speed, and how to fix a bird’s nest when it happens. By the end, you’ll spool like someone who’s been doing it for years.
If you’re tired of holding a pencil between your knees while your buddy cranks the reel, a dedicated line spooler like the Beyond Braid EZ Fishing Line Spooler takes the hassle out of the job. It clamps to a table or rod, holds most spool sizes, and lets you spool up solo with even tension. Worth a look if you re-spool more than a couple times a season.
Why Line Twist Ruins Casting (And How to Avoid It)
Line twist is the hidden enemy. Every time you cast and retrieve with a spinning reel, you add a little twist. Most of it works itself out, but if you spool the line backward, you’re starting with dozens of twists already in the line. Those twists turn into wind knots on the cast and loops on the retrieve.
The physics is simple: line has memory. Monofilament and fluorocarbon especially want to return to the shape they were stored in. If you wind line onto your reel spool in the opposite direction of how it sits on the filler spool, you’re fighting that memory. Braid is more forgiving, but it still twists.
Here’s the rule that fixes 90% of spooling problems: line must come off the filler spool in the same direction it rotates onto the reel spool. For a spinning reel, that means the line comes off the bottom of the filler spool (if the reel is lying flat). For a baitcaster, it’s the opposite — the line comes off the top. More on that in a moment.
Another culprit is spooling with too little tension. Loose line on the reel slips under itself on the retrieve, creating a mess. You need enough tension to lay the line tightly, but not so much that you stretch mono or flatten braid.
Gear Checklist: What You Need Before You Start
Gather these before you begin:
- Your rod and reel, fully assembled
- Fresh line (mono, fluoro, or braid)
- A pair of scissors or line cutters
- A damp rag or paper towel (for the wet method)
- Backing line if you’re using braid (see below)
- Optional: a line spooler or a drill with a screwdriver bit
One thing most people forget: check the reel’s line capacity. It’s printed on the reel spool or in the manual. It tells you how much of a given line diameter (in pounds test) the spool holds. For example, a 2500-size spinning reel might hold 150 yards of 10-pound mono. If you’re using braid, which is thinner, you can fit more.
How to Put Line on a Spinning Reel (Step-by-Step)
Step 1: Filling the Spool with Backing
Braid is expensive. Filling your entire spool with 300 yards of braid when you only fish 100 yards is a waste of money. Instead, fill the spool about one-third full with cheap monofilament backing, then tie on your braid. This also gives the braid something to grip — braid can slip on a smooth spool arbor.
Use a mono backing that’s the same pound test or slightly heavier than your main line. Tie the backing to the spool with an arbor knot (see Step 3), then wind it on until the spool is about 40% full. You’ll finish filling with braid.
Step 2: Threading Through the Guides
Run the line through each guide on your rod, starting from the tip down to the reel. This is critical: if you thread the line through the guides with the rod assembled, you’ll get the line to the reel. But if you’re spooling the reel without the rod, you can skip this step and just tie the line directly to the spool. However, threading the line through the guides before spooling ensures the line isn’t twisted as it passes through the guides.
Many anglers skip this and spool the reel off the rod, then thread the line through the guides afterward. That works too, but you risk introducing twists. Best practice: do it with the rod assembled.
Step 3: Tying the Arbor Knot
The arbor knot is the standard for attaching line to the spool. It’s simple and strong:
- Wrap the line around the spool arbor once.
- Tie an overhand knot in the tag end, then tie a second overhand knot a few inches up the main line.
- Pull the tag end so the first knot jams against the second knot, then cinch tight against the arbor.
- Trim the tag end close.
This knot grips the arbor without slipping. For braid, you can also use a double overhand knot or a uni knot — braid is slick, so a more secure knot helps.
Step 4: The “Line Roller” Direction Rule
Here’s where most people mess up. On a spinning reel, the line roller (that small wheel on the bail) is what lays line onto the spool. The line must come off the filler spool in the same direction as the line roller rotates.
To check: hold the filler spool with the label facing you. If you’re right-handed, your reel’s handle is on the left side (or right — depends on the reel). The line roller rotates counterclockwise when you crank the handle (for most reels). So the line should come off the filler spool counterclockwise. The easiest way to visualize: if the filler spool is lying flat on the table, the line should come off the bottom, not the top.
If you get it wrong, you’ll see the line twisting and coiling as it goes on. Stop and flip the spool over. This one detail saves you hours of frustration.
Step 5: Applying Tension and Filling the Spool
Now, with the line threaded through the guides, close the bail and start winding. You need tension — enough to press the line into the spool, but not so much that you stretch the line. A good rule: the line should feel snug when you pinch it between your thumb and forefinger, but you shouldn’t have to strain to hold it.
For the wet method (especially with braid), wet a rag and wrap it around the line just above the reel. This cools the line as it passes through your fingers, reduces heat friction, and helps the line lay tighter. It also prevents the line from slipping on the spool.
Fill the spool to about 1/8 inch below the spool lip. Overfilling causes line to catch on the lip and cast poorly. Underfilling reduces casting distance. You want the line level with the spool’s beveled edge.
How to Put Line on a Baitcasting Reel (Step-by-Step)
Step 1: Spool Orientation and Brake Settings
Baitcasters are different. The spool on a baitcaster rotates as the line comes off, so the line must come off the filler spool in the opposite direction compared to a spinning reel. For a baitcaster, the line comes off the top of the filler spool (when the filler spool is lying flat).
Also, before you start, set the reel’s brake system (magnetic or centrifugal) to a medium-high setting. This creates resistance on the spool, which helps you wind the line with tension. You’ll adjust it back down after spooling.
Step 2: Tying the Knot and Winding
Tie the line to the spool using an arbor knot or a uni knot. Thread the line through the rod guides, then through the levelwind guide (the small eye that moves side to side) and tie to the spool. Make sure the line goes through the levelwind correctly — it should sit in the groove.
Close the reel’s spool tension knob (the star or dial on the side) so the spool doesn’t spin freely. This provides resistance as you crank. Wind the line on, keeping tension with your fingers. For baitcasters, you don’t need the wet method as much, but it still helps if you’re using braid.
Step 3: Avoiding the “Overrun” Trap
Overfilling a baitcaster is worse than underfilling. If the line is above the spool’s bevel, it will cause backlash on every cast. Fill to about 1/8 inch below the spool edge. Also, make sure the line lays evenly across the spool — the levelwind should move back and forth smoothly. If it doesn’t, you might have the line routed incorrectly.
One more tip: after spooling, tie a heavy lure (like a 1-ounce sinker) to the line and make a few practice casts with the brake set high. This helps seat the line and reveals any twist problems before you’re on the water.
The Two-Person and Drill Methods for Perfect Spooling
If you’re spooling alone, the two-person method is the gold standard. One person holds the filler spool with a pencil through its center, applying light drag with their fingers. The other person cranks the reel. The key is that the person holding the spool must keep the line coming off in the correct direction — not let it spin freely.
For solo anglers, a drill is a game-changer. Attach a screwdriver bit to the drill, insert it into the filler spool’s center hole, and clamp the drill in a vise or hold it between your knees. Then crank the reel. The drill keeps the spool from spinning, so the line comes off the top (or bottom, depending on reel type) with consistent tension. You can also use a line winder like the Beyond Braid EZ Fishing Line Spooler to hold the spool and control tension with one hand.
The drill method works well for mono and fluoro. For braid, slow the drill down — braid can heat up and melt if you spin it too fast.
Fixing Common Problems: Wind Knots and Bird’s Nests
Even with perfect spooling, wind knots happen. Here’s how to fix them fast.
Wind knot (a loop that tightens on the cast): Stop reeling immediately. Pull line off the reel until you find the loose loop. Gently pull the loop through the guides — don’t yank, or you’ll tighten the knot. If it’s tight, use a pin or hook to pick at the knot until it loosens. If it’s a tangle, you may need to cut the line and retie. Best prevention: use a swivel to reduce line twist, and make sure your spool isn’t overfilled.
Bird’s nest on a baitcaster: This is a backlash, not a knot. The spool overran and piled line. To fix, pull the line out of the reel in short, sharp tugs until the nest loosens. Don’t pull the line through the guides — you’ll just make it worse. Once you’ve loosened it, pick out the loops with your fingers. If it’s a massive nest, you might have to cut the line and re-spool. Prevention: set your brakes correctly and use your thumb to feather the spool during the cast.
Matching Line Type to Reel (Mono, Fluoro, Braid)
Not all lines are equal. Here’s a quick guide:
- Monofilament — stretches, absorbs shock, floats. Good for topwater and crankbaits. It has high memory, so spool it carefully and avoid leaving it on the reel for months.
- Fluorocarbon — sinks, low visibility, abrasion-resistant. Good for bottom fishing and clear water. It’s stiffer than mono, so it’s more prone to wind knots if spooled wrong.
- Braid — no stretch, high strength-to-diameter ratio, casts far. Slick and thin, so it needs backing to grip the spool. Also, braid is visible, so use a fluorocarbon leader.
For spinning reels, braid is popular because it doesn’t twist as much as mono. For baitcasters, mono or fluoro is easier to control because it has some stretch. But braid works fine if you set the brakes right.
Final Checklist Before You Cast
Before you hit the water, run through this list:
- Line is filled to 1/8 inch below the spool lip.
- Line comes off the filler spool in the correct direction (no twist).
- Spool tension is set (baitcaster) or the drag is set (spinning).
- Line is threaded through all guides correctly.
- No wind knots or loops visible.
- Line is wet (if you used the wet method) and dry.
- You’ve made a few practice casts to seat the line.
If you followed these steps, your line should lay flat, cast far, and last longer. Spooling is a 10-minute job once you know the rules.
Frequently Asked Questions
Why does my line keep twisting when I cast?
Most likely, you spooled the line in the wrong direction. Check the direction rule for your reel type. Also, if you’re using a spinning reel, make sure the line roller is engaged properly — sometimes the bail doesn’t close fully, causing the line to twist as it comes off.
How much line should I put on my reel?
Fill to about 1/8 inch below the spool lip. Overfilling causes tangles; underfilling reduces casting distance. Check your reel’s line capacity (printed on the spool) and use that as a guide.
Can I use braid on a spinning reel?
Yes, braid works great on spinning reels. It has less stretch and casts farther. Just use a mono backing to save money and prevent slippage. Also, braid is thinner, so you can fit more on the spool — adjust your backing amount accordingly.
What is the best knot to tie line to the spool?
The arbor knot is the most common and works for all line types. For braid, use a double arbor knot or a uni knot for extra grip. Make sure the knot is snug against the spool arbor.
Should I use a line conditioner?
Line conditioner (like Reel Magic or KVD Line & Lure) helps reduce line memory and friction. It’s especially useful for mono and fluoro. Apply it after spooling and periodically during the season. It won’t fix a bad spooling job, but it makes casting smoother.
Spool Like a Pro: Final Thoughts
Spooling a reel isn’t hard, but it requires attention to direction and tension. The biggest mistakes are spooling backward, underfilling, and skipping the backing. Fix those three and you’ll eliminate most tangles.
- Always match the line’s exit direction to the reel’s rotation.
- Use backing for braid to save money and prevent slipping.
- Fill to 1/8 inch below the spool lip — not more, not less.
- Apply firm, even tension while winding.
- Use the wet method for braid to avoid heat damage.
- Test with practice casts before heading out.
- Invest in a line spooler if you re-spool often — it’s worth it.
Now go spool up and fish with confidence. Your line will thank you.


