You’ve spent an hour untangling birds’ nests in your line, and just when you finally get a clean cast, the bass smashes your favorite soft plastic—and swims off with it. That lure cost you three bucks and it’s gone in a second. We’ve all been there. The solution isn’t to keep buying packs of worms; it’s to make your own molds and pour your own soft plastics at a fraction of the cost.
This guide walks you through the entire process of creating a silicone mold for fishing lures, from choosing the right silicone to pouring your first batch of plastisol. You’ll learn exact mix ratios, degassing pressures, and the little tricks that separate a one-use mold from a workhorse that lasts years. By the end, you’ll have the knowledge to produce custom lures in any color, shape, or size you can imagine.

FusionX Fishing Lures
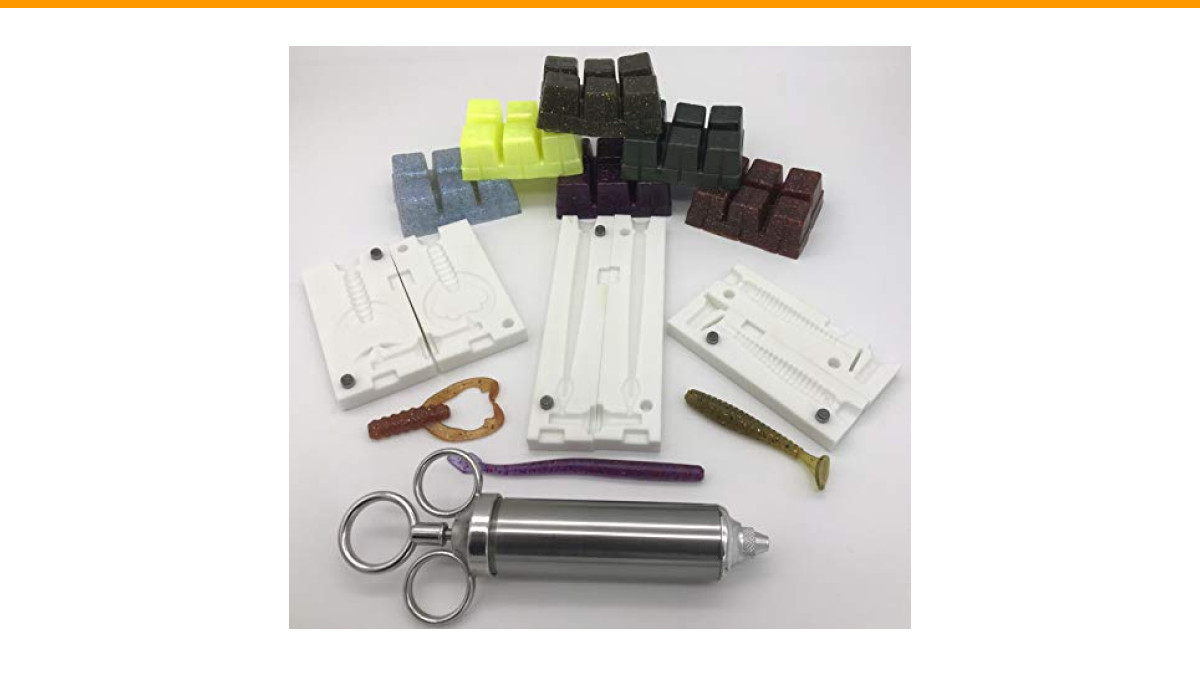
INJEX Petite BASS Lure Making Kit - 3 Soft Plastic Injection Fishing Lure MOLDS Injector 6 Resin Colors - FusionX Fishing
- 3 - CNC Machined High Density Resin Injection Molds ( 5" Worm, 3" Swim Bait, 2-1/2" Craw)
- FusionX Fishing 60 Degree Taper Stainless Steel Mold Injector
- 6 Colors of X-Cube Plastic Resin
If you’re just getting started and want a complete kit that removes the guesswork, the INJEX Petite BASS Lure Making Kit includes three CNC-machined resin injection molds (a 5-inch worm, a 3-inch swim bait, and a 2.5-inch craw), a stainless steel injector, and six colors of X-Cube plastic resin. It’s a solid foundation that lets you practice the techniques below without sourcing every component separately.
Why Bother Making Your Own Lure Molds?
Cost is the obvious reason. A single soft plastic lure costs $2 to $5 at retail, but a gallon of plastisol (the liquid plastic) costs around $50 and yields hundreds of lures. The mold itself is a one-time investment—silicone rubber runs about $30 per two-part kit, and you can pour dozens of lures from a single mold before it wears out.
But the real payoff is customization. You can match the exact hatch in your local lake, create a signature color that no one else has, or tweak a lure’s profile to trigger more strikes. You can also produce lures with different buoyancy, salt content, or glitter density than anything on the shelf. That level of control is impossible with store-bought plastics.
There’s also the satisfaction of catching fish on something you made yourself. It’s a different feeling—like tying your own flies but with more room for experimentation.
Choosing the Right Mold Material (Silicone vs. Alternatives)
Silicone rubber is the gold standard for lure molds, but it’s not the only option. Here’s how the main materials stack up:
| Material | Cost per Mold | Durability | Detail Reproduction | Ease of Use | Best For |
|---|---|---|---|---|---|
| Silicone rubber (tin-cure) | $25–$40 | High—hundreds of pours | Excellent | Moderate—needs degassing | Most lures, especially complex shapes |
| Silicone rubber (platinum-cure) | $40–$60 | Very high, but reacts with some plastisols | Excellent | Moderate—needs degassing and careful mixing | Food-safe applications, but check compatibility |
| Mold putty (two-part silicone) | $15–$25 | Low—a few dozen pours | Good, but loses fine detail | Very easy—no degassing needed | Quick one-off molds for simple shapes |
| 3D-printed molds (PETG/ABS) | $5–$15 (filament) | Medium—can warp with heat | Good, but layer lines show | Requires 3D printer and CAD skills | Multi-cavity production, but not for high-temp plastisol |
| Resin molds (CNC-machined) | $20–$50 per mold | Very high—years of use | Excellent, precise | Ready to use—no mixing | Production and repeatability |
For most hobbyists, tin-cure silicone is the best balance of cost, durability, and ease. It has a longer pot life (working time) than platinum-cure, and it doesn’t inhibit with sulfur-based clays or certain plastisol additives. Platinum-cure silicone is more expensive and can fail to cure if it touches certain materials, so unless you’re making food-safe molds, stick with tin-cure.
Mold putty is tempting because it requires no degassing, but it’s dense and doesn’t capture fine details like gill lines or scale textures. I’ve used it for a quick crankbait mold and the results were mediocre—the surface had bubbles and the lure looked rough. Silicone rubber is worth the extra effort.
3D-printed molds are a niche option. They work for low-temperature resins, but plastisol is typically heated to 350°F, which will warp most printed plastics. If you go that route, you’d need to print a master lure and then cast a silicone mold from it—which brings you back to silicone anyway.
Essential Tools and Materials Checklist
Before you start, gather these items. You’ll need most of them for every mold you make:
- Silicone rubber (tin-cure, two-part, 1:1 or 10:1 mix ratio—read the label)
- Master lure—the original you want to copy (store-bought or 3D-printed)
- Mold frame—a plastic container, LEGO bricks, or acrylic sheets cut to size
- Release agent—petroleum jelly or a commercial spray like Mann Ease Release 200
- Degassing chamber—a vacuum pump and chamber (or a pressure pot if you’re advanced)
- Mixing cups and stirring sticks—disposable is fine
- Registration keys—small round beads or coins to create alignment notches
- Plastisol—liquid plastic for pouring
- Heat source—a microwave or a dedicated melting pot
- Thermometer—a candy thermometer works
- Mold release for the mold—a spray like CRC or a thin coat of silicone oil
- Safety gear—nitrile gloves, safety glasses, and a respirator if you’re working with uncured silicone
Most of these you can find at a hardware store or online. The vacuum chamber is the one big-ticket item—a basic setup runs $60–$100. But you can skip it if you’re careful with pouring and use a pressure pot instead (more on that later).
Step-by-Step: Creating a Two-Part Silicone Mold
This is the core process. Follow these steps exactly, and you’ll get a mold that’s clean, bubble-free, and ready to pour.
Preparing the Master Lure
Clean the lure thoroughly with dish soap and warm water to remove any oils or dirt. Dry it completely. If the lure has hooks or hardware, remove them—you only want the body.
Attach a sprue—a small tube or rod—to the tail end of the lure. This will create the injection channel later. A piece of 1/4-inch dowel or a drinking straw works. Glue it in place with a drop of superglue, making sure it’s centered and straight.
Apply a thin coat of release agent to the lure and the sprue. Use a brush to spread it evenly. Let it dry for 10 minutes, then apply a second coat. This prevents the silicone from bonding to the master.
Building the Mold Frame and Pouring the First Half
You need a frame that’s about 1/2 inch wider than the lure on all sides. Place the lure in the frame, with the sprue sticking out through a hole in the bottom or side. If you’re making a two-part mold, you’ll pour the first half, let it cure, then flip it over and pour the second half.
Mix your silicone according to the manufacturer’s instructions. For a 1:1 ratio, measure equal volumes by weight or volume—use a scale for accuracy. Stir slowly and thoroughly for at least 2 minutes, scraping the sides and bottom. Fast stirring introduces bubbles.
Pour the silicone into the frame in a thin, steady stream from a corner, letting it flow over the lure. This helps displace air. Fill the frame to about halfway up the lure’s side. Then place the frame in your vacuum chamber and pull a vacuum of 25–28 inches of mercury (inHg) for 2–3 minutes. You’ll see the bubbles rise and pop. Release the vacuum slowly.
Let the silicone cure. Pot life is typically 30–60 minutes, and full cure takes 4–8 hours at room temperature. Don’t rush it—curing too fast (by adding extra catalyst) weakens the mold.
Creating Registration Keys and Pouring the Second Half
Once the first half is cured, remove it from the frame. You’ll see the lure embedded in the silicone. Now, cut two or three small hemispherical notches along the flat surface of the silicone—these are your registration keys. They’ll align the two halves perfectly when you reassemble them.
Place the first half back in the frame, with the lure still in place. Apply release agent to the exposed surface of the silicone, especially the keys. Mix a fresh batch of silicone and pour it over the lure, filling the frame to the top. Vacuum degas again.
After curing, carefully separate the two halves. The lure should pop out cleanly. Trim any excess silicone with a sharp knife, and you’re done. You now have a two-part mold with a sprue hole for injecting plastisol.
Advanced Mold Making: Multi-Cavity and Articulated Lures
If you’re making lures for yourself, a single-cavity mold is fine. But if you’re producing for friends or a small side business, multi-cavity molds save time. The process is the same—you just place multiple master lures in the frame, spaced at least 1/2 inch apart. Use a common sprue system: a main channel that branches to each cavity. This lets you inject one shot of plastisol and fill all cavities at once.
For articulated lures (like a jointed swimbait), you need to create a mold that captures the joint. The trick is to mold each segment separately, then join them with a flexible hinge. You can also embed a small piece of wire or a plastic hinge in the mold itself—just place it between the two segments before pouring the silicone. The silicone will form around it, creating a living hinge.
Another approach is to mold the lure in one piece, then cut a slit across the body after demolding. This works for soft plastics but reduces durability. I’ve done this with a senko-style worm and it worked okay, but the slit created a weak point that tore after a few fish.
How to Pour Soft Plastic Lures into Your New Mold
Now that you have a mold, it’s time to use it. The process is straightforward but requires attention to temperature and technique.
Melting and Coloring Plastisol
Plastisol is a liquid PVC resin that becomes solid when heated. Heat it to 350°F in a microwave or a melting pot, stirring every 30 seconds. Don’t overheat—above 400°F it degrades and releases toxic fumes.
Add color pigments and glitter while the plastisol is still liquid. Start with a few drops of color and mix thoroughly. You can always add more, but you can’t take it out. For a translucent look, use less pigment; for opaque, add more.
Pour the melted plastisol into a pouring cup or directly into the mold’s sprue hole using a syringe or a dedicated injector. If you’re using a syringe, fill it slowly to avoid air bubbles.
Injecting vs. Pouring: Which is Better?
Pouring is simpler: you just pour plastisol into the sprue and let it flow into the cavity. It works for open molds or single-cavity molds with a wide sprue. But it’s easy to trap air, and you’ll get incomplete fills.
Injecting is more reliable. You use a syringe or a mold injector to force plastisol into the sprue under pressure. This pushes air out and ensures a complete fill. It’s especially important for thin-tailed lures like worms. The INJEX kit includes a stainless steel injector that makes this easy—it has a 60-degree taper that fits standard sprue holes.
I’ve used both methods. Pouring is fine for a chunky craw, but for a 5-inch worm, injecting is the only way to get a solid tail without bubbles.
Troubleshooting Common Mold Making Failures
Even experienced mold makers hit snags. Here’s how to fix the most common ones:
- Bubbles in the mold: Your degassing wasn’t thorough, or you poured too fast. Solution: vacuum for longer (up to 5 minutes) and pour in a thinner stream.
- Silicone didn’t cure: You may have used too much catalyst, or the silicone came into contact with a sulfur-based clay (if you used a clay master). Solution: check the material compatibility and re-mold with a fresh mix.
- Mold tears when demolding: The silicone is too thin (less than 1/4 inch) or you didn’t use enough release agent. Solution: rebuild with a thicker silicone layer and apply release agent liberally.
- Lure sticks to the mold: The master wasn’t coated with enough release agent. Solution: apply two or three thin coats, letting each dry.
- Plastisol fills incompletely: The sprue is too narrow, or the plastisol is too thick (not hot enough). Solution: widen the sprue and heat the plastisol to 350°F.
If you tear a mold, you can often repair it with a small patch of fresh silicone. Clean the tear, apply a thin layer of uncured silicone, and let it cure. It won’t be as strong as the original, but it’ll extend the mold’s life.
Extending the Lifespan of Your Mold
A well-made silicone mold can last for hundreds of pours if you take care of it. Here are the habits that matter:
- Clean after every use: Wash the mold with warm soapy water and dry it thoroughly. Plastisol residue can build up and cause sticking.
- Store flat: Silicone can deform if stored under weight. Keep your molds flat in a drawer or on a shelf.
- Apply a thin coat of mold release before each pour: This prevents sticking and makes demolding easier.
- Avoid sharp tools: Use plastic or wooden tools to remove lures. Metal can scratch the silicone.
- Don’t overheat the mold: If you’re using a heat gun to speed up curing, keep it moving. Concentrated heat can degrade the silicone.
One thing I learned the hard way: never leave plastisol in the mold overnight. It hardens and can be a pain to remove, and you might tear the mold trying to get it out.
Safety First: Handling Chemicals and Hot Plastic
Silicone rubber and plastisol are safe when used correctly, but they’re not toys. Follow these rules:
- Work in a ventilated area: Open a window or use a fan. Uncured silicone releases acetic acid (vinegar smell) and plastisol fumes can be irritating.
- Wear nitrile gloves: Latex gloves can react with some chemicals. Nitrile is the standard for resin work.
- Use safety glasses: Splashes happen, especially when stirring hot plastisol.
- Never microwave plastisol without a dedicated container: Use a Pyrex measuring cup or a metal melting pot. The plastic can overheat and splatter.
- Keep a fire extinguisher nearby: Plastisol is flammable if it reaches its flash point (around 400°F).
If you’re using food-grade silicone for molds that might touch food (not typical for lures), make sure it’s specifically labeled as food-safe. Industrial silicone may contain fillers that aren’t safe for ingestion. But for fishing lures, standard tin-cure silicone is fine—just don’t eat the lures.
Frequently Asked Questions
Can I use any silicone to make a lure mold?
No. You need a two-part liquid silicone rubber (tin-cure or platinum-cure) designed for mold making. Caulk or one-part silicone won’t cure properly and will be too soft. Look for a Shore hardness of 20–30A for lure molds—softer is better for flexible lures, but too soft (below 10A) will tear easily.
How long does silicone take to cure?
Most tin-cure silicones have a pot life of 30–60 minutes and a full cure time of 4–8 hours at 70°F. Higher temperatures speed up curing, but too much heat can cause bubbles. Follow the manufacturer’s recommendation—usually 24 hours for maximum strength.
Do I need a vacuum chamber?
It’s highly recommended for bubble-free molds. Without one, you’ll likely get surface bubbles that show up on your lures. If you don’t have a vacuum chamber, you can use a pressure pot instead—it compresses bubbles so they become microscopic. Both work; vacuum is cheaper for small setups.
Can I make a mold from a live fish?
Technically yes, but it’s not practical. Fish skin has a slime layer that prevents silicone from bonding, and the fish will die during the process. It’s better to use a realistic plastic lure as your master.
How do I add a hook slot to my mold?
You can embed a thin strip of metal or plastic into the mold before pouring the silicone. After curing, remove the strip to create a slot. Alternatively, cut a slit with a razor blade after the mold is done—just be careful not to tear the silicone.
Final Cast: Key Takeaways
- Tin-cure silicone rubber is the best material for lure molds—balance of cost, durability, and ease.
- Degassing at 25–28 inHg for 2–3 minutes is essential to prevent bubbles.
- Use registration keys (small notches) to align two-part molds perfectly.
- Inject plastisol rather than pouring it—you’ll get fewer air pockets and better detail.
- Clean and store your molds properly to get 100+ pours per mold.
- Always work in a ventilated area and wear nitrile gloves when handling chemicals.
- Start with a kit like the INJEX Petite BASS to learn the process before investing in bulk materials.
Making your own silicone molds isn’t hard, but it rewards patience and attention to detail. Get the process right once, and you’ll never buy a soft plastic again. Now go pour something that’ll make the bass wish they’d stayed in the deep water.