Why Spooling Braid Correctly Prevents Costly Casting Failures
You buy a quality reel, pair it with a sensitive rod, and string it with expensive braid. Then the first cast ends in a bird’s nest so tight you need a knife and twenty minutes of patience. That failure usually traces back to one moment: the spooling job.
Braid behaves differently than monofilament. It has almost no stretch, which means it transmits every bit of line twist directly to your reel spool. If you spool it loosely or with twists, those problems compound into wind knots, reduced casting distance, and line that digs into itself on the retrieve. This guide walks through the exact process to avoid those failures, starting with the arbor knot and ending with a leader connection that won’t fail.

Beyond Braid
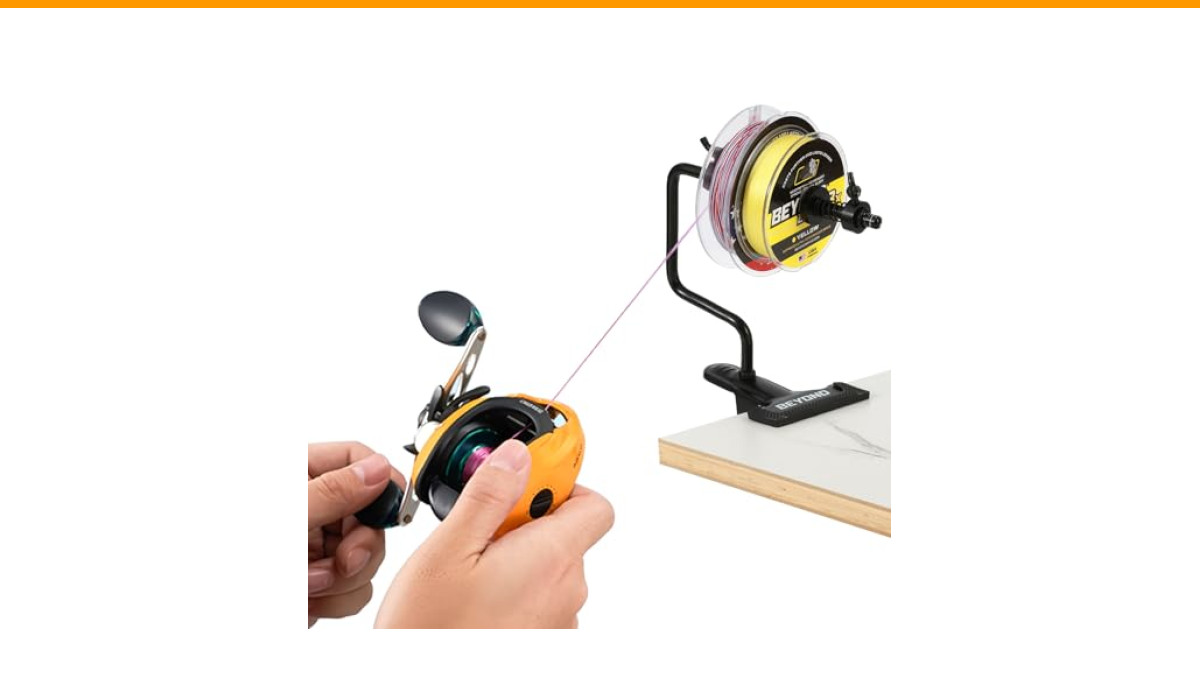
Beyond Braid EZ Fishing Line Spooler
- TABLE MOUNTING CLIP/PORTABLE - Our fishing line spooler features a heavy duty non slip clip at the base that fits nearly every kin…
- SPOOL UP TIGHT IN SECONDS - Switch out your line fast without the mess. Loading up fresh braid or mono tightly onto your reel, thi…
- FITS MOST SIZE SPOOLS- Will fit almost every type of fishing line spool from small to large. Ideal for spooling up with 100yd, 150…
You’ll learn the wet spool technique, when to use mono backing, and how to fix common spooling mistakes before they ruin a day on the water.
Spooling braid under proper tension is a two-person job if you’re using a pencil and a bucket. A tool like the Beyond Braid EZ Fishing Line Spooler clamps to a table or rod and holds the line spool stationary while you crank the reel, which keeps tension consistent from first wrap to last. It’s a practical upgrade if you re-spool more than once a season.
What You Need Before You Start
Gather these items before you touch the reel:
- Braided line in the correct pound test (more on choosing below)
- Monofilament backing if your spool is large or your braid is thin
- Scissors or braid scissors — regular clippers struggle with slick braid
- Electrical tape or rubber tape for the arbor
- A bucket of water for the wet spool method
- A clean, lint-free cloth
You don’t need a line winder. A towel on the floor works, but a spooling station makes the job noticeably easier.
Choosing the Right Braid Diameter and Pound Test
Match the braid’s diameter, not just its pound test, to your reel’s spool size. A 2500-size spinning reel holds roughly 150 yards of 10-pound braid. A 4000-size reel holds closer to 200 yards of 20-pound braid. Check the spool’s line capacity markings before buying.
Here’s the mistake most anglers make: they spool 30-pound braid on a 2500 reel because they want strength. The thick line leaves only 80 yards on the spool, which hurts casting distance and reduces line capacity for long runs from fish. Drop to 15-pound braid on that reel and you get 150 yards plus better casting performance.
A general rule for spinning gear: use the lightest braid you can get away with for the species. For bass and inshore saltwater, 10 to 15-pound braid covers most situations. For heavy cover or larger fish, step up to 20 or 30-pound, but only on a reel sized for it.
Braid-Ready Spools vs. Standard Spools
Some reels come with a braid-ready spool that has a rubber or textured ring on the arbor. That ring grips the braid so it doesn’t slip when you hook a big fish. Standard spools have a smooth metal or graphite arbor, and braid will slip on them without extra help.
If your spool is smooth, you need a backup. The arbor knot alone isn’t enough — braid can slide around the arbor under heavy load. A strip of electrical tape wrapped around the arbor before you tie the knot gives the line something to bite into.
Step-by-Step: How to Tie Braided Line to a Spinning Reel
This process takes about ten minutes the first time. Go slow and pay attention to tension.
Step 1: Thread Line Through Rod Guides
Run the braid through each rod guide, starting from the tip and working down toward the reel. Keep the line tight as you go so it doesn’t tangle. Open the bail arm on the reel before threading the line through the roller — most people forget this step and wonder why the line won’t lay properly.
Step 2: Open the Bail Arm and Wrap the Arbor
With the bail open, wrap the braid around the spool arbor once. Leave about eight inches of tag end. This single wrap gives you something to tie around.
Step 3: Tie the Arbor Knot (With a Tape Backup)
The arbor knot is simple and reliable. Here’s how to tie it:
- Wrap the tag end around the main line five times.
- Pass the tag end through the loop created near the arbor.
- Pass it through the same loop again, creating a second pass.
- Moisten the knot and pull both ends tight.
Trim the tag end close, leaving about an eighth of an inch. Before you tighten the knot fully, slide a small piece of electrical tape over the arbor so the knot sits on top of the tape. The tape prevents slippage on smooth spools. Rubber tape works even better because it has more grip, but electrical tape is easier to find and does the job.
Step 4: Spool Under Heavy Tension (The Wet Spool Method)
Close the bail arm. Now the critical part: the line must go onto the spool under firm tension. If it goes on loose, the braid will dig into itself on the retrieve, creating a mess on your next cast.
The wet spool method reduces heat friction and helps the braid lay flatter. Submerge the filler spool in a bucket of water before you start winding. The water acts as a lubricant and keeps the line cool as it passes through your fingers.
Hold the line between your thumb and forefinger about a foot above the reel. Apply steady pressure — enough that the rod tip bends slightly. Crank the reel slowly and evenly. The line should lay side by side, not overlapping or leaving gaps.
Fill the spool to within about 1/8 inch of the spool lip. Overfilling causes wind knots. Underfilling reduces casting distance because the line has to climb over the spool edge.
Mono Backing: When You Need It and When to Skip It
Mono backing serves two purposes: it fills the spool so you use less expensive braid, and it gives the braid a grippy surface to bite into. Braid costs more per yard than monofilament, so filling the bottom half of a deep spool with mono saves money.
You need mono backing if your braid is thin (10-pound or less) and your spool is deep. Without it, you’ll run out of braid before the spool is full. You can skip it if you’re using thicker braid on a shallow spool that it fills completely.
To add backing, spool the mono first using the same tension method, then tie the braid to the mono with a double uni knot or a blood knot. The connection must be smooth — any bump will catch on the rod guides during casting.
One more option: instead of mono, use a strip of electrical tape over the arbor and skip the backing entirely. This works well for most spinning setups and keeps the line lay cleaner.
Troubleshooting Common Spooling Mistakes
Even careful anglers run into problems. Here’s how to fix the most common ones.
Fixing Line Dig-In and Uneven Lay
Line dig-in happens when the braid on the spool is too loose. The top layers sink into the bottom layers when you set the hook, and the next cast ends in a tangle. The fix is to re-spool with more tension. There’s no shortcut — dig-in doesn’t fix itself.
Uneven lay means the line piles up on one side of the spool. This usually comes from an inconsistent cranking speed or uneven tension. Slow down and keep a steady rhythm. If the line still piles up, check that the spool is seated correctly on the reel.
Preventing Wind Knots Before They Happen
Wind knots happen when the line comes off the spool in loops during the cast. The biggest cause is overfilled spools. Leave that 1/8 inch of space at the top. Another cause is line twist, which gets baked in during the spooling process. The wet spool method and consistent tension prevent most twist.
Line twist also comes from fighting fish that spin, or from a swivel that isn’t working properly. If you notice twist mid-season, strip the line off the reel and re-spool it — don’t try to untwist it by dragging it behind the boat.
| Problem | Symptom | Cause | Fix |
|---|---|---|---|
| Line dig-in | Braid sinks into itself on hookset | Spooled too loose | Re-spool with higher tension |
| Wind knots | Loops form during cast | Overfilled spool or line twist | Remove line to 1/8 inch below lip; re-spool if twisted |
| Uneven lay | Line piles on one side | Inconsistent cranking speed | Slow down; keep steady tension |
| Line slippage | Line spins on arbor when hooked up | Smooth spool without tape | Add electrical tape or mono backing |
How to Attach a Leader to Braid (Without a Swivel)
Spinning reels cast better with a fluorocarbon leader for abrasion resistance and invisibility. A swivel between braid and leader adds weight and can catch on the rod guides. The FG knot solves this — it’s thin, strong, and passes through guides smoothly.
The FG knot takes practice. Here’s the basic sequence:
- Hold the braid and leader parallel, pointing in opposite directions.
- Wrap the braid around the leader 10 to 12 times in tight coils.
- Pull the braid tag end to lock the coils.
- Repeat the wrapping process 10 more times in the opposite direction.
- Pull all four ends to tighten, then trim the tags.
The knot should be slim and barely thicker than the leader itself. Wet it before pulling tight to prevent heat damage. Practice this knot at home until you can tie it in under a minute — it’s worth the effort.
Frequently Asked Questions
How much braid should I put on a spinning reel?
Fill the spool to within 1/8 inch of the lip. This leaves enough room for the line to come off cleanly without overfilling. Use mono backing to fill the bottom half of deep spools so you don’t waste expensive braid.
Why does my braid keep slipping on the spool?
Braid slips on smooth spool arbors because it’s slick. Wrap a strip of electrical tape or rubber tape around the arbor before tying your arbor knot. Mono backing also solves this problem because the braid bites into the softer mono.
Can I spool braid without mono backing?
Yes, if the spool isn’t too deep and you use tape on the arbor. Many modern spinning reels have braid-ready spools with rubber rings, so backing isn’t needed. For thin braid on deep spools, backing is recommended to save money and prevent slippage.
How often should I replace braid on my spinning reel?
Braid lasts much longer than mono — often two to three seasons with regular use. Replace it when the color fades significantly, when you notice frayed sections, or when casting distance drops. Re-spooling is cheap insurance compared to losing a big fish to old line.
What’s the best knot for tying braid to a spinning reel spool?
The arbor knot is the standard choice. It’s easy to tie and holds well when paired with tape or mono backing. For connecting a leader later, the FG knot is the best option for spinning gear because it’s thin and guide-friendly.
Final Verdict: Master the Spool, Master the Cast
Spooling braid correctly takes ten extra minutes and saves you hours of frustration on the water. The process isn’t hard once you understand why each step matters.
- Always tie an arbor knot and back it with electrical tape on smooth spools.
- Use the wet spool method — soak the filler spool to reduce friction and memory.
- Apply heavy, consistent tension while cranking; a bent rod tip is your guide.
- Fill to 1/8 inch below the spool lip, never more, never less.
- Match braid diameter to spool size — lighter line on smaller reels casts farther.
- Add mono backing for deep spools or thin braid to save money and prevent slip.
- Learn the FG knot for leader connections; skip the swivel for better casts.
Re-spooling isn’t anyone’s favorite chore, but doing it right transforms your spinning setup from frustrating to dependable. Take the time once, and you’ll notice the difference on every cast after.